Android Question How to use RelativeLayout in widgets

Haris Hafeez

Active Member
Licensed User
Longtime User
Hi all,

While working on a widget, I have come across an issue with widget sizing that I think is the result of AbsoluteLayout used by the designer. Of course, I'm no authority on layouts and android development and there might simply be a different issue here.

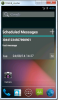
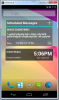
I'm attaching two screen shots of emulators. One is a 1280x768 (nexus 4) and the other is 480x800(nexus s). As can be seen, the lowres widget is truncated somewhat while the other takes up less space. Note that I have dropped the WorldClock widget (corwin42's advanced widget work) for comparison.
My question is why is it truncating the widget in the low res emulator? I have also tried to install the application on a device with 480x800 resolution and it didn't even show up in the widget list. Why would that be? The target sdk and the api level of the emulator and device are 17 so that is not the reason.

The other issue I have been trying to work around is the widget size in general. I know there are bits and pieces of discussions around this, but I am yet to come across a comprehensive conclusion as to what the best practices are for a widget size when developing in B4A. My widget should be 4x3 cells but it takes up much less space. On a real device, the widget itself is only about 4x2 but takes up space on the homescreen of a 4x3.

Looking at the WorldClock widget, it seems like I may have to write the widget layout XML by hand, outside the designer. However, even that is not as simple as it sounds as the designer fails to compile the application if I change the widget layout to use RelativeLayout. So, what is the process of creating widget layouts outside the designer and then use it in a B4A project?

Any help or tips will be highly appreciated.

EDIT: forgot to mention that the panel housing the widget layout is set to 320x180.
Many Thanks.
HH
 

Attachments

  • widget_lowres.png
    widget_lowres.png
    242.4 KB · Views: 310
  • widget_720.png
    widget_720.png
    267.9 KB · Views: 334
Last edited:

Haris Hafeez

Active Member
Licensed User
Longtime User
Hi Erel,

The panel size is 320x180. As for manually creating the layout, I tried changing that in the generated file and setting it to read-only, but it did not work. The compiler complained about not being able to find some symbols(Java errors). Would appreciate tips on how to proceed with this.

Thanks.
 
Upvote 0

soltypio

Member
Licensed User
Longtime User
Hello,
As I understood, manually created layout should be a solution to widget sizing problem, that many B4A users seem to struggle with. So do I. My widget sized 320x260 (tried also 294x260, and other sizes too, never gets scaled to the screen size, as it is promised to. As I read on developer.android.com (if understood right) scalling will not happen with Absolute Layout that is creater by the designer. If all that is true, maybe someone allready created layout file by hand, that allows widget to be scaled by the OS? Maybe that kind person would share an example, that would not be too complicated?
 
Upvote 0

Haris Hafeez

Active Member
Licensed User
Longtime User
Hello,
As I understood, manually created layout should be a solution to widget sizing problem, that many B4A users seem to struggle with. So do I. My widget sized 320x260 (tried also 294x260, and other sizes too, never gets scaled to the screen size, as it is promised to. As I read on developer.android.com (if understood right) scalling will not happen with Absolute Layout that is creater by the designer. If all that is true, maybe someone allready created layout file by hand, that allows widget to be scaled by the OS? Maybe that kind person would share an example, that would not be too complicated?
Soltypio,

I'm going to try and help you out to the best of my abilities :) Note that this may not be the best way or the only way to do things. This is what I have learned myself and works quite well in my project.

I have learned using RelativeLayouts using the following high-level approach:
  • Create your layout using the designer. Make sure that you have all the views, such as labels, text fields, buttons etc in this layout. This is important because B4A will generate the java references for these views. If you're not an experienced android (or general) developer, I'd advise keep it simple by showing a few labels and a button to get a feel for things.
  • Handle any events using B4A as in other projects.
  • Compile your application to generate the source.
  • Now its the manual part. Go to your project folder->Objects->res->layout. Here you will find the generated widget layout file. This is generally named after the service module that handles the events of your widget. e.g. For a service module MyWidget, you will have a file mywidget_layout.xml
  • Open this layout file in a text editor and write your layout using RelativeLayout or FrameLayout as required. I'm attaching an example that shows a header text label, a button and another label. You can ignore the background or image or other style attributes in this. However, do note that the names of the views should stick to the naming convention used by B4A. For example, if in the layout designer you call your label as HeaderLabel, you must name it mywidgetservice_headerlabel. Otherwise you will get compilation errors.
  • Once you have written the layout file, save it and make it read only. This will indicate to the designer that you do not want to overwrite this and to include this in the generated package a-is.
  • Compile the application again and voila, your widget will now resize based on your device's dpi.

My advice in general is to focus on the functionality of your widget/app first and then do work on UI elements such as this. This way you will be sure that your widget/ui is functionally ok but would only require tweaking later on.


Hope the above is helpful. If not, I will follow this thread and turn around to help you as soon as I can.

SAMPLE LAYOUT XML
B4X:
<?xml version="1.0" encoding="utf-8"?>
<RelativeLayout xmlns:android="http://schemas.android.com/apk/res/android"
        android:layout_width="match_parent"
        android:layout_height="match_parent"
        android:id="@+id/pawidgetservice_pnlnomessages"
        android:layout_width="match_parent"
        android:layout_height="match_parent"
        android:layout_alignParentBottom="true"
        android:layout_alignParentLeft="true"
        android:layout_alignParentRight="true"
        android:layout_alignParentTop="true"
        android:background="@drawable/pawidgetservice_pnlnomessages_background"
        android:visibility="invisible" >
        <TextView
            android:id="@+id/pawidgetservice_headerlabel"
            android:layout_width="wrap_content"
            android:layout_height="wrap_content"
            android:layout_alignBottom="@+id/pawidgetservice_btnadd"
            android:layout_alignParentTop="true"
            android:layout_marginLeft="2dp"
            android:text="Scheduled Messages"
            android:textAppearance="?android:attr/textAppearanceLarge"
            android:textColor="#FFFFFFFF"
            android:textSize="24sp"
            android:textStyle="bold"
            android:typeface="normal" />

        <ImageButton
            android:id="@+id/pawidgetservice_ivadd"
            android:layout_width="40dp"
            android:layout_height="40dp"
            android:layout_alignParentRight="true"
            android:layout_alignParentTop="true"
            android:src="@drawable/pawidgetservice_btnnew_selector"
            android:scaleType="fitXY" />

        <LinearLayout
            android:id="@+id/pawidgetservice_pnldivider"
            android:layout_width="match_parent"
            android:layout_height="5dp"
            android:layout_below="@+id/pawidgetservice_headerlabel"
            android:layout_marginTop="5dp"
            android:background="@drawable/pawidgetservice_pnldivider_background"
            android:orientation="horizontal" >
        </LinearLayout>

        <TextView
            android:id="@+id/pawidgetservice_lblnomessages"
            android:layout_width="wrap_content"
            android:layout_height="wrap_content"
            android:layout_centerVertical="true"
            android:layout_centerHorizontal="true"
            android:text="No Messages Scheduled"
            android:textColor="#FFFFFFFF"
            android:textSize="18sp"
            android:textStyle="bold" />


</RelativeLayout>
 
Upvote 0

soltypio

Member
Licensed User
Longtime User
Haris,
Your answer is just awesome! These are the exact details that I was missing.
Please correct me If I'm wrong.
I see that you specify heights and widths of views id dps, just as in absolute layout generated by the designer and so for other properties that don't change view posiotioning - good for my current layout file....
But you've done some magic to top and left properties :).
You seem to position your views by
aligning it to the parent and by specifying a distance form orher view (like LinearView is 5dp from headerLabel in Your fine example) - this it pretty cool.
This leads me to two questions:
1) can still I specify view position using top and left properties (or margin_top, margin_left) as percentage of parent height/witdh or percentage of screen dimensions, or should I stick to specify positions only relative to other UI elements?
2) LinearLayout was originally generated by the designer, or you change it from some other view that couldn't be acceted by relative layout?

I will try your example, and sure be back with more questions.
Thank You very much, sir!
 
Last edited:
Upvote 0

Haris Hafeez

Active Member
Licensed User
Longtime User
Sol,
The RelativeLayout, as the name suggests, works by allowing us to align the views 'relatively' to each other. A good primer for RelativeLayout is http://developer.android.com/guide/topics/ui/layout/relative.html

In answer to you specific questions:
1 - I don't think you can use % directly. However, you may want to look into using the 'weight' property of a view. For example, if in your relative layout, in one imaginary row you'd like to have two text fields with one of them taking 50dip space and the second should take up the rest of available space. In this case, you'll set the width of the second text field to 0dp. I know, it sounds a bit off but its how it works.
2 - LinearLayout can be generated by the designer as well however in my case I just wanted a simple 'divider'. Note that RelativeLayout is a container and there is no such view that will not be 'accepted' by this layout, none that I am aware of in any case.

It might sound a bit overwhelming at first if you are just starting off. But to make the authoring of these layout files a little easier, I'd suggest you install the Android Eclipse tools from Google. You can use the layout designer in Eclipse to visually design a relative layout and then bring that into your B4A project. Its not as cool as the B4A designer but it might help you if you think you are going to struggle with hand writing XML.

Hope this helps and good luck. We are all here to support each other and I will try to be as prompt as possible.
Have fun.
 
Upvote 0

soltypio

Member
Licensed User
Longtime User
It worked perfectly, however I had to make a little tuning:
1. Your XML had duplicate statements for Layout height and width (I did exaclty the same as I edited original Ablolute layout) which made compiler moan a little.
2. In res folder I had to also mark drawables XMLs as read only, because they were erased during compilation with altered layout. Why?


Now it scales beautifully using every pixel there is :)
Thank You again. Now I have a lot of work to do as my widget consists of many small wiews covered by a skin bitmap.
 
Last edited:
Upvote 0

Haris Hafeez

Active Member
Licensed User
Longtime User
Glad that you are on your way to stardom :)

Yes I did forget to mention that you have to mark the drawable and layout folders as read-only.

Good luck with the rest of your project.
 
Upvote 0

stanks

Active Member
Licensed User
Longtime User
can you post your original (B4A) xml file so we can see the diff? i changes smthg and i see that change but it does not look good. what to do with original eg. android:layout_x, android:layout_y (is that android:layout_marginLeft and android:layout_marginTop)?
? should we remove thta or not? eevry mageView have android:scaleType...what to do with that? remove it or not? can you attach image of original (B4A) and new xml file?
in your example you have this:
B4X:
android:layout_alignBottom="@+id/pawidgetservice_btnadd"
but i don't see that button elsewhere in xml file
...

thanks
 
Last edited:
Upvote 0

stanks

Active Member
Licensed User
Longtime User
after playing with this i changed every android:layout_x, android:layout_y to android:layout_marginLeft and android:layout_marginTop. values stayed same. maybe not the right way but everything looks nice

thanks
 
Upvote 0
Top