Android Question Rotate RGB channels of an Image

Johan Schoeman

Expert
Licensed User
Longtime User
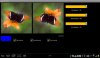
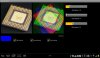
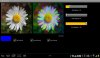
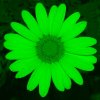
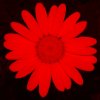
I am seeing the forest for the trees with the attached project. The object is to rotate the R, G, B channels independently based on the 3 x seekbar values and then combine them into a "twisted" RGB image. The rotation around the centre point seems to be working fine but if you for eg select only the Green channel to view, the image is not only green. Same with the Blue only channel. I suspect the Red channel suffers from the same sickness although not as obvious as Green and Blue channels. Can someone perhaps see where I am missing whatever it is that I am missing? Will really appreciate it.

I have a similar project (but without rotation) where the same images split perfectly into separate R,G, and B channels. But I don't want to follow that route. Would like to understand what it is that I am missing in the attached project.

Note:
The check boxes -> select channel(s) to display in converted image
The Seekbars -> set degrees to rotate color channel(s) by

(Making use of JPEG library by @agraham)

Edit: If you click on any of the two displayed images it will load a new/different image (5 different images in the project)
 

Attachments

  • JHS_IMAGE_ROTATE.zip
    484.1 KB · Views: 228
Last edited:

Johan Schoeman

Expert
Licensed User
Longtime User
This is what the other project does with R, G, and B separation of the "yellow daisy" that is the startup image of the above project. Why don't I get the same results when individual channels are selected in the above project? Even at 0 Degrees rotation?
 

Attachments

  • Blue.jpg
    Blue.jpg
    48.7 KB · Views: 186
  • Green.jpg
    Green.jpg
    76.2 KB · Views: 175
  • Red.jpg
    Red.jpg
    65.2 KB · Views: 183
Last edited:
Upvote 0

sorex

Expert
Licensed User
Longtime User
Johan: What do you exactly mean by rotating? if r value is 0 and you set it to 5 it will become 5 , if 255 it will become 4 ?
 
Upvote 0

Johan Schoeman

Expert
Licensed User
Longtime User
Johan: What do you exactly mean by rotating? if r value is 0 and you set it to 5 it will become 5 , if 255 it will become 4 ?
What I am doing is the following:
1. I extract the x / y coordinates and pixel value (R,G,B values) for each pixel in the bitmap. I then use the values from the seekbars to calculate new x / y coordinates for each of the Red, Green, and Blue pixel values as if they are rotated at the seekbar values (degrees) around the centre point of the image. I then combine the new RGB values (red rotated by for eg 10 degrees, green rotated by for eg 30 degrees, blue rotated by for eg 60 degrees) and display it in the rghthand imageview. It should give the impression that the new image consists of 3 individual "layers" - one layer being Red, one layer being Green, and one layer being Blue.

The problem that I have is that I am doing something wrong when extracting the Green and Blue channels (and I therfore guess the Red too) from the original image. Try the following (with the yellow daisy - the startup image):

1. disable the red and blue channels by means of the check boxes at the bottom (so that only the green channel is being displayed)
2. Click on the command button
3. The image in the righthand view does not look like the green image posted in post #2.

The green only image of the butterfly is actually worse.
 
Upvote 0

sorex

Expert
Licensed User
Longtime User
ok, got it.

this seems to be a way to do it (screenshots are attached) ...

notice the extra AND's at the set pixel. for some reason it's needed even if you ANDed the value before already.

if you don't do it you get white dots for some unclear reason.


B4X:
Sub btnConvert_Click
   
    Dim In As InputStream
    Dim c1,cr As Canvas
    Dim r As Rect
    Dim bmp1, bmpr As Bitmap   

    ImageView2.SetBackgroundImage(Null)
    c1.Initialize(ImageView1)
    cr.Initialize(ImageView2)
   
    In = File.OpenInput(File.DirAssets, ImageName)
    Jpg1.LoadJpegSizeOnly(In)
    In = File.OpenInput(File.DirAssets, ImageName)   
    bmp1 = Jpg1.LoadJpegSmaller(In, Jpg1.JpegHeight/ImageView1.Height)
'    Jpg2 = Jpg1
    bmpr.InitializeMutable(Jpg1.JpegWidth,Jpg1.JpegHeight)
   
   
    Jpg1.SetPixelsFromBmp(bmp1)
    Jpg1.PixelsABGRtoARGB
    Jpgr.SetPixelsFromBmp(bmpr)
'    Jpgr.PixelsABGRtoARGB
   
    Dim pixelval As Double
    Dim alpha, rd, gn, bl As Byte

    'Calculate Offset In order To rotate on image middle
    Dim xOffset As Int
    Dim yOffset As Int
   
    xOffset = (Jpg1.JpegWidth) / 2
    yOffset = (Jpg1.JpegHeight) / 2
   
'    Log("jpg width" & Jpg1.JpegWidth)
'    Log("jpg height" & Jpg1.JpegHeight)
   
    Dim degreesRed,degRed As Float
    degreesRed = SeekBar1.Value
    Dim degreesGreen,degGreen As Float
    degreesGreen = SeekBar2.Value   
    Dim degreesBlue,degBlue As Float
    degreesBlue = SeekBar3.Value
   
    Dim img_rd(Jpg1.BmpWidth,Jpg1.BmpHeight) As Byte
    Dim img_gn(Jpg1.BmpWidth,Jpg1.BmpHeight) As Byte
    Dim img_bl(Jpg1.BmpWidth,Jpg1.BmpHeight) As Byte

    For x = 0 To Jpg1.BmpWidth-1
      For y = 0 To Jpg1.BmpHeight-1
        img_rd(x,y) = 0
        img_gn(x,y) = 0
        img_bl(x,y) = 0
      Next
    Next 
   
    Dim rx_bl, ry_bl, rx_rd, ry_rd, rx_gn, ry_gn As Float
    'Convert To Radians
    degBlue = (degreesBlue) * 3.14159 / 180
    degGreen = (degreesGreen) * 3.14159 / 180
    degRed = (degreesRed) * 3.14159 / 180   

    For x = 0 To Jpg1.BmpWidth - 1
      For y = 0 To Jpg1.BmpHeight - 1
        pixelval = Jpg1.GetBmpPixel(x, y)

        If CheckBox1.Checked = False Then
            rd=0
            rx_rd = x
            ry_rd = y         
        Else
              rd = Bit.UnsignedShiftRight(Bit.AND(pixelval, 0xff0000), 16)
              rx_rd = Floor((x - xOffset) * Cos(degRed)) - ((y - yOffset) * Sin(degRed)) + xOffset
              ry_rd = Floor((x - xOffset) * Sin(degRed)) + ((y - yOffset) * Cos(degRed)) + yOffset       
            End If
   
        If CheckBox2.Checked = False Then
            gn=0
            rx_gn = x
              ry_gn = y
        Else
            gn = Bit.UnsignedShiftRight(Bit.AND(pixelval, 0xff00), 8)
              rx_gn = Floor((x - xOffset) * Cos(degGreen)) - ((y - yOffset) * Sin(degGreen)) + xOffset
              ry_gn = Floor((x - xOffset) * Sin(degGreen)) + ((y - yOffset) * Cos(degGreen)) + yOffset       
        End If

        If CheckBox3.Checked = False Then
            bl=0
              rx_bl = x
              ry_bl = y
        Else
              bl = Bit.AND(pixelval, 0xff)
            rx_bl = Floor((x - xOffset) * Cos(degBlue) - (y - yOffset) * Sin(degBlue)) + xOffset
            ry_bl = Floor((x - xOffset) * Sin(degBlue) + (y - yOffset) * Cos(degBlue)) + yOffset       
        End If         
       
          Try              'some x or y values might be negative or larger than bipmap height and/or width - so, try and catch
            img_rd(Floor(rx_rd),Floor(ry_rd)) = rd          'store new red coordinates
            Catch
          End Try   

          Try
            img_gn(Floor(rx_gn),Floor(ry_gn)) = gn          'store new green coordinates
            Catch
          End Try   

          Try
            img_bl(Floor(rx_bl),Floor(ry_bl)) = bl          'store new blue coordinates
            Catch
          End Try       
       
      Next
    Next

    For x = 0 To Jpg1.BmpWidth - 1
      For y = 0 To Jpg1.BmpHeight - 1
          Jpgr.SetBmpPixel(x, y, Colors.ARGB(255,Bit.AND(img_rd(x,y),255), Bit.AND(img_gn(x,y),255), Bit.AND(img_bl(x,y),255) )) 
      Next
    Next

    bmpr = Jpgr.GetBmpFromPixels
    In.Close

    r.Initialize(0, 0, ImageView1.Width, ImageView1.Height)
    c1.DrawBitmap(bmp1, Null, r)
    ImageView1.Invalidate

    r.Initialize(0, 0, ImageView2.Width, ImageView2.Height)
    cr.DrawBitmap(bmpr, Null, r)
    ImageView2.Invalidate
   
End Sub
 

Attachments

  • piccy_red.png
    piccy_red.png
    49.5 KB · Views: 189
  • piccy_green.png
    piccy_green.png
    51.2 KB · Views: 211
  • piccy_blue.png
    piccy_blue.png
    50.1 KB · Views: 190
  • piccy_greenblue.png
    piccy_greenblue.png
    51.1 KB · Views: 207
  • piccy_redblue.png
    piccy_redblue.png
    51.6 KB · Views: 192
  • piccy_shifted.png
    piccy_shifted.png
    50 KB · Views: 191
Upvote 0

Johan Schoeman

Expert
Licensed User
Longtime User
ok, got it.

this seems to be a way to do it (screenshots are attached) ...

notice the extra AND's at the set pixel. for some reason it's needed even if you ANDed the value before already.

if you don't do it you get white dots for some unclear reason.


B4X:
Sub btnConvert_Click
  
    Dim In As InputStream
    Dim c1,cr As Canvas
    Dim r As Rect
    Dim bmp1, bmpr As Bitmap  
 
    ImageView2.SetBackgroundImage(Null)
    c1.Initialize(ImageView1)
    cr.Initialize(ImageView2)
  
    In = File.OpenInput(File.DirAssets, ImageName)
    Jpg1.LoadJpegSizeOnly(In)
    In = File.OpenInput(File.DirAssets, ImageName)  
    bmp1 = Jpg1.LoadJpegSmaller(In, Jpg1.JpegHeight/ImageView1.Height)
'    Jpg2 = Jpg1
    bmpr.InitializeMutable(Jpg1.JpegWidth,Jpg1.JpegHeight)
  
  
    Jpg1.SetPixelsFromBmp(bmp1)
    Jpg1.PixelsABGRtoARGB
    Jpgr.SetPixelsFromBmp(bmpr)
'    Jpgr.PixelsABGRtoARGB
  
    Dim pixelval As Double
    Dim alpha, rd, gn, bl As Byte
 
    'Calculate Offset In order To rotate on image middle
    Dim xOffset As Int
    Dim yOffset As Int
  
    xOffset = (Jpg1.JpegWidth) / 2
    yOffset = (Jpg1.JpegHeight) / 2
  
'    Log("jpg width" & Jpg1.JpegWidth)
'    Log("jpg height" & Jpg1.JpegHeight)
  
    Dim degreesRed,degRed As Float
    degreesRed = SeekBar1.Value
    Dim degreesGreen,degGreen As Float
    degreesGreen = SeekBar2.Value  
    Dim degreesBlue,degBlue As Float
    degreesBlue = SeekBar3.Value
  
    Dim img_rd(Jpg1.BmpWidth,Jpg1.BmpHeight) As Byte
    Dim img_gn(Jpg1.BmpWidth,Jpg1.BmpHeight) As Byte
    Dim img_bl(Jpg1.BmpWidth,Jpg1.BmpHeight) As Byte
 
    For x = 0 To Jpg1.BmpWidth-1
      For y = 0 To Jpg1.BmpHeight-1
        img_rd(x,y) = 0
        img_gn(x,y) = 0
        img_bl(x,y) = 0
      Next
    Next
  
    Dim rx_bl, ry_bl, rx_rd, ry_rd, rx_gn, ry_gn As Float
    'Convert To Radians
    degBlue = (degreesBlue) * 3.14159 / 180
    degGreen = (degreesGreen) * 3.14159 / 180
    degRed = (degreesRed) * 3.14159 / 180  
 
    For x = 0 To Jpg1.BmpWidth - 1
      For y = 0 To Jpg1.BmpHeight - 1
        pixelval = Jpg1.GetBmpPixel(x, y)
 
        If CheckBox1.Checked = False Then
            rd=0
            rx_rd = x
            ry_rd = y        
        Else
              rd = Bit.UnsignedShiftRight(Bit.AND(pixelval, 0xff0000), 16)
              rx_rd = Floor((x - xOffset) * Cos(degRed)) - ((y - yOffset) * Sin(degRed)) + xOffset
              ry_rd = Floor((x - xOffset) * Sin(degRed)) + ((y - yOffset) * Cos(degRed)) + yOffset      
            End If
  
        If CheckBox2.Checked = False Then
            gn=0
            rx_gn = x
              ry_gn = y
        Else
            gn = Bit.UnsignedShiftRight(Bit.AND(pixelval, 0xff00), 8)
              rx_gn = Floor((x - xOffset) * Cos(degGreen)) - ((y - yOffset) * Sin(degGreen)) + xOffset
              ry_gn = Floor((x - xOffset) * Sin(degGreen)) + ((y - yOffset) * Cos(degGreen)) + yOffset      
        End If
 
        If CheckBox3.Checked = False Then
            bl=0
              rx_bl = x
              ry_bl = y
        Else
              bl = Bit.AND(pixelval, 0xff)
            rx_bl = Floor((x - xOffset) * Cos(degBlue) - (y - yOffset) * Sin(degBlue)) + xOffset
            ry_bl = Floor((x - xOffset) * Sin(degBlue) + (y - yOffset) * Cos(degBlue)) + yOffset      
        End If        
      
          Try              'some x or y values might be negative or larger than bipmap height and/or width - so, try and catch
            img_rd(Floor(rx_rd),Floor(ry_rd)) = rd          'store new red coordinates
            Catch
          End Try  
 
          Try
            img_gn(Floor(rx_gn),Floor(ry_gn)) = gn          'store new green coordinates
            Catch
          End Try  
 
          Try
            img_bl(Floor(rx_bl),Floor(ry_bl)) = bl          'store new blue coordinates
            Catch
          End Try      
      
      Next
    Next
 
    For x = 0 To Jpg1.BmpWidth - 1
      For y = 0 To Jpg1.BmpHeight - 1
          Jpgr.SetBmpPixel(x, y, Colors.ARGB(255,Bit.AND(img_rd(x,y),255), Bit.AND(img_gn(x,y),255), Bit.AND(img_bl(x,y),255) ))
      Next
    Next
 
    bmpr = Jpgr.GetBmpFromPixels
    In.Close
 
    r.Initialize(0, 0, ImageView1.Width, ImageView1.Height)
    c1.DrawBitmap(bmp1, Null, r)
    ImageView1.Invalidate
 
    r.Initialize(0, 0, ImageView2.Width, ImageView2.Height)
    cr.DrawBitmap(bmpr, Null, r)
    ImageView2.Invalidate
  
End Sub


Fantastic! Thanks for your assistance! Indeed strange that it requires the additional AND.
 
Upvote 0

Johan Schoeman

Expert
Licensed User
Longtime User
you have to check that rotation code, I don't think it worked right.
Can you please explain what it is that you have picked up that is incorrect in the rotation?
 
Upvote 0

Johan Schoeman

Expert
Licensed User
Longtime User
It didn't rotate is just moved away from the center.
Will check tonight when at home if I can find something. Tested the code on my Samsumg PT-3100 and it rotated fine around the centre point. Does it also do so on your device with the original code that I have posted in post #1 (i.e does not rotate but just move away from the centre)?
 
Upvote 0

Johan Schoeman

Expert
Licensed User
Longtime User

Attachments

  • butterfly_180.jpg
    butterfly_180.jpg
    101.9 KB · Views: 182
  • cpu_rotated.jpg
    cpu_rotated.jpg
    158 KB · Views: 193
  • red_and_blue_moved.jpg
    red_and_blue_moved.jpg
    136.1 KB · Views: 175
Upvote 0

Johan Schoeman

Expert
Licensed User
Longtime User
apparently not, it behaves the same in the original.
There is indeed something very strange going on. If I change the size of the imageviews in the designer script to be less than 60%y (for my 7" tablet) then I see what you have noticed earlier today. The image gets shrunk to about 25% of its original size and then the rotation seems to take place around the bottom right hand corner of the image. That is why the image then sometime turn out to be black only - it rotated out of the imageview. Except for the CPU image. That seems to be unaffected but will probably at some stage (smaller than 50%y imageview size) start to behave the same way - strange but true...

Have tried Imageview2.Gravity = Gravity.Fill at various places but does not seem to solve the problem. Anyone with any ideas that can perhaps explain this phenomenon?
 
Upvote 0

Johan Schoeman

Expert
Licensed User
Longtime User
There is indeed something very strange going on. If I change the size of the imageviews in the designer script to be less than 60%y (for my 7" tablet) then I see what you have noticed earlier today. The image gets shrunk to about 25% of its original size and then the rotation seems to take place around the bottom right hand corner of the image. That is why the image then sometime turn out to be black only - it rotated out of the imageview. Except for the CPU image. That seems to be unaffected but will probably at some stage (smaller than 50%y imageview size) start to behave the same way - strange but true...

Have tried Imageview2.Gravity = Gravity.Fill at various places but does not seem to solve the problem. Anyone with any ideas that can perhaps explain this phenomenon?

Edit:
The solution must be in a full understanding of the functionality of the JPEG library. The rotation code is working - have tested it.
 
Upvote 0
Top