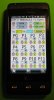
Hi,
This program example will allow you to control Output port pins on
a Basic Stamp using an LG Fathom Windows Mobile Phone and a wireless
BlueTooth module.
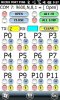
You can control 12 of the Basic Stamps Output pins (P0 - P11).
Port pin P15 is used to receive data from the Bluetooth module.
Port pins P12, P13 and P14 are not used and can be used for
other things.
You can set Port Pins (P0 - P11) High or Low individually.
You can set all Port Pins (P0 - P11) High at one time.
You can set all Port Pins (P0 - P11) Low at one time.
You can Open and Close the Bluetooth Serial Communications
port.
You can Clear the TX and RX windows. When a button is pressed,
the single byte character command that is transmitted is displayed
in the TX window. If the external hardware sent data back to the
PDA it would be displayed in the RX window.
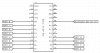
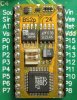
The LG Fathom runs the B4PPC program which sends data commands
to the wireless bluetooth adapter which is plugged into an RS232
converter board that is connected to Port Pin 15 of the Basic Stamp.
When a single byte character command is received by the Basic Stamp
it will analyze it and perform the specified action.
Here is a listing of the Basic Stamp program code:
' {$STAMP BS2p}
' {$PBASIC 2.5}
serdata VAR Byte
valdata VAR Byte
Baud CON 240
INPUT 15
OUTPUT 0
OUTPUT 1
OUTPUT 2
OUTPUT 3
OUTPUT 4
OUTPUT 5
OUTPUT 6
OUTPUT 7
OUTPUT 8
OUTPUT 9
OUTPUT 10
OUTPUT 11
LOW 0
LOW 1
LOW 2
LOW 3
LOW 4
LOW 5
LOW 6
LOW 7
LOW 8
LOW 9
LOW 10
LOW 11
Main:
DO
SERIN 15,Baud,[serdata]
LOOKDOWN serdata,[65,66,67,68,69,70,71,72,73,74,75,76,77,78,79,80,81,82,83,84,85,86,87,88,89,90],valdata
BRANCH valdata,[c1,c2,c3,c4,c5,c6,c7,c8,c9,c10,c11,c12,c13,c14,c15,c16,c17,c18,c19,c20,c21,c22,c23,c24,c25,c26]
GOTO jumpend
c1:
'Character A was received. Set P0 High.
HIGH 0
GOTO jumpend
c2:
'Character B was received. Set P0 Low.
LOW 0
GOTO jumpend
c3:
'Character C was received. Set P1 High.
HIGH 1
GOTO jumpend
c4:
'Character D was received. Set P1 Low.
LOW 1
GOTO jumpend
c5:
'Character E was received. Set P2 High.
HIGH 2
GOTO jumpend
c6:
'Character F was received. Set P2 Low.
LOW 2
GOTO jumpend
c7:
'Character G was received. Set P3 High.
HIGH 3
GOTO jumpend
c8:
'Character H was received. Set P3 Low.
LOW 3
GOTO jumpend
c9:
'Character I was received. Set P4 High.
HIGH 4
GOTO jumpend
c10:
'Character J was received. Set P4 Low.
LOW 4
GOTO jumpend
c11:
'Character K was received. Set P5 High.
HIGH 5
GOTO jumpend
c12:
'Character L was received. Set P5 Low.
LOW 5
GOTO jumpend
c13:
'Character M was received. Set P6 High.
HIGH 6
GOTO jumpend
c14:
'Character N was received. Set P6 Low.
LOW 6
GOTO jumpend
c15:
'Character O was received. Set P7 High.
HIGH 7
GOTO jumpend
c16:
'Character P was received. Set P7 Low.
LOW 7
GOTO jumpend
c17:
'Character Q was received. Set P8 High.
HIGH 8
GOTO jumpend
c18:
'Character R was received. Set P8 Low.
LOW 8
GOTO jumpend
c19:
'Character S was received. Set P9 High.
HIGH 9
GOTO jumpend
c20:
'Character T was received. Set P9 Low.
LOW 9
GOTO jumpend
c21:
'Character U was received. Set P10 High.
HIGH 10
GOTO jumpend
c22:
'Character V was received. Set P10 Low.
LOW 10
GOTO jumpend
c23:
'Character W was received. Set P11 High.
HIGH 11
GOTO jumpend
c24:
'Character X was received. Set P11 Low.
LOW 11
GOTO jumpend
c25:
'Character Y was received. Set P0,P1,P2,P3,P4,P5,P6,P7,P8,P9,P10,P11 High.
HIGH 0
HIGH 1
HIGH 2
HIGH 3
HIGH 4
HIGH 5
HIGH 6
HIGH 7
HIGH 8
HIGH 9
HIGH 10
HIGH 11
GOTO jumpend
c26:
'Character Z was received. Set P0,P1,P2,P3,P4,P5,P6,P7,P8,P9,P10,P11 Low.
LOW 0
LOW 1
LOW 2
LOW 3
LOW 4
LOW 5
LOW 6
LOW 7
LOW 8
LOW 9
LOW 10
LOW 11
jumpend:
LOOP ' repeat forever
END
This program example will allow you to control Output port pins on
a Basic Stamp using an LG Fathom Windows Mobile Phone and a wireless
BlueTooth module.
You can control 12 of the Basic Stamps Output pins (P0 - P11).
Port pin P15 is used to receive data from the Bluetooth module.
Port pins P12, P13 and P14 are not used and can be used for
other things.
You can set Port Pins (P0 - P11) High or Low individually.
You can set all Port Pins (P0 - P11) High at one time.
You can set all Port Pins (P0 - P11) Low at one time.
You can Open and Close the Bluetooth Serial Communications
port.
You can Clear the TX and RX windows. When a button is pressed,
the single byte character command that is transmitted is displayed
in the TX window. If the external hardware sent data back to the
PDA it would be displayed in the RX window.
The LG Fathom runs the B4PPC program which sends data commands
to the wireless bluetooth adapter which is plugged into an RS232
converter board that is connected to Port Pin 15 of the Basic Stamp.
When a single byte character command is received by the Basic Stamp
it will analyze it and perform the specified action.
Here is a listing of the Basic Stamp program code:
' {$STAMP BS2p}
' {$PBASIC 2.5}
serdata VAR Byte
valdata VAR Byte
Baud CON 240
INPUT 15
OUTPUT 0
OUTPUT 1
OUTPUT 2
OUTPUT 3
OUTPUT 4
OUTPUT 5
OUTPUT 6
OUTPUT 7
OUTPUT 8
OUTPUT 9
OUTPUT 10
OUTPUT 11
LOW 0
LOW 1
LOW 2
LOW 3
LOW 4
LOW 5
LOW 6
LOW 7
LOW 8
LOW 9
LOW 10
LOW 11
Main:
DO
SERIN 15,Baud,[serdata]
LOOKDOWN serdata,[65,66,67,68,69,70,71,72,73,74,75,76,77,78,79,80,81,82,83,84,85,86,87,88,89,90],valdata
BRANCH valdata,[c1,c2,c3,c4,c5,c6,c7,c8,c9,c10,c11,c12,c13,c14,c15,c16,c17,c18,c19,c20,c21,c22,c23,c24,c25,c26]
GOTO jumpend
c1:
'Character A was received. Set P0 High.
HIGH 0
GOTO jumpend
c2:
'Character B was received. Set P0 Low.
LOW 0
GOTO jumpend
c3:
'Character C was received. Set P1 High.
HIGH 1
GOTO jumpend
c4:
'Character D was received. Set P1 Low.
LOW 1
GOTO jumpend
c5:
'Character E was received. Set P2 High.
HIGH 2
GOTO jumpend
c6:
'Character F was received. Set P2 Low.
LOW 2
GOTO jumpend
c7:
'Character G was received. Set P3 High.
HIGH 3
GOTO jumpend
c8:
'Character H was received. Set P3 Low.
LOW 3
GOTO jumpend
c9:
'Character I was received. Set P4 High.
HIGH 4
GOTO jumpend
c10:
'Character J was received. Set P4 Low.
LOW 4
GOTO jumpend
c11:
'Character K was received. Set P5 High.
HIGH 5
GOTO jumpend
c12:
'Character L was received. Set P5 Low.
LOW 5
GOTO jumpend
c13:
'Character M was received. Set P6 High.
HIGH 6
GOTO jumpend
c14:
'Character N was received. Set P6 Low.
LOW 6
GOTO jumpend
c15:
'Character O was received. Set P7 High.
HIGH 7
GOTO jumpend
c16:
'Character P was received. Set P7 Low.
LOW 7
GOTO jumpend
c17:
'Character Q was received. Set P8 High.
HIGH 8
GOTO jumpend
c18:
'Character R was received. Set P8 Low.
LOW 8
GOTO jumpend
c19:
'Character S was received. Set P9 High.
HIGH 9
GOTO jumpend
c20:
'Character T was received. Set P9 Low.
LOW 9
GOTO jumpend
c21:
'Character U was received. Set P10 High.
HIGH 10
GOTO jumpend
c22:
'Character V was received. Set P10 Low.
LOW 10
GOTO jumpend
c23:
'Character W was received. Set P11 High.
HIGH 11
GOTO jumpend
c24:
'Character X was received. Set P11 Low.
LOW 11
GOTO jumpend
c25:
'Character Y was received. Set P0,P1,P2,P3,P4,P5,P6,P7,P8,P9,P10,P11 High.
HIGH 0
HIGH 1
HIGH 2
HIGH 3
HIGH 4
HIGH 5
HIGH 6
HIGH 7
HIGH 8
HIGH 9
HIGH 10
HIGH 11
GOTO jumpend
c26:
'Character Z was received. Set P0,P1,P2,P3,P4,P5,P6,P7,P8,P9,P10,P11 Low.
LOW 0
LOW 1
LOW 2
LOW 3
LOW 4
LOW 5
LOW 6
LOW 7
LOW 8
LOW 9
LOW 10
LOW 11
jumpend:
LOOP ' repeat forever
END
Attachments

Last edited: