B4J Kanban cards application

PaulMeuris

Active Member
Licensed User
You can find the Android version in the second message!:)
In the first thread i presented a visualisation of a Kanban board using CustomListViews.
Here's the link: Kanban board application using CustomListViews: a visualisation
In this thread i present the Kanban cards application.
1692871529716.png

With the Stage button you can create a stage title that will be placed on top of each column (default width 200dip) and in each next column.
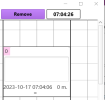
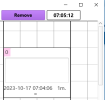
With the Card button you can create a card that can be moved to any position on the board except on the title row. Its default size is width 200dip by height 150dip.
You can place a ruler on the board with the Ruler button. A ruler can have a width of 150dip to 2000dip (default).
You can save your work as an image using the snapshot button.
With the slider you can pan left or right to see the rest of the board (10 columns of 200dip). You can use the scrollbar (or mousewheel) to scroll up or down (10 rows of 200dip).
If you place a card on top of another card (like for instance in the card game "Patience") then you can bring the card underneath on top.
You can remove a stage, card or ruler.
The snapshot image is large but you can use an image editor to cut out the portion you need.
example01.png

example01_cutout.png

The idea is to use this application on a laptop or tablet of medium size so you can carry the kanban board with you.
If you have comments or idea's about this application i would like to read about them.
The source code is available in the attachment.
 

Attachments

  • kanban_move_cards.zip
    12.8 KB · Views: 117
Last edited:

PaulMeuris

Active Member
Licensed User
In this message i present you the Android version of the application.
I have tested the app on a Samsung smartphone Galaxy J7 (Android 8.1.0) and on a Samsung tablet Galaxy Tab 4 (Android 5.0.2).
example01.png

example07.png

If you tap on the Snapshot button you can review the board. A photo dialog appears with a snapshot bitmap.
The bitmap can be zoomed using a ZoomImageView: Zoom image view. Make sure you have the library in your additional libraries folder.
You can find more images in the attached zip-files.
In the Android version you can swipe to move the screen content. If you tap on a component a blue border appears and you can move the component.
On a card you have to tap on the header or the footer to move the card. If you tap in the text area you can change the text.
A selected component can be removed or brought to the front of another component.
The source code is in the attachment.
 

Attachments

  • B4A_images.zip
    277.8 KB · Views: 103
  • B4J_images.zip
    63.3 KB · Views: 114
  • kanban_move_cards.zip
    20.9 KB · Views: 107

javiers

Active Member
Licensed User
Longtime User
Hello, I would like to put a counter on each card that shows the time since its creation, but I don't know how to do it.
I would appreciate help.
Thanks in advance...
kanban.png
 

PaulMeuris

Active Member
Licensed User
@javiers, thank you for your reply and question.
To be able to calculate the number of minutes that have past since the creation of the card you need to keep the creation datetime in the tag of the card.
There is a Type tagdata declared in the Main module:
B4X:
    Type tagdata (pressedX As Int, pressedY As Int, count As Int, id As String, imgurl As String, _
         backcolor As Int, brdthick As Int, brdcolor As Int, brdradius As Int, noborder As Boolean, _
         fontfamily As String, fontsize As Int, isbold As Boolean, isitalic As Boolean, _
         alignment As String, textcolor As Int, parent As String, drawing As String, cnvs As B4XCanvas, _
         drawingtext As String,gradient1 As String,gradient2 As String,gradienthorz As Boolean, _
         comptype As String, nofill As Boolean, rotation As Int, createticks As Long)
Add the createticks variable to that type (see highlighted line)
Then in the B4XMainPage in the subroutine add_new_pane you add this highlighted line to add the createticks variable to the tagdata:
B4X:
    td.comptype = "Pane"
    td.createticks = ticks
    newpnl.Tag = td
I see you have already added the labels to display the datetime and the elapsed minutes.
Here is my version of that code:
B4X:
    ' datetime label
    Dim ticks As Long = DateTime.Now
    DateTime.DateFormat = "yyyy-MM-dd"
    Dim datestring As String = DateTime.Date(ticks) & " " & DateTime.Time(ticks)
    Dim lbl As Label = set_label(datestring,200dip,40dip,fx.Colors.Transparent)
    newpnl.AddNode(lbl,1dip,height-50dip,200dip,40dip)
    ' minutes label
    Dim duration As Long = 0
    Dim lbl As Label = set_label(duration & " m.",50dip,40dip,fx.Colors.Transparent)
    newpnl.AddNode(lbl,width-40dip,height-50dip,50dip,40dip)
    '
Then you need to implement a timer.
The code to do that is this:
B4X:
    ' in Class_Globals
    Private lbltimer As Label
    ' in the subroutine B4XPage_Created at the end
    timer.Initialize("timer",1000)
    timer.Enabled = True
End Sub
Private Sub timer_tick
    lbltimer.Text = DateTime.Time(DateTime.Now)
    For Each vw In panemain.GetAllViewsRecursive
        If vw Is Pane Then
            If vw.As(Pane).Tag <> "" Then
                Dim tagd As tagdata = vw.As(Pane).Tag
                Log(tagd)
                If tagd.createticks > 0 Then
                    Dim duration As Long = Round((DateTime.Now - tagd.createticks)/1000)
                    Dim lbl As Label = vw.As(Pane).GetNode(4)
                    If (duration Mod 60) = 0 Then                ' show every minute
                        lbl.Text = Round(duration/60) & "m."
                    End If    
                End If
            End If
        End If
    Next
End Sub
To check the timer add a label next to the Remove button in the upper right corner.
In the code above i called it "lbltimer" (see first line in the timer_tick subroutine).
Note that the minutes label is node 4 in the card pane in my example. This is different in your code. Calculate the number of views in your card layout to find out.
Here's how it looks:
1697519599060.png
1697519649331.png

I hope you can implement this solution.
If you have any more questions, don't hesitate to let me know.
 

Attachments

  • 1697519088618.png
    1697519088618.png
    8.9 KB · Views: 63
  • 1697519127708.png
    1697519127708.png
    8.9 KB · Views: 60

javiers

Active Member
Licensed User
Longtime User
Thank you very much for the quick response. It works perfectly. Thanks again!
 
Top