Android Tutorial OSMDroid - MapView for B4A tutorial

You can find the OSMDroid library thread here: http://www.b4x.com/forum/additional...tes/16309-osmdroid-mapview-b4a.html#post92643.

AIM: Create and initialize a MapView, enable the map zoom controller and multitouch controller, set a zoom level then center the map on a location.

B4X:
Sub Process_Globals
End Sub

Sub Globals
   Dim MapView1 As MapView
End Sub

Sub Activity_Create(FirstTime As Boolean)
   If File.ExternalWritable=False Then
      '   OSMDroid requires the use of external storage to cache tiles
      '   if no external storage is available then the MapView will display no tiles
      Log("WARNING NO EXTERNAL STORAGE AVAILABLE")
   End If
   
   '   no EventName is required as we don't need to listen for MapView events
   MapView1.Initialize("")
   Activity.AddView(MapView1, 0, 0, 100%x, 100%y)
   
   '   by default the map will zoom in on a double tap and also be draggable - no other user interface features are enabled
   
   '   enable the built in zoom controller - the map can now be zoomed in and out
   MapView1.SetZoomEnabled(True)
   
   '   enable the built in multi touch controller - the map can now be 'pinch zoomed'
   MapView1.SetMultiTouchEnabled(True)
   
   '   set the zoom level BEFORE the center (otherwise unpredictable map center may be set)
   MapView1.Zoom=14
   MapView1.SetCenter(52.75192, 0.40505)
End Sub

Sub Activity_Resume
End Sub

Sub Activity_Pause (UserClosed As Boolean)
End Sub

The code is pretty self-explanatory.

I've added the code to check if the device has available external storage as OSMDroid will not display any tiles if no external storage is available.
External storage is used to save/cache all downloaded tiles - no external storage means no map!
(I'll omit that check from future tutorials but it's something to bear in mind - not that i know of any Android devices that have no external storage).

Create and initialize a MapView, add it to the Activity 100% width and 100% height.
Enable the zoom and multi-touch controller.
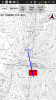
Zoom in to level 14 then set the MapView center to a location (sunny Norfolk, UK!).

I've found that setting the map center and then immediately setting the zoom level does not work as expected.
I think that while the MapView is setting the map center it also zooms in so the end result is unpredictable.

Pan and zoom the map, now rotate your device and you'll see the map returns to it's initial state of zoom level 14, center (52.75192, 0.40505).

I shall show you how to save and restore the MapView state next...

Martin.
 

Attachments

  • 01 - SimpleMap.zip
    5.8 KB · Views: 4,638
Last edited:

warwound

Expert
Licensed User
Longtime User
Can you post the full exception from the log?
If it includes java source class names and line numbers it'll make it easier to debug the problem.

Martin.
 

PABLO2013

Well-Known Member
Licensed User
Longtime User
regards
I resolved it, using the osm version 3.08 and C: \ ANDROID SDK \ platforms \ android-12 \ android.jar
I find that the osm version 4.1 did not work well
regards

java.lang.NullPointerException


at org.osmdroid.views.overlay.MyLocationOverlay.<init>(MyLocationOverlay.java:155)
at uk.co.martinpearman.b4a.osmdroid.views.overlays.MyMyLocationOverlay.<init>(MyMyLocationOverlay.java:24)
at uk.co.martinpearman.b4a.osmdroid.views.overlays.wrappers.MyMyLocationOverlayWrapper.Initialize(MyMyLocationOverlayWrapper.java:23)
at com.redtagapp.b4a.main._activity_create(main.java:508)
at java.lang.reflect.Method.invokeNative(Native Method)
at java.lang.reflect.Method.invoke(Method.java:511)
at anywheresoftware.b4a.BA.raiseEvent2(BA.java:174)
at com.redtagapp.b4a.main.afterFirstLayout(main.java:98)
at com.redtagapp.b4a.main.access$100(main.java:16)
at com.redtagapp.b4a.main$WaitForLayout.run(main.java:76)
at android.os.Handler.handleCallback(Handler.java:615)
at android.os.Handler.dispatchMessage(Handler.java:92)
at android.os.Looper.loop(Looper.java:137)
at android.app.ActivityThread.main(ActivityThread.java:4830)


at java.lang.reflect.Method.invokeNative(Native Method)
at java.lang.reflect.Method.invoke(Method.java:511)
at com.android.internal.os.ZygoteInit$MethodAndArgsCaller.run(ZygoteInit.java:789)
at com.android.internal.os.ZygoteInit.main(ZygoteInit.java:556)
at dalvik.system.NativeStart.main(Native Method)
** Activity (main) Create, isFirst = true **


** Activity (main) Resume **


MyLocationOverlay1_FollowLocationAutoDisabled


MyLocationOverlay1_FollowLocationAutoDisabled
 

warwound

Expert
Licensed User
Longtime User
Yes version 4.1 is still under development - it needs users such as yourself to report bugs so i can fix them.
I'll take a look at the version 4.1 MyLocationOverlay later :).
 

PABLO2013

Well-Known Member
Licensed User
Longtime User
EXPANDING INFORMATION
I HAVE THE ERROR WITH OSM Version 4.1,THE "MapCenter As GeoPoint" VARIABLE HOWN AS IF OSM NOT INSTALLED.
HAVE INSTALLED PLATFORM SDK 19 ...
GREETINGS
 

Attachments

  • OSM1.PNG
    OSM1.PNG
    11.9 KB · Views: 509
  • OSM2.PNG
    OSM2.PNG
    10.5 KB · Views: 489
Last edited:

PABLO2013

Well-Known Member
Licensed User
Longtime User
GREETINGS
I SEE THAT THE SYNTAX CHANGE CODE, SORRY THAT MY QUESTIONS ARE NOT AT THE HEIGHT OF YOUR KNOWLEDGE, I WAS TURNING THE SAMPLE OSM (08-OverlayMapMyLocation), BUT COULD NOT BECAUSE, HOW I ADDED THE OVERLAYS TO MAPVIEW1 IN A NEW VERSION?
ONLY DO THIS, BUT NOT!

Dim MapView1 As OSMDroid_MapView
Dim MinimapOverlay1 As OSMDroid_MinimapOverlay
Dim ScaleBarOverlay1 As OSMDroid_ScaleBarOverlay
Dim TileSourceSpinner As Spinner
Dim PathOverlay1 As OSMDroid_PathOverlay
......
MapView1.GetZoomLevel=ZoomLevel
MapView1.GetMapCenter=MapCenter
ScaleBarOverlay1.Initialize
MyLocationOverlay1.Initialize("MyLocationOverlay1",MapView1)
SimpleLocationOverlay1.Initialize

.......
MapView1.?????(???????) FOR ADD OVERLAYS , IT SAY LIST?

TKS
 

warwound

Expert
Licensed User
Longtime User
There's two ways to add an Overlay to the MapView in version 4.1:

B4X:
MyMapView.GetOverlays.Add(MyOverlay)

OR

B4X:
MyMapView.GetOverlayManager.Add(MyIndex, MyOverlay)

The first method adds MyOverlay as the next Overlay in the MapView's list of Overlays - it become the next uppermost Overlay that is displayed.

The second method allows you to set the index where to add/insert MyOverlay - so you can use this second method to insert an Overlay at a specific position.

The position of each Overlay determines the rendering order - so this second method is useful if you want to add an Overlay and have it rendered before an 'already added' Overlay.

Martin.
 

Spectre

Active Member
Licensed User
Longtime User
Can you explain that in a bit more detail?

Martin.

Hi Martin.

Hello. I hope you understand, im my English is not good.
You can use maps in JPG format, made from scans and then you can see them in Osmodroid ?
Custom Maps ofline ...
 

warwound

Expert
Licensed User
Longtime User
Looks like you have two options:
  • The as yet unwrapped OSMBonusPack GroundOverlay.
    I've started to wrap OSMBonusPack for version 4.1 of OSMDroid BUT haven't worked on it for a month or so now - too busy with work.
    I could look at wrapping it and letting you have an early copy of the OSMBonusPack.
    With a GroundOverlay you display your image anchored to a (latitude,longitude) and set it's dimensions.
    You can set Width and Height using Float values but the documentation doesn't state if these are meter or whatever types of units.
    An advantage is you can download an image within your app and display it as a GroundOverlay with minimal effort.
    Large images might cause out of memory errors.
  • Chop you image into map tiles and display it as a custom tile layer.
    This requires both:
    • Pre-processing the image by cutting it into tiles.
    • Packing the tiles within your application or making them available online as an online (custom) tile source.
    You'd unlikely to want to chop the image into tiles on the android device so this method requires that you have a means to get the tiles on the device.
    Even a small image, once cut into many tiles will take more storage space than the original image.
    An advantage is that you can display images of any size without worrying about out of memory errors.

So let me have a bit more info:
  • How large is the image that you want to display? What's it's size in both byte size and pixel dimensions?
  • Do you need to display more than one image on the map?
  • Do you need to package the image or tiles with your application OR do you want your application to download them from the internet.
  • Is the image a semi transparent PNG image or has it got no transparency?

Martin.
 

Spectre

Active Member
Licensed User
Longtime User
Looks like you have two options:
Hi Martin...

I'm running my app with your library osmodroid 4.1 and I must say that even though beta works perfectly ...
I can not, however, yet to put the name under icon always visible ..

How large is the image That You want to display? What's it's size in bytes Both size and pixel dimensions?

Image is of variable size usually does not exceed 10, 15 mb pixel dimensions are also variables eg 9000x6000 pixels.

Do you need to display blackberries than one image on the map?

Usually displays an image at a time.

Do you need to package the image or tiles with your application OR do you want your application to download them from the Internet.

Better prepare the image with the application from the internet.

Is the image a semi transparent PNG image or has it got no transparency?

If it is too complex to be good images are not transparent.

Martin.

upload_2014-4-29_16-57-19.png
upload_2014-4-29_16-58-17.png
 

warwound

Expert
Licensed User
Longtime User
Well if your images are sized around 9000x6000 pixels then i think cutting them into custom tiles is your only option.
I think trying to use a GroundOverlay would be a bad idea and you'd likely end up with out of memory errors.

So let's assume you'll display your images as an opaque or semi-transparent cutom tile layer.

Cutting an image into tiles and ending up with correctly named tiles that cover the correct corresponding point on the earth - ensuring that the image is accurately mapped to a geographical bounds on the earth - requires tile cutting software as well as knowing the exact bounds of the earth that the image covers.

https://www.google.co.uk/search?q=map+tile+cutter&ie=UTF-8&oe=UTF-8

You'll have to do some research and find a tool that works for you.
Once you have a set of custom tiles and are ready to display those tiles in OSMDroid post again and i'll help more.

Just an idea: Once you have your tiles you could convert them all into BLOBs and use an SQLite database to store them.
Have a read of this thread: http://www.b4x.com/android/forum/threads/google-maps-android-v2-tutorial.24415/page-22#post-235553 and search Google for info about MBTiles.
I've not yet wrapped the OSMDroid code that supports MBTiles but it can be done.

Martin.
 

gvoulg

Member
Licensed User
Longtime User
[
Just an idea: Once you have your tiles you could convert them all into BLOBs and use an SQLite database to store them.

Martin.[/quote]

If you prepare the tile structure (I am using MapTiler for this job) you can put them in a zip file .
There is an example by Martin for that method and OSMdroid.
This way the time to transfer the images from PC to Tablet reduces significant and this is important when we have tile sets of thousands of separate files and directories.
Of course this is also the advantage of using the mbtiles format.
George
 

Spectre

Active Member
Licensed User
Longtime User
Well if your images are sized around 9000x6000 pixels then i think cutting them into custom tiles is your only option.
I think trying to use a GroundOverlay would be a bad idea and you'd likely end up with out of memory errors.

So let's assume you'll display your images as an opaque or semi-transparent cutom tile layer.

Cutting an image into tiles and ending up with correctly named tiles that cover the correct corresponding point on the earth - ensuring that the image is accurately mapped to a geographical bounds on the earth - requires tile cutting software as well as knowing the exact bounds of the earth that the image covers.

https://www.google.co.uk/search?q=map tile cutter&ie=UTF-8&oe=UTF-8

You'll have to do some research and find a tool that works for you.
Once you have a set of custom tiles and are ready to display those tiles in OSMDroid post again and i'll help more.

Just an idea: Once you have your tiles you could convert them all into BLOBs and use an SQLite database to store them.
Have a read of this thread: http://www.b4x.com/android/forum/threads/google-maps-android-v2-tutorial.24415/page-22#post-235553 and search Google for info about MBTiles.
I've not yet wrapped the OSMDroid code that supports MBTiles but it can be done.

Martin.


Ok ... I used map tiler to create the structure of the dowels to my map test.
I guess now you will have to convert to osmodroid that can read?

Spectre
 

Spectre

Active Member
Licensed User
Longtime User
Hi!
with the function: AddGreatCircle (StartPoint As GeoPoint, GeoPoint As EndPoint, NumberOfPoints As Int) you can draw a perfect circle between two distant points such as 500 meters?

Best Regards, spectre...
 

warwound

Expert
Licensed User
Longtime User
Hi!
with the function: AddGreatCircle (StartPoint As GeoPoint, GeoPoint As EndPoint, NumberOfPoints As Int) you can draw a perfect circle between two distant points such as 500 meters?

Best Regards, spectre...

No.

It'll interpolate a great circle from one GeoPoint to another - that's all.
You'll need to use a PathOverlay and some basic geometry.

Martin.
 
Top