B4R Question Push notification with my intercom door. Thanks for you help. (Solved)

jvrh_1

Active Member
Licensed User
Good morning. I need your help again. I am starting with B4R and I have some doubts.

I would want that when I receive a call in my home intercom door, I receive a push message notification in my mobile phone.

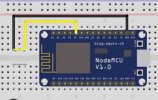
To check it, I have develop a B4R app with a NodeMCU ESP8266 wifi (chip 2102 drive). This board send the push notification. In the other side, I have develop another App with B4A to received the notification. Works perfectly!. To make it, i have conected the GND pin with the D3 pin manually (I have not got a switch botton now). When I conect this wires, all works perfectly. See attached image.


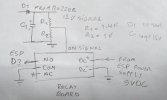
Now, I want that It Works with my home intercom door. This is the model: FERMAX 6201 https://www.tdtprofesional.com/blog/manual-de-instalacion-para-el-kit-6201-de-fermax/

In the manual appears that it Works with 12V in VCA. I have thinked that I could conect the board (pin D3) with the wire number 4. This wire is the buzzer of the home intercom door at house and It will activated when the user press the button, but I do not knwo if I can conect the wire directly to the board because it has got 12V in VCA. What can I do? Thanks a lot.

Sorry. My English skill is not the best.
 

Attachments

  • ESQUEMA.jpeg
    ESQUEMA.jpeg
    77.8 KB · Views: 122
  • TELEFONILLO.jpg
    TELEFONILLO.jpg
    52.1 KB · Views: 127

Mostez

Well-Known Member
Licensed User
Longtime User
Don't connect anything directly from your intercom board to ESP. From data you've provided you only have 12VAC output signal from intercom board, when you press a button, if that correct then, to connect D3 to GND on ESP board, you may use an NPN-transistor optocoupler (as D3 is negative triggered), or use 12VAC relay, use relay pins (COM / NO common and normally open) to dry contact PIN3 to GND, which I prefer in this case as it does not require lot of modifications.
You should be aware that the 12VAC output can drive both the relay and buzzer at the same time or it could overload the board and cause serious damage.

EDIT: press the button use a multimeter to measure the voltage across buzzer terminal, you should also determine if it is AC or DC, this tells you whether to use AC or DC relay.

Good luck
 
Last edited:
Upvote 0

hatzisn

Well-Known Member
Licensed User
Longtime User
I am not familiar with nodemcu but the wemos d1 mini R3 & R4 can be powered with 5V connected to the 5V pin. I would use a voltage divider using a potentiometer of a corresponding calculated value in which I would connect the one side to the intercomm Vcc and the other side to the Intercomm GND. Then with a multimeter I would set the position of the potentiometer so that it exits from the third pin 5,2 V after the redistance connected to the third pin. This is because I would also measure the current intensity of this pin and add a corresponding value resistance so that the current it provides at last to the NodeMCU is at the appropriate level and the Voltage as Mentioned before. Then I would take the 3,3 V from the corresponding pin of nodemcu and Connect it to pin D3 through a 220Ω resistance and connect an NPN transistor also directly to the pin (collector) and the ground (emmiter). Then I would connect the base to pin 4 of intercom through a correct value resistance to bring the final voltage of pin 4 of intercom to an appropriate level for the base. Make sure all values and power ratings of resistors/potentiometer are correct... Also connect the ground of intercom to ground of nodemcu.
 
Last edited:
Upvote 0

jvrh_1

Active Member
Licensed User
I am not familiar with nodemcu but the wemos d1 mini R3 & R4 can be powered with 5V connected to the 5V pin. I would use a voltage divider using a potentiometer of a corresponding calculated value in which I would connect the one side to the intercomm Vcc and the other side to the Intercomm GND. Then with a multimeter I would set the position of the potentiometer so that it exits from the third pin 5,2 V after the redistance connected to the third pin. This is because I would also measure the current intensity of this pin and add a corresponding value resistance so that the current it provides at last to the NodeMCU is at the appropriate level and the Voltage as Mentioned before. Then I would take the 3,3 V from the corresponding pin of nodemcu and Connect it to pin D3 through a 220Ω resistance and connect an NPN transistor also directly to the pin (collector) and the ground (emmiter). Then I would connect the base to pin 4 of intercom through a correct value resistance to bring the final voltage of pin 4 of intercom to an appropriate level for the base. Make sure all values and power ratings of resistors/potentiometer are correct... Also connect the ground of intercom to ground of nodemcu.
Uoooouuu. Very very dificult for me. I don't know anything about electronic. Thanks, but I can not do it. It is a very hight level. You are very profesional.
 
Upvote 0

jvrh_1

Active Member
Licensed User
Don't connect anything directly from your intercom board to ESP. From data you've provided you only have 12VAC output signal from intercom board, when you press a button, if that correct then, to connect D3 to GND on ESP board, you may use an NPN-transistor optocoupler (as D3 is negative triggered), or use 12VAC relay, use relay pins (COM / NO common and normally open) to dry contact PIN3 to GND, which I prefer in this case as it does not require lot of modifications.
You should be aware that the 12VAC output can drive both the relay and buzzer at the same time or it could overload the board and cause serious damage.

EDIT: press the button use a multimeter to measure the voltage across buzzer terminal, you should also determine if it is AC or DC, this tells you whether to use AC or DC relay.

Good luck
And... Is there something standart to buy?
This one will be adecuated?
Thanks a lot!
 
Upvote 0

hatzisn

Well-Known Member
Licensed User
Longtime User
Uoooouuu. Very very dificult for me. I don't know anything about electronic. Thanks, but I can not do it. It is a very hight level. You are very profesional.

I am not a professional. Just hobyist. I started in 2019 with B4R exactly as you (basic knowledge of electronics). I watched a lot of youtube videos. There is nothing difficault.
Just search in you tube for the keyword phrases:
1) How resistors work
1a) What do resistors do to voltage
1b) What do resistors do to the current intensity (also search for what is current intensity if you are not familiar)
2) Choosing the right resistor
3) Voltage divider
4) Resistor power rating
5) Principles of transistors
6) How to use NPN transistor as a switch

Just keep in mind that the only rule for safety of the board is just don't go beyond the Voltage of the pins (3,3V for nodemcu and wemos). For wemos you can connect to the 5v pin a five volt external power. For Nodemcu I do not know if this possible but I suppose there will be an apropriate pin (Google it). After watching the videos you will see that your enemy from succeding in this is only your fear. Also make sure it is not AC the power of the intecom.
 
Last edited:
Upvote 0

hatzisn

Well-Known Member
Licensed User
Longtime User
Don't connect anything directly from your intercom board to ESP. From data you've provided you only have 12VAC output signal from intercom board, when you press a button, if that correct then, to connect D3 to GND on ESP board, you may use an NPN-transistor optocoupler (as D3 is negative triggered), or use 12VAC relay, use relay pins (COM / NO common and normally open) to dry contact PIN3 to GND, which I prefer in this case as it does not require lot of modifications.
You should be aware that the 12VAC output can drive both the relay and buzzer at the same time or it could overload the board and cause serious damage.

EDIT: press the button use a multimeter to measure the voltage across buzzer terminal, you should also determine if it is AC or DC, this tells you whether to use AC or DC relay.

Good luck

Better solution. I had missed the AC part.
 
Upvote 0

hatzisn

Well-Known Member
Licensed User
Longtime User
I am not a professional. Just hobyist. I started in 2019 with B4R exactly as you (basic knowledge of electronics). I watched a lot of youtube videos. There is nothing difficault.
Just search in you tube for the keyword phrases:
1) How resistors work
1a) What do resistors do to voltage
1b) What do resistors do to the current intensity (also search for what is current intensity if you are not familiar)
2) Choosing the right resistor
3) Voltage divider
4) Resistor power rating
5) Principles of transistors
6) How to use NPN transistor as a switch

Just keep in mind that the only rule for safety of the board is just don't go beyond the Voltage of the pins (3,3V for nodemcu and wemos). For wemos you can connect to the 5v pin a five volt external power. For Nodemcu I do not know if this possible but I suppose there will be an apropriate pin (Google it). After watching the videos you will see that your enemy from succeding in this is only your fear. Also make sure it is not AC the power of the intecom.

Disregard please my solution. Although correct for DC it is incorrect for AC which slipped my attention. Do use though the youtube resourses. They are useful.
 
Upvote 0

hatzisn

Well-Known Member
Licensed User
Longtime User
Actually with two of these modules you can make work my solution too.


The w203 is a potentiometer (a variable resistor which can by used also as a variable voltage divider). By turning it logic says that you change the output of the DC Voltage. Use a multimeter and set its DC output to 6V. Please make sure that the power of the intercom can support both of these modules. You might also use a combination of my solution and @Mostez (that is use one of the above module to power the nodemcu and use an AC relay as @Mostez mentions).

Now my solution turns into this. Add a resistance connected to the output of the module so that the outout voltage is brought down to 5,2V and power the nodemcu with this. Take the 3,3 V from the corresponding pin of nodemcu and Connect it to pin D3 through a 220Ω resistance and connect an NPN transistor also directly to the pin (collector) and the ground (emmiter). Connect the base to the output of the second module which is powered by pin 4 of intercom. Add a correct value resistance to the DC output of the module to bring the final voltage to an appropriate level for the base. Make sure all values and power ratings of resistors are correct... Also connect the DC ground of module 1 to DC ground of module 2 and to the GND of nodemcu. Also connect the neutral of AC side in both buck converter modules and make sure that they are insulated from each other. I would use plastic gloves also. Please, also at last, make sure that the power of the intercom can support this.

Extra resources you might want to see:

1) What is a potentiometer?
2) Buck Converters

Also, these youtube channels will make you learn a lot. They did for me...

1) Andreas Spiess
2) Dronebot Workshop (especially this)
 
Last edited:
Upvote 0

Mostez

Well-Known Member
Licensed User
Longtime User
This one will be adecuated?
You can use this module, but you have to measure the voltage across buzzer terminal when you press the button, this is the activation signal, you should know it's level!

Assuming that this signal is 12VDC and you're using 5V power supply for ESP board, then use the attached schematics.
As long as we need only 5V to activate the relay, so we use R1 and R2 resistors to divide the 12V signal into two parts 7V (across R1, dropped down) and 5V (across R2) this what we need.
DON'T forget to connect the ground line of the intercom power supply with the ground line of the ESP power supply

Sorry for my bad handwriting and that messy schematics, just wanted to reply your message as soon as possible.
 

Attachments

  • 20230816_101636.jpg
    20230816_101636.jpg
    476.4 KB · Views: 96
Last edited:
Upvote 0

jvrh_1

Active Member
Licensed User
Actually with two of these modules you can make work my solution too.


The w203 is a potentiometer (a variable resistor which can by used also as a variable voltage divider). By turning it logic says that you change the output of the DC Voltage. Use a multimeter and set its DC output to 6V. Please make sure that the power of the intercom can support both of these modules. You might also use a combination of my solution and @Mostez (that is use one of the above module to power the nodemcu and use an AC relay as @Mostez mentions).

Now my solution turns into this. Add a resistance connected to the output of the module so that the outout voltage is brought down to 5,2V and power the nodemcu with this. Take the 3,3 V from the corresponding pin of nodemcu and Connect it to pin D3 through a 220Ω resistance and connect an NPN transistor also directly to the pin (collector) and the ground (emmiter). Connect the base to the output of the second module which is powered by pin 4 of intercom. Add a correct value resistance to the DC output of the module to bring the final voltage to an appropriate level for the base. Make sure all values and power ratings of resistors are correct... Also connect the DC ground of module 1 to DC ground of module 2 and to the GND of nodemcu. Also connect the neutral of AC side in both buck converter modules and make sure that they are insulated from each other. I would use plastic gloves also. Please, also at last, make sure that the power of the intercom can support this.

Extra resources you might want to see:

1) What is a potentiometer?
2) Buck Converters

Also, these youtube channels will make you learn a lot. They did for me...

1) Andreas Spiess
2) Dronebot Workshop (especially this)
Thanks again. I think you’re really good at this. Very interesting YouTube channels. I’m starting to read about this topic. This topic is very interesting. I’ve always been interested, but I’ve never had a chance to start. I think that it can be a good start point.
Last night I was reading about the subject and I bought by Amazon two devices:

12V AC to 5V DC
To download voltage with a potentiometer and digital display to get 3.3v dc in the output.

I hope that it will work. Firslty I have to use a multimeter to check if I have 12v AC when the buzzer is activated. What is your opinion? May be? Thanks a lot.
 
Upvote 0

jvrh_1

Active Member
Licensed User
You can use this module, but you have to measure the voltage across buzzer terminal when you press the button, this is the activation signal, you should know it's level!

Assuming that this signal is 12VDC and you're using 5V power supply for ESP board, then use the attached schematics.
As long as we need only 5V to activate the relay, so we use R1 and R2 resistors to divide the 12V signal into two parts 7V (across R1, dropped down) and 5V (across R2) this what we need.
DON'T forget to connect the ground line of the intercom power supply with the ground line of the ESP power supply

Sorry for my bad handwriting and that messy schematics, just wanted to reply your message as soon as possible.
Really good and thank you. Your schema is very clear and useful. I understand almost everything. Finally, I will try with this components:
12V AC to 5V DC
To download voltage with a potentiometer and digital display to get 3.3v dc in the output.
My start signal is 12 V AC. Firstly, I have to convert it.
 
Upvote 0

Mostez

Well-Known Member
Licensed User
Longtime User
My start signal is 12 V AC. Firstly, I have to convert it.
1- how do you supply power to your ESP, what source and voltage? this may lead to simplify the whole thing.
2- how far do you place the ESP project box from the intercom?
 
Upvote 0

jvrh_1

Active Member
Licensed User
1- how do you supply power to your ESP, what source and voltage? this may lead to simplify the whole thing.
2- how far do you place the ESP project box from the intercom?
1- Using a USB conected to a mobile charger. 5v DC 2A

2- About 10-12 meters (may be less)
 
Upvote 0

hatzisn

Well-Known Member
Licensed User
Longtime User
Thanks again. I think you’re really good at this. Very interesting YouTube channels. I’m starting to read about this topic. This topic is very interesting. I’ve always been interested, but I’ve never had a chance to start. I think that it can be a good start point.
Last night I was reading about the subject and I bought by Amazon two devices:

12V AC to 5V DC
To download voltage with a potentiometer and digital display to get 3.3v dc in the output.

I hope that it will work. Firslty I have to use a multimeter to check if I have 12v AC when the buzzer is activated. What is your opinion? May be? Thanks a lot.

I am not a Guru. 😀 I get extremelly clumsy when the circuit comes to use AC. 😀. This time though it slipped my attention and I did not mess up. The question you ask only a multimeter can answer it (but I suspect it will be a yes although in the cirquit it will be again dc). The only thing I will say as it is mentioned in a Dronebot Workshop video when measuring always start at the greater available setting the multimeter. Then scale down accordingly.
 
Upvote 0

hatzisn

Well-Known Member
Licensed User
Longtime User
I am not a Guru. 😀 I get extremelly clumsy when the circuit comes to use AC. 😀. This time though it slipped my attention and I did not mess up. The question you ask only a multimeter can answer it (but I suspect it will be a yes although in the cirquit it will be again dc). The only thing I will say as it is mentioned in a Dronebot Workshop video when measuring always start at the greater available setting the multimeter. Then scale down accordingly.
Also keep in mind that what you will measure in AC will be RMS value. This means that it will be (Amplitude of the wave)/(Square Root of 2). Thus you can calculate the amplitude of the AC voltage.
 
Upvote 0
Top