Hello fellow B4X developers,
I'm at it again but this time I've taken photos specifically to post on this great community.
Updating my current screen means that I'll be going from a 1366x768 not full HD to a 1920x1080 full HD portable external screen.
A few weeks ago I purchased a faulty Toshiba laptop identical to my current development laptop, please note that you can do this with almost any used laptop screen and housing. I ordered an LCD controller board kit from Ali Express for about £19 delivered, about 2 weeks later (that is today) I received the LCD controller board kit and I proceeded to recycle the Toshiba laptop screen into a portable HD external screen to use with my development laptop. In total it took me about 90 minutes to complete the conversion. As this screen is a lot thinner, lighter with a thinner bezel than my current screen, it will easily fit into my current laptop rucksack.
Older thicker 1366x768 external laptop screen display on the left, newer thinner 1920x1080 external laptop screen display on the right")

Basic instructions to follow:
This is the LCD controller board kit that I will be using on my recycled laptop screen.

1. Get a faulty laptop but with a fully working screen.
l personally specifically looked for and found a laptop that matched my current laptop. The faulty laptop only cost me £30, that way I've got a spare battery, original power supply and the 1080p HD screen that perfectly matches my current laptop. Having a matching screen doesn't really matter though.

2. Separate the screen from it's base unit.
I'll be selling the keyboard with base unit but without internals on eBay.

3. Take the bezel off from the front of the LCD screen housing.

4. Test the screen and LCD controller board.
Before going any further connect the recycled laptop screen and the LCD controller board kit together, do this to make sure that everything is working as expected. These type of LCD controller kits run on 12VDC.

5. Decide where to mount the LCD controller board kit.
You will need to decide where you want to mount the LCD controller board and the keypad on the back of your recycled screen housing before drilling any holes, taking into consideration any internal frames for housing the actual LCD screen itself.
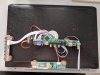
The photo below shows the LCD controller board sitting loosely on the standoffs. The standoffs are currently not screwed into place.

6. Connect the LVDS cable, older kits use normal cables.
If need be LOOSELY fold the LVDS ribbon cable to the general height to where you will be placing the LCD controller board on the back of the screen. Try to line the LVDS ribbon cable position as best as possible to where the LVDS ribbon cable will be connected to the LCD controller board, this will help to keep the LVDS ribbon cable as straight as possible.

7. Line up the LCD controller board and the keypad onto the back of the recycled screen housing.
Use a marker to poke through the LCD controller board and keypad screws holes to mark where you want to drill through the screen housing. Drill holes and cut out a rectangle for the LVDS ribbon cable, if you just have a normal none ribbon cable then you can just drill out a large hole. Now proceed to install the 5mm high standoffs.

8. Below is a photo of the flat screw heads that I used inside.
You can also see where I cut out the rectangle for the LVDS ribbon cable. I deburred the edges of the rectangle to protect the LVDS ribbon cable, I also placed black electrical tape around one edge to help protect the LVDS ribbon cable.
I've used M3x4MM flat head screws, the flat head is only 0.5mm in height, this screen with housing is extremely thin.

9a. Screw the LCD controller board and the keypad directly onto the 5MM high standoffs.
I used M3 nuts for the keypad and I used M3x13MM female to female standoffs for the LCD controller board.

9b. Closeup photo of the LCD controller board and the keypad screwed down into place.

10. Finally mount the protective cover.
Line up the back cover to the standoffs on the LCD controller board. Drill 4 holes for the cover screws to screw into the M3x13MM standoffs, then screw the cover onto the standoffs.
Please note:
You should mark and drill the cover holes before screwing down the LCD controller board, in my case I had to cut the cover in half and I completely forgot to line up and drill the cover holes first. Either way will do as long as the end results still looks great.
I finally placed the recycled external screen onto a foldable tablet stand, this way I can easily get my laptop, 6" right angled HDMI cable, and external screen into my laptop rucksack as the screen only weighs 593g.

Here is the end result.
This recycled external screen project has cost me about £58 in total as I already had screws and standoffs. I still have to sell the recycled keyboard with base which I'll advertise for £29 on eBay, also my friend Ian is buying my previous external screen from me for £35. So this upgraded external screen for my development laptop will end up costing me absolutely nothing, only about 90 minutes of time to put it all together...
My new thin recycled screen with a resolution of 1920x1080 full 1080p HD.

Enjoy...
I'm at it again but this time I've taken photos specifically to post on this great community.
Updating my current screen means that I'll be going from a 1366x768 not full HD to a 1920x1080 full HD portable external screen.
A few weeks ago I purchased a faulty Toshiba laptop identical to my current development laptop, please note that you can do this with almost any used laptop screen and housing. I ordered an LCD controller board kit from Ali Express for about £19 delivered, about 2 weeks later (that is today) I received the LCD controller board kit and I proceeded to recycle the Toshiba laptop screen into a portable HD external screen to use with my development laptop. In total it took me about 90 minutes to complete the conversion. As this screen is a lot thinner, lighter with a thinner bezel than my current screen, it will easily fit into my current laptop rucksack.
Older thicker 1366x768 external laptop screen display on the left, newer thinner 1920x1080 external laptop screen display on the right
Basic instructions to follow:
This is the LCD controller board kit that I will be using on my recycled laptop screen.
1. Get a faulty laptop but with a fully working screen.
l personally specifically looked for and found a laptop that matched my current laptop. The faulty laptop only cost me £30, that way I've got a spare battery, original power supply and the 1080p HD screen that perfectly matches my current laptop. Having a matching screen doesn't really matter though.
2. Separate the screen from it's base unit.
I'll be selling the keyboard with base unit but without internals on eBay.
3. Take the bezel off from the front of the LCD screen housing.
4. Test the screen and LCD controller board.
Before going any further connect the recycled laptop screen and the LCD controller board kit together, do this to make sure that everything is working as expected. These type of LCD controller kits run on 12VDC.
5. Decide where to mount the LCD controller board kit.
You will need to decide where you want to mount the LCD controller board and the keypad on the back of your recycled screen housing before drilling any holes, taking into consideration any internal frames for housing the actual LCD screen itself.
The photo below shows the LCD controller board sitting loosely on the standoffs. The standoffs are currently not screwed into place.
6. Connect the LVDS cable, older kits use normal cables.
If need be LOOSELY fold the LVDS ribbon cable to the general height to where you will be placing the LCD controller board on the back of the screen. Try to line the LVDS ribbon cable position as best as possible to where the LVDS ribbon cable will be connected to the LCD controller board, this will help to keep the LVDS ribbon cable as straight as possible.
7. Line up the LCD controller board and the keypad onto the back of the recycled screen housing.
Use a marker to poke through the LCD controller board and keypad screws holes to mark where you want to drill through the screen housing. Drill holes and cut out a rectangle for the LVDS ribbon cable, if you just have a normal none ribbon cable then you can just drill out a large hole. Now proceed to install the 5mm high standoffs.
8. Below is a photo of the flat screw heads that I used inside.
You can also see where I cut out the rectangle for the LVDS ribbon cable. I deburred the edges of the rectangle to protect the LVDS ribbon cable, I also placed black electrical tape around one edge to help protect the LVDS ribbon cable.
I've used M3x4MM flat head screws, the flat head is only 0.5mm in height, this screen with housing is extremely thin.
9a. Screw the LCD controller board and the keypad directly onto the 5MM high standoffs.
I used M3 nuts for the keypad and I used M3x13MM female to female standoffs for the LCD controller board.
9b. Closeup photo of the LCD controller board and the keypad screwed down into place.
10. Finally mount the protective cover.
Line up the back cover to the standoffs on the LCD controller board. Drill 4 holes for the cover screws to screw into the M3x13MM standoffs, then screw the cover onto the standoffs.
Please note:
You should mark and drill the cover holes before screwing down the LCD controller board, in my case I had to cut the cover in half and I completely forgot to line up and drill the cover holes first. Either way will do as long as the end results still looks great.
I finally placed the recycled external screen onto a foldable tablet stand, this way I can easily get my laptop, 6" right angled HDMI cable, and external screen into my laptop rucksack as the screen only weighs 593g.
Here is the end result.
This recycled external screen project has cost me about £58 in total as I already had screws and standoffs. I still have to sell the recycled keyboard with base which I'll advertise for £29 on eBay, also my friend Ian is buying my previous external screen from me for £35. So this upgraded external screen for my development laptop will end up costing me absolutely nothing, only about 90 minutes of time to put it all together...
My new thin recycled screen with a resolution of 1920x1080 full 1080p HD.
Enjoy...
Last edited: