A simpler example based on Tiled Map Editor is available: [XUI2D] Hello World 2 based on Tile Map
The purpose of this tutorial is to help you run your very first app based on XUI2D.
A great benefit of XUI2D being cross platform is that you can do most of the development in B4J. Developing directly on the desktop is simpler and faster.
Later you can create B4A and B4i projects and add references to the exact same modules.
Before we start, make sure to use the latest version of XUI2D: https://www.b4x.com/android/forum/threads/b4x-xui2d-box2d-game-engine.95208/#content
1. Create a new B4J UI project.
2. Add references to the following internal libraries: jBitmapCreator, jGameViewHelper (for the sounds), jXUI and XUI2D.
3. Add the five X2 class modules to the project. I'm always adding them as linked modules though it is possible that you will want to modify them in the future so it is fine to copy them to the project.
You will see an error in the logs about a missing game type.
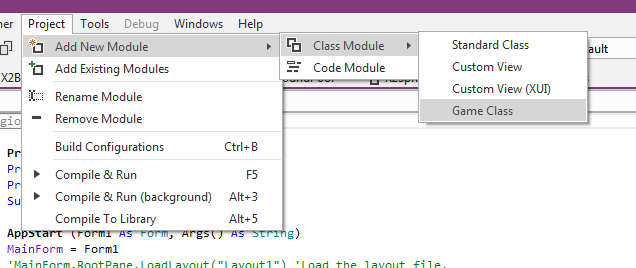
You should add a new class module named Game. Unlike the other X2 modules which are generic and ideally will not need to be modified, the Game class is specific to your game.
A template is included inside XUI2D library (not available in v0.91.0):
4. Create the layout.
It should include two ImageViews named ivBackground and ivForeground and a label named lblStats at the bottom (anchored to the BOTTOM and BOTH sides).
The ImageViews layout is set in the designer script:
The above code makes sure that the width to height ratio is always as defined in GameRatio variable.
Set the main form color to black.
Main module code to:
You can run the program now. You should see this:
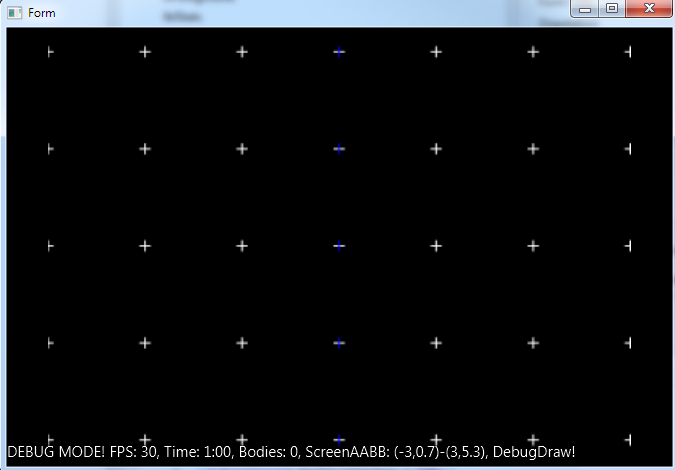
The small crosses are drawn because DebugDraw is enabled. They mark the world grid.
The next tutorial will cover the units used in XUI2D. It is very important to understand them. For now you should know that all the dimensions are measured in meters.
Unlike the pixels coordinates which start at the top of the screen and go downwards, the world coordinates start at the bottom and go upwards.
5. Lets add a few bodies.
This code creates a rectangle body and position it at the top of the screen:
Adding a new block approximately every 500ms:
6. Drawing the background:
The background is static so it is only needed to be drawn once when Game is initialized.
At this point it should look like this:
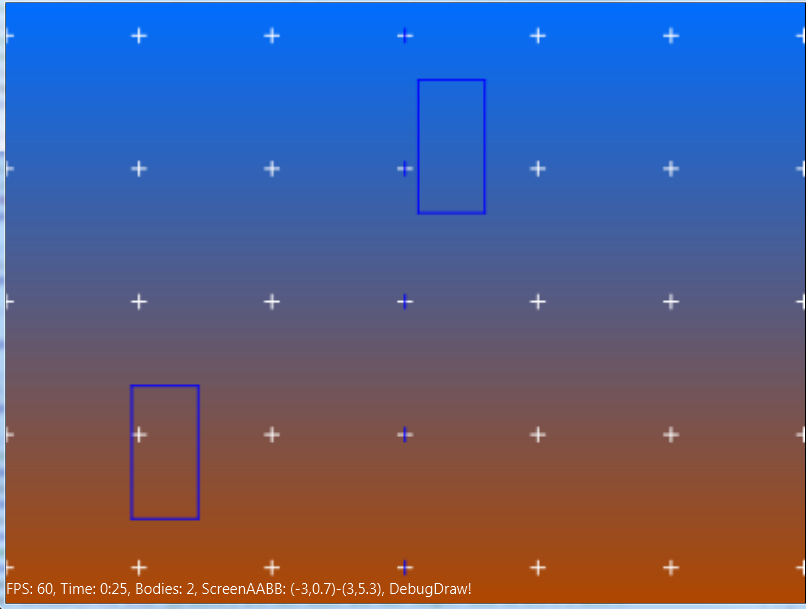
Notes:
- The blocks fall out of the screen.
- The blocks do not yet have real graphics. We can only see them because debug drawing is enabled.
To fix the first issue we need to add a ground body:
This sub should be called once. Note that we can use X2.ScreenAABB to get the screen coordinates.
7. The last step is to add graphics to the blocks. There are all kinds of ways to do it. In most cases the graphics will come from image files. The best way to kill the game performance is by frequently creating new graphics, especially with antialiasing enabled.
I will use a canvas here to draw a rectangle:
Note that I've also set the graphic name property:
The project is attached. I've also added a circle body based on an image file.

The purpose of this tutorial is to help you run your very first app based on XUI2D.
A great benefit of XUI2D being cross platform is that you can do most of the development in B4J. Developing directly on the desktop is simpler and faster.
Later you can create B4A and B4i projects and add references to the exact same modules.
Before we start, make sure to use the latest version of XUI2D: https://www.b4x.com/android/forum/threads/b4x-xui2d-box2d-game-engine.95208/#content
1. Create a new B4J UI project.
2. Add references to the following internal libraries: jBitmapCreator, jGameViewHelper (for the sounds), jXUI and XUI2D.
3. Add the five X2 class modules to the project. I'm always adding them as linked modules though it is possible that you will want to modify them in the future so it is fine to copy them to the project.
You will see an error in the logs about a missing game type.
You should add a new class module named Game. Unlike the other X2 modules which are generic and ideally will not need to be modified, the Game class is specific to your game.
A template is included inside XUI2D library (not available in v
4. Create the layout.
It should include two ImageViews named ivBackground and ivForeground and a label named lblStats at the bottom (anchored to the BOTTOM and BOTH sides).
The ImageViews layout is set in the designer script:
B4X:
GameRatio = 1.333 'width / height - change as needed

ScreenRatio = 100%x / 100%y
If ScreenRatio < GameRatio Then
 ivForeground.SetLeftAndRight(0, 100%x)
 ivForeground.Height = ivForeground.Width / GameRatio
 ivForeground.VerticalCenter = 50%y
Else
 ivForeground.SetTopAndBottom(0, 100%y)
 ivForeground.Width = ivForeground.Height * GameRatio
 ivForeground.HorizontalCenter = 50%x
End If
ivBackground.SetLeftAndRight(ivForeground.Left, ivForeground.Right)
ivBackground.SetTopAndBottom(ivForeground.Top, ivForeground.Bottom)Set the main form color to black.
Main module code to:
B4X:
#Region Project Attributes
   #MainFormWidth: 800
   #MainFormHeight: 600
#End Region

Sub Process_Globals
   Private fx As JFX
   Private MainForm As Form
   Private gm As Game
End Sub

Sub AppStart (Form1 As Form, Args() As String)
   MainForm = Form1
   MainForm.Show
   gm.Initialize(MainForm.RootPane)
   gm.X2.Start
End Sub

Sub MainForm_Resize (Width As Double, Height As Double)
   gm.Resize
End Sub
You can run the program now. You should see this:
The small crosses are drawn because DebugDraw is enabled. They mark the world grid.
The next tutorial will cover the units used in XUI2D. It is very important to understand them. For now you should know that all the dimensions are measured in meters.
Unlike the pixels coordinates which start at the top of the screen and go downwards, the world coordinates start at the bottom and go upwards.
5. Lets add a few bodies.
This code creates a rectangle body and position it at the top of the screen:
B4X:
Private Sub CreateBlock
   'create the body
   Dim bd As B2BodyDef
   bd.BodyType = bd.TYPE_DYNAMIC 'regular body
   Dim x As Float = X2.RndFloat(X2.ScreenAABB.BottomLeft.X, X2.ScreenAABB.TopRight.X)
   bd.Position = X2.CreateVec2(x, 5)
   Dim wrapper As X2BodyWrapper = X2.CreateBodyAndWrapper(bd, Null, "Block")
   'add fixture
   Dim rect As B2PolygonShape
   rect.Initialize
   rect.SetAsBox(0.25, 0.5) 'parameters are half width and half height. Size is 0.5 x 1 meters.
   wrapper.Body.CreateFixture2(rect, 1)
End Sub
Adding a new block approximately every 500ms:
B4X:
Public Sub Tick (GS As X2GameStep)
   If X2.RndFloat(0, 500) < X2.TimeStepMs Then CreateBlock
End Sub
6. Drawing the background:
B4X:
Private Sub CreateStaticBackground
   Dim bc As BitmapCreator
   bc.Initialize(ivBackground.Width / xui.Scale, ivBackground.Height / xui.Scale)
   bc.FillGradient(Array As Int(0xFF006EFF, 0xFFB04700), bc.TargetRect, "TOP_BOTTOM")
   ivBackground.SetBitmap(bc.Bitmap)
End SubAt this point it should look like this:
Notes:
- The blocks fall out of the screen.
- The blocks do not yet have real graphics. We can only see them because debug drawing is enabled.
To fix the first issue we need to add a ground body:
B4X:
Private Sub CreateGround
   Dim bd As B2BodyDef
   bd.BodyType = bd.TYPE_STATIC 'the engine should not move it
   Dim wrapper As X2BodyWrapper = X2.CreateBodyAndWrapper(bd, Null, "ground")
   Dim edge As B2EdgeShape
   edge.Initialize(X2.CreateVec2(-20, 1), X2.CreateVec2(20, 1))
   wrapper.Body.CreateFixture2(edge, 1)
End Sub7. The last step is to add graphics to the blocks. There are all kinds of ways to do it. In most cases the graphics will come from image files. The best way to kill the game performance is by frequently creating new graphics, especially with antialiasing enabled.
I will use a canvas here to draw a rectangle:
B4X:
'The canvas is returned from a cache of square canvases.
'It will be larger than the size requests.
Dim CvsMinSize As Int = X2.MetersToBCPixels(Max(BoxSize.X, BoxSize.Y))
'We need to divide the size by X2.BmpSmoothScale.
Dim Cvs As B4XCanvas = X2.GraphicCache.GetCanvas(CvsMinSize / X2.BmpSmoothScale)
Dim r As B4XRect
r.Initialize(0, 0, X2.MetersToBCPixels(BoxSize.X) + 1, X2.MetersToBCPixels(BoxSize.Y) + 1)
Cvs.ClearRect(r)
Cvs.DrawRect(r, 0xFF2100AB, True, 0)
'Create a scaled bitmap type. This holds the bitmap and its scale (1 in this case)
Dim sb As X2ScaledBitmap
sb.Bmp = Cvs.CreateBitmap.Crop(0, 0, r.Right, r.Bottom)
sb.Scale = 1
'last step is to add the scaled bitmap to the cache.
X2.GraphicCache.PutGraphic("block", Array(sb))
B4X:
wrapper.GraphicName = "Block"The project is attached. I've also added a circle body based on an image file.
Attachments
Last edited: