BitmapCreator (BC) continues to evolve. Version 4.5 update is a large update with several new drawing features.
Background
At its core BC holds an array of bytes that represent an image.
It can quickly extract the raw data from existing bitmaps and it can quickly generate bitmaps from this data.
BC is mostly written in B4X and it is cross platform. It depends on XUI library.
We can directly access the raw data and modify it. As we work with the raw data directly we can do things that are not possible to do with Canvas. You can see all kinds of examples in BitmapCreatorEffects class.
BC is the graphic engine behind XUI2D game framework. There are all kinds of features in BC that were added specifically for the 2d games use case. They will not be discussed here.
BitmapCreator can be used in many other cases. It can be used as an alternative to Canvas / B4XCanvas and they can be both used together.
Simple example
New drawing methods
The following drawing methods were added in v4.5: DrawLine, DrawCircle, DrawRect, DrawRectRounded and DrawPath.
With the exception of DrawLine, the shapes can be either filled or not filled. All methods include a StrokeWidth parameter that affects the contour width of non-filled drawings.
All drawings are antialiased. This is very important and was challenging to implement efficiently.
The drawings are optimized and are quite fast.
There are three variants for each method:
Drawings are done with brushes (BCBrush). There are three ways to create brushes:
BC.CreateBrushFromColor
BC.CreateBrushFromBitmap
BC.CreateBrushFromBitmapCreator
DrawCircle creates the brush for you and calls DrawCircle2:
Example with one brush created from a bitmap and another one from a BC:
Brushes can and should be reused. If you are making many drawings with the same color then create the brush yourself and use it instead of implicitly creating a new brush each call.
The third 'async' method is used for making drawings with a background thread. It will be discussed in a different tutorial.
Brushes
There are several configurable settings.
You can change the offset. For example:
Brush.SrcOffsetX / SrcOffsetY define the brush zero position.
We can easily make nice animations by modifying the offsets (animation looks better than in this gif):

Code:
There are two additional parameters that we can change:
BCBrush.BlendBorders (default = true) - Whether the antialiased borders should be blend with the background.
BCBrush.BlendAll (default = false) - Whether the interior drawings should be blend with the background.
This is relevant when the brush is not fully opaque. For example the above code with:
Two notes:
- BlendAll = False (the default) is significantly faster.
- If you want to draw with a semi-transparent color brush then you need to do two things:
Paths
There are three types of paths so it can be confusing: Path (native Canvas), B4XPath (B4XCanvas) and BCPath. As you can guess BitmapCreator works with BCPath.
A path defines a list of points.
You can either draw lines between these points or fill the polygon shape.
The shape is closed automatically if needed.
This time the shape is not closed automatically:
It is not obvious in the above image but by default the connection segments between each two lines are also drawn. It can be disabled with:
You can access the points list directly and remove or add points from another path. You should however call Path.Invalidate after those changes.
To dip or not to dip
Both options are possible. Both options will work in all three platforms though they only make a difference in B4A.
In the above examples the BC size is the same as the activity size or the ImageView size. This means that the BC scale is the same as the device scale and we need to use 'dip' units.
I actually recommend to create normalized BCs as the default and to avoid using 'dip' units. In most cases it will look good enough, the memory footprint will be smaller and performance will be better.
Two things should be done to work with normalized BCs:
1.
2. Don't use 'dip' or %x / %y
If you get compiler warnings about missing 'dip' units then you can disable them in the current module with:
Background
At its core BC holds an array of bytes that represent an image.
It can quickly extract the raw data from existing bitmaps and it can quickly generate bitmaps from this data.
BC is mostly written in B4X and it is cross platform. It depends on XUI library.
We can directly access the raw data and modify it. As we work with the raw data directly we can do things that are not possible to do with Canvas. You can see all kinds of examples in BitmapCreatorEffects class.
BC is the graphic engine behind XUI2D game framework. There are all kinds of features in BC that were added specifically for the 2d games use case. They will not be discussed here.
BitmapCreator can be used in many other cases. It can be used as an alternative to Canvas / B4XCanvas and they can be both used together.
Simple example
B4X:
'Depends on XUI / iXUI / jXUI and BitmapCreator / iBitmapCreator / jBitmapCreator libraries
'Similar code will work in all three platforms.
Sub Process_Globals
   Private xui As XUI
End Sub

Sub Activity_Create(FirstTime As Boolean)
   Dim bc As BitmapCreator
   bc.Initialize(100%x, 100%y)
   bc.DrawCircle(100dip, 100dip, 50dip, xui.Color_Red, True, 10dip)
   bc.DrawLine(0, 0, bc.mWidth, bc.mHeight, 0xff0000ff, 5dip)
   Activity.SetBackgroundImage(bc.Bitmap)
   'we can continue to use 'bc'
End Sub
New drawing methods
The following drawing methods were added in v4.5: DrawLine, DrawCircle, DrawRect, DrawRectRounded and DrawPath.
With the exception of DrawLine, the shapes can be either filled or not filled. All methods include a StrokeWidth parameter that affects the contour width of non-filled drawings.
All drawings are antialiased. This is very important and was challenging to implement efficiently.
The drawings are optimized and are quite fast.
There are three variants for each method:
B4X:
DrawCircle (X As Float, Y As Float, Radius As Float, Color As Int, Filled As Boolean, StrokeWidth As Int)
DrawCircle2 (X As Float, Y As Float, Radius As Float, Brush As BCBrush, Filled As Boolean, StrokeWidth As Int)
AsyncDrawCircle (X As Float, Y As Float, Radius As Float, Brush As BCBrush, Filled As Boolean, StrokeWidth As Int) As DrawTask
Drawings are done with brushes (BCBrush). There are three ways to create brushes:
BC.CreateBrushFromColor
BC.CreateBrushFromBitmap
BC.CreateBrushFromBitmapCreator
DrawCircle creates the brush for you and calls DrawCircle2:
B4X:
Public Sub DrawCircle (X As Float, Y As Float, Radius As Float, Color As Int, Filled As Boolean, StrokeWidth As Int) As BCBrush
Return DrawCircle2(X, Y, Radius, CreateBrushFromColor(Color), Filled, StrokeWidth)
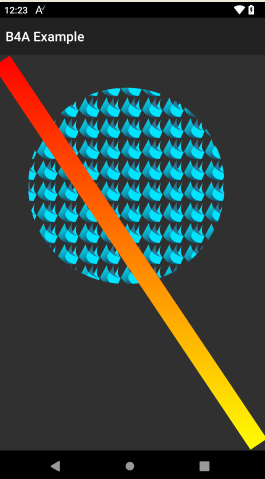
End SubExample with one brush created from a bitmap and another one from a BC:
B4X:
Sub Activity_Create(FirstTime As Boolean)
   Dim bc As BitmapCreator
   bc.Initialize(100%x, 100%y)
   Dim bmp As B4XBitmap = xui.LoadBitmapResize(File.DirAssets, "logo.png", 32dip, 32dip, True)
   Dim brush As BCBrush = bc.CreateBrushFromBitmap(bmp)
   bc.DrawCircle2(200dip, 200dip, 150dip, brush, True, 10dip)

   Dim bc2 As BitmapCreator
   bc2.Initialize(20dip, bc.mHeight)
   bc2.FillGradient(Array As Int(xui.Color_Red, xui.Color_Yellow), bc2.TargetRect, "TOP_BOTTOM")
   bc.DrawLine2(10dip, 10dip, bc.mWidth - 10dip, bc.mHeight - 10dip, bc.CreateBrushFromBitmapCreator(bc2), 30dip)
   Activity.SetBackgroundImage(bc.Bitmap)
End Sub
Brushes can and should be reused. If you are making many drawings with the same color then create the brush yourself and use it instead of implicitly creating a new brush each call.
The third 'async' method is used for making drawings with a background thread. It will be discussed in a different tutorial.
Brushes
There are several configurable settings.
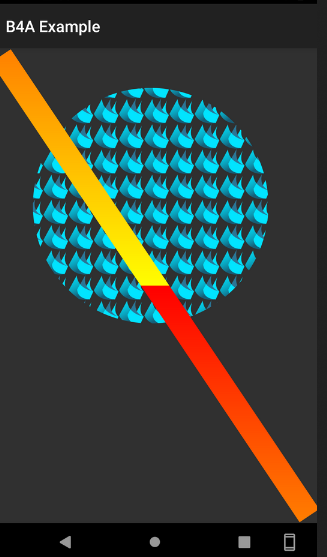
You can change the offset. For example:
B4X:
Dim Brush2 As BCBrush = bc.CreateBrushFromBitmapCreator(bc2)
Brush2.SrcOffsetY = bc.TargetRect.CenterY
bc.DrawLine2(10dip, 10dip, bc.mWidth - 10dip, bc.mHeight - 10dip, Brush2 , 30dip)
Brush.SrcOffsetX / SrcOffsetY define the brush zero position.
We can easily make nice animations by modifying the offsets (animation looks better than in this gif):
Code:
B4X:
Sub Process_Globals
   Private xui As XUI
End Sub

Sub Globals
   Private ImageView1 As B4XView 'using ImageView this time to make it cross platform.
End Sub

Sub Activity_Create(FirstTime As Boolean)
   Activity.LoadLayout("1")
   Dim bc As BitmapCreator
   bc.Initialize(ImageView1.Width, ImageView1.Height)
   Dim bmp As B4XBitmap = xui.LoadBitmapResize(File.DirAssets, "logo.png", 32dip, 32dip, True)
   Dim brush As BCBrush = bc.CreateBrushFromBitmap(bmp)
   Dim bc2 As BitmapCreator
   bc2.Initialize(20dip, bc.mHeight)
   bc2.FillGradient(Array As Int(xui.Color_Red, xui.Color_Yellow), bc2.TargetRect, "TOP_BOTTOM")
   Dim Brush2 As BCBrush = bc.CreateBrushFromBitmapCreator(bc2)
   Do While True
       brush.SrcOffsetX = brush.SrcOffsetX + 1dip
       brush.SrcOffsetY = brush.SrcOffsetY + 1dip
       Brush2.SrcOffsetY = Brush2.SrcOffsetY + 1dip
       bc.DrawRect(bc.TargetRect, xui.Color_Transparent, True, 0)
       bc.DrawLine2(10dip, 10dip, bc.mWidth - 10dip, bc.mHeight - 10dip, Brush2 , 30dip)
       bc.DrawCircle2(200dip, 200dip, 150dip, brush, True, 10dip)
       bc.SetBitmapToImageView(bc.Bitmap, ImageView1) '<---- this is the best way to set a BC Bitmap to an ImageView. It sets the Gravity to FILL (unlike B4XView.SetBitmap).
       Sleep(15)
   Loop
End Sub
There are two additional parameters that we can change:
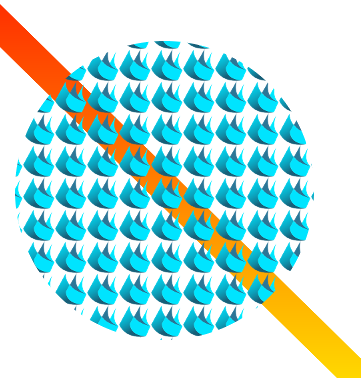
BCBrush.BlendBorders (default = true) - Whether the antialiased borders should be blend with the background.
BCBrush.BlendAll (default = false) - Whether the interior drawings should be blend with the background.
This is relevant when the brush is not fully opaque. For example the above code with:
B4X:
brush.BlendAll = TrueTwo notes:
- BlendAll = False (the default) is significantly faster.
- If you want to draw with a semi-transparent color brush then you need to do two things:
B4X:
BCBrush.IsSolidColor = False 'IsSolidColor is used internally for optimizations.
BCBrush.BlendAll = True
Paths
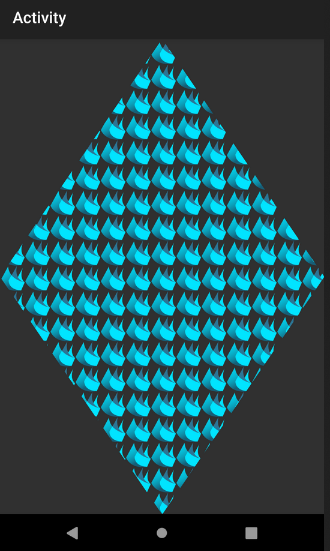
There are three types of paths so it can be confusing: Path (native Canvas), B4XPath (B4XCanvas) and BCPath. As you can guess BitmapCreator works with BCPath.
A path defines a list of points.
You can either draw lines between these points or fill the polygon shape.
The shape is closed automatically if needed.
B4X:
Dim Rhombus As BCPath
Rhombus.Initialize(0, bc.mHeight / 2).LineTo(bc.mWidth / 2, 0)
Rhombus.LineTo(bc.mWidth, bc.mHeight / 2).LineTo(bc.mWidth / 2, bc.mHeight)
bc.DrawPath2(Rhombus, brush, True, 0)
B4X:
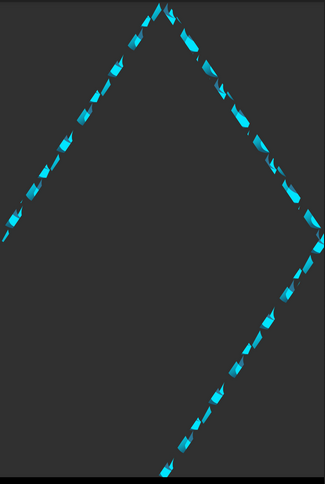
bc.DrawPath2(Rhombus, brush, False, 10dip)It is not obvious in the above image but by default the connection segments between each two lines are also drawn. It can be disabled with:
B4X:
Path.DrawConnectionSegments = FalseYou can access the points list directly and remove or add points from another path. You should however call Path.Invalidate after those changes.
To dip or not to dip
Both options are possible. Both options will work in all three platforms though they only make a difference in B4A.
In the above examples the BC size is the same as the activity size or the ImageView size. This means that the BC scale is the same as the device scale and we need to use 'dip' units.
I actually recommend to create normalized BCs as the default and to avoid using 'dip' units. In most cases it will look good enough, the memory footprint will be smaller and performance will be better.
Two things should be done to work with normalized BCs:
1.
B4X:
'divide the width and height with xui.scale:
bc.Initialize(ImageView1.Width / xui.Scale, ImageView1.Height / xui.Scale)
B4X:
Sub Activity_Create(FirstTime As Boolean)
   Activity.LoadLayout("1")
   Dim bc As BitmapCreator
   bc.Initialize(ImageView1.Width / xui.Scale, ImageView1.Height / xui.Scale)
   Dim bmp As B4XBitmap = xui.LoadBitmapResize(File.DirAssets, "logo.png", 32, 32, True)
   Dim brush As BCBrush = bc.CreateBrushFromBitmap(bmp)
   bc.DrawCircle2(200, 200, 150, brush, True, 10)

   Dim bc2 As BitmapCreator
   bc2.Initialize(20, bc.mHeight)
   bc2.FillGradient(Array As Int(xui.Color_Red, xui.Color_Yellow), bc2.TargetRect, "TOP_BOTTOM")
   bc.DrawLine2(10, 10, bc.mWidth - 10, bc.mHeight - 10, bc.CreateBrushFromBitmapCreator(bc2), 30)
   bc.SetBitmapToImageView(bc.Bitmap, ImageView1)
End Sub
If you get compiler warnings about missing 'dip' units then you can disable them in the current module with:
B4X:
#IgnoreWarnings: 6
Last edited: