For new projects it is recommended to use the more recent API (v3): http://www.b4x.com/forum/basic4andr...ls/29997-android-app-billing-v3-tutorial.html
Android market provides an in-app billing service which you can use to accept payments from your own application.
The code required to use this service is quite simple. However the actual process that is done in the background is pretty complicated. To better understand it you should read the official documentation: In-app Billing | Android Developers
This tutorial will cover the main concepts and the steps required to integrate in-app billing in your Basic4android project.
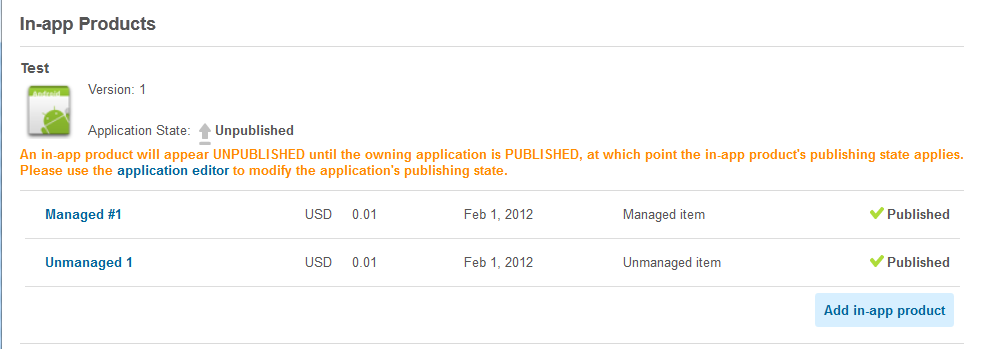
The billing service allows the user to purchase "products". Products are declared in the Android market developer console.
There are two types of products: managed and unmanaged products.
Differences between managed and unmanaged products:
- The user can only purchase a managed products once.
- You can later restore all the managed transactions.
For example, access to premium features should be a managed product.
Coins, potions and other "temporary" assets should be unmanaged products.
Developer console:

Basic4android code
The InAppBilling library includes one type of object which is BillingManager.
The BillingManager should belong to a Service module.
Typical code should look like:
PublicKey is your developer public key as appears in the developer console under Edit Profile.
This string should be set in Process_Globals sub to allow it to be obfuscated.
The BillingManager is initialized in Service_Create. BillingManager processes the intents that are sent to the service (through the internal receiver).
BillingManager provides two events:
BillingSupported - This event is raised after initializing the manager. The parameter will tell you whether billing is supported. Note that the emulator doesn't support billing.
PurchaseStateChange - This event is raised when a product is purchased, refunded or cancelled.
PurchaseState will be one of the following values: PURCHASE_STATE_PURCHASED, PURCHASE_STATE_CANCELED, PURCHASE_STATE_REFUNDED or PURCHASE_STATE_NODATA.
ExtraData is an arbitrary string that you can send together with the purchase request.
When the service is destroyed you should call UnbindMarketService to free resources.
Activity code
When the activity is created we start the service if necessary.
The following code sends a purchase request to the market for a product:
RestoreTransactions
Managed products are tracked by the market. It is possible to retrieve previous purchases of such products.
For example if the user has uninstalled the application and now installs it again, you can call RestoreTransactions to retrieve the previous products.
According to Google documentation you should not call RestoreTransactions each time your application starts.
When you call RestoreTransactions the PurchaseStateChange event will be raised for each purchase. If there are no previous transaction then PurchaseStateChange will be raised and PurchaseState parameter value will be PURCHASE_STATE_NODATA.
Manifest editor
The following code should be added to the manifest editor code (change InAppBillingService to your service name):
Testing your application
It is not so simple to test the payment process. A device set to the same account as the merchant account cannot be used, as you are not allowed to purchase from yourself.
From my experience this is the easiest way to test your application:
- Upload a draft application to the market. You do not need to publish it.
- Set some low cost ($0.01) products.
- Use a device with an account other than the merchant account.
- Add this account as a test account. This is done under Edit Profile page.
The account must be a gmail.com account.
You will now be able to develop and debug with this device. If you like you can also cancel the orders from the merchant console.
You may need to first publish the application and then unpublish it.
The application must be signed with the same signature and have the same version number as the uploaded one.
Tips
- Track the logs.
- When you cancel an order the purchase state will be PURCHASE_STATE_CANCEL. When you partially refund it the state will be PURCHASE_STATE_REFUND.
The library is available here: http://www.b4x.com/forum/additional...oid-market-app-billing-service.html#post82746
Android market provides an in-app billing service which you can use to accept payments from your own application.
The code required to use this service is quite simple. However the actual process that is done in the background is pretty complicated. To better understand it you should read the official documentation: In-app Billing | Android Developers
This tutorial will cover the main concepts and the steps required to integrate in-app billing in your Basic4android project.
The billing service allows the user to purchase "products". Products are declared in the Android market developer console.
There are two types of products: managed and unmanaged products.
Differences between managed and unmanaged products:
- The user can only purchase a managed products once.
- You can later restore all the managed transactions.
For example, access to premium features should be a managed product.
Coins, potions and other "temporary" assets should be unmanaged products.
Developer console:
Basic4android code
The InAppBilling library includes one type of object which is BillingManager.
The BillingManager should belong to a Service module.
Typical code should look like:
B4X:
'Service module
Sub Process_Globals
   Dim Manager As BillingManager
   Dim PublicKey As String
   PublicKey = "xxxx" 'From the developer console
End Sub

Sub Service_Create
   Manager.Initialize("manager", PublicKey)
End Sub

Sub Service_Start (StartingIntent As Intent)
   Manager.HandleIntent(StartingIntent)
End Sub

Sub Manager_BillingSupported (Supported As Boolean)
   Log("BillingSupported: " & Supported)
End Sub

Sub Manager_PurchaseStateChange (PurchaseState As Int, ProductIdAs String, OrderId As String, PurchaseTime As Long, ExtraData As String)
   Log("PurchaseStateChange: " & PurchaseState & ", " & ProductId& ", " & OrderId & ", " & DateTime.Time(PurchaseTime) & ", " & ExtraData)
   If PurchaseState = Manager.PURCHASE_STATE_PURCHASED Then
      'Here you should store the purchase information
      'and then notify the activity about the purchase.
      'In most cases the activity will be running at this state. However it is possible that it will be paused.
      'In that case the following call will be ignored.
      CallSub2(Main, "ThankYouForPurchasing", ProductId)
   End If
End Sub

Sub Service_Destroy
   Manager.UnbindMarketService
End SubThis string should be set in Process_Globals sub to allow it to be obfuscated.
The BillingManager is initialized in Service_Create. BillingManager processes the intents that are sent to the service (through the internal receiver).
BillingManager provides two events:
BillingSupported - This event is raised after initializing the manager. The parameter will tell you whether billing is supported. Note that the emulator doesn't support billing.
PurchaseStateChange - This event is raised when a product is purchased, refunded or cancelled.
PurchaseState will be one of the following values: PURCHASE_STATE_PURCHASED, PURCHASE_STATE_CANCELED, PURCHASE_STATE_REFUNDED or PURCHASE_STATE_NODATA.
ExtraData is an arbitrary string that you can send together with the purchase request.
When the service is destroyed you should call UnbindMarketService to free resources.
Activity code
B4X:
Sub Activity_Create(FirstTime As Boolean)
   If IsPaused(InAppBillingService) Then StartService(InAppBillingService)
   Activity.LoadLayout("1")
End Sub

Sub Button1_Click
   InAppBillingService.Manager.RequestPayment(Activity, "unmanaged_1", "extra data")
End Sub

Sub ThankYouForPurchasing (Product As String)
   Msgbox("Thank you for purchasing: " & Product, "")
End Sub
When the activity is created we start the service if necessary.
The following code sends a purchase request to the market for a product:
B4X:
'InAppBillingService is the name of the Service.
InAppBillingService.Manager.RequestPayment(Activity, "unmanaged_1", "extra data")
RestoreTransactions
Managed products are tracked by the market. It is possible to retrieve previous purchases of such products.
For example if the user has uninstalled the application and now installs it again, you can call RestoreTransactions to retrieve the previous products.
According to Google documentation you should not call RestoreTransactions each time your application starts.
When you call RestoreTransactions the PurchaseStateChange event will be raised for each purchase. If there are no previous transaction then PurchaseStateChange will be raised and PurchaseState parameter value will be PURCHASE_STATE_NODATA.
Manifest editor
The following code should be added to the manifest editor code (change InAppBillingService to your service name):
B4X:
'InAppBilling declarations - Start
AddReceiverText(InAppBillingService,  <intent-filter>
                <action android:name="com.android.vending.billing.IN_APP_NOTIFY" />
                <action android:name="com.android.vending.billing.RESPONSE_CODE" />
                <action android:name="com.android.vending.billing.PURCHASE_STATE_CHANGED" />
            </intent-filter>)
'InAppBilling declarations - End
Testing your application
It is not so simple to test the payment process. A device set to the same account as the merchant account cannot be used, as you are not allowed to purchase from yourself.
From my experience this is the easiest way to test your application:
- Upload a draft application to the market. You do not need to publish it.
- Set some low cost ($0.01) products.
- Use a device with an account other than the merchant account.
- Add this account as a test account. This is done under Edit Profile page.
The account must be a gmail.com account.
You will now be able to develop and debug with this device. If you like you can also cancel the orders from the merchant console.
You may need to first publish the application and then unpublish it.
The application must be signed with the same signature and have the same version number as the uploaded one.
Tips
- Track the logs.
- When you cancel an order the purchase state will be PURCHASE_STATE_CANCEL. When you partially refund it the state will be PURCHASE_STATE_REFUND.
The library is available here: http://www.b4x.com/forum/additional...oid-market-app-billing-service.html#post82746