Hi there
NB: B4xTemplate & Example Project Attached
This example is a showcase of using the VFlexDialog with MySQL as a back-end using PHP.
By the end of this tutorial, you should have been able to
1. You created a new BVAD3 CRUD Project that will use MySQL + PHP, using a b4xtemplate named BVAD3 VFlexMySQL PHP.
2. You created a page for a table named projects using an existing template named BVAD3 CRUD Page. This involved creating a class module based on an existing template. You named this page ViewProjects
3. You copied the layCRUD template to a layProjects and renamed all the elements inside it from contCRUD to contProjects etc.
4. You have installed a development webserver (if you did not have one running) of your choice.
5. In the Main Module, you have changed the variable AppName to be assigned the name of your app (DO NOT USE SPACES)
6. In the Main Module, you have updated the Publish variable to be assigned the folder path where your app will be published to on your PC. The contents of this folder are what you will FTP to your public webserver.
7. You have updated the config.properties file to point to where your app will be running from.
8. You have updated the mysqlconfig.php file to link your MySQL backend to the app.
9. You have also created the back-end MySQL database that you will use with the tables you need.
10. We started the VFlexDialog builder and created a new page, a new form and 2 text fields.
11. We updated the properties of the form so that it works with the projects table.
12. We also updated the properties of both our text fields to be linked to the id and name fields of our table.
13. We did a preview of how our UI looks like, how our HTML will look like and how our b4x code is.
14. We downloaded the generated b4x source code so that we can copy it to our project.
15. After downloading the VFlexBuilder generated source code for your page, you added parts of the code to pgIndex.AddPages, this had an effect of adding the page for the build up process of the app.
16. You also added a script to save the data-model for the projects table to the memory of the app. Part of this code has an effect of creating the database table if it does not exist.
17. You also added a link to the page on the navigation drawer of the app.
18. You replaced all the source code in the ViewProjects page in your B4J project with what was generated by the VFlexDialog builder.
19. You ran your app, added, updated, deleted some projects.
20. You discovered that a bug where the id column is marked as "Hidden-Table" was showing on the data-table. This bug was set on purpose for you to fix.
21. You fixed the "All Columns Visible" property of the tblProjects component by setting it to off.
22. You also verified the code that controls the name field visibility on the data-table.
23. Possibly you played with Hide Details to explore what it does on the "error" messages being shown under the field.
24. You are happy with the progress made and are ready to publish your app to your server.
Lets begin!

In the attached source code, there are templates, this is how you will use them to create your app.
Preparing the IDE
1. Close B4J and copy the attached b4xtemplate to your Additional Libraries folder
2. If you have not used BVAD3 before, copy these additional resources and unzip them to your Additional Libraries. Also download, unzip and run the BVAD3 library from here. You will need the BANano library for this to work.
Creating a Database Driven Web App
1. Open B4J, click File > New then

2. Type in your project name and click Ok.

Adding a Page for projects (this should be done for each table you need to be in the WebApp)
1. Click on Project > Add New Module > Class Module > BVAD3 CRUD Page

2. Type in the name of the View, name it ViewProjects and click Ok. Another page for another table can be ViewResources, ViewRisks, ViewTasks etc.

Creating the layouts (this should be done for each DB table you want to be in the webapp)
1. We have a template called layCRUD. This is the basis for everything crud you will do. It comes with a data-source, a vue table, a msgbox and a message box elements.

2. Lets use the example provided, for creating a CRUD example using a DB table called "projects". Open the layCRUD layout.

3. On the layout, click File > Save As

4. We will use the table name as a suffix for everything. Type in layprojects as a layout name and click Ok. For another table it can be layresources, layrisks, laychallenges etc.

5. In layprojects, rename the elements to be suffixed by the word projects. So contCRUD>contProjects, dsCRUD>dsProjects etc.

contProjects - this is the housing container for everything on the page. This container is compulsory for each page. By renaming it contProjects you are making it unique across the app.
dsProjects - this is the Database Abstract Layer. Its a simple tool for you not to worry about writing SQL statements and yes, you can feed it custom SQL statements too. You rename is dsProjects to make it unique.
rowProjects - this is the row inside the container.
colProjects - this is the 12 spaces column inside the row
tblProjects - this is the data-table to list the records in the database table. The following important properties are set [Manual=True, Button Size=Small, Button Elevation=0]. The Manual property is compulsory because the data-table structure, that is columns etc will be build by the vflexdialog.
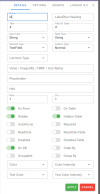
dlgProjects - this is the vflexdialog that is the glue for our page. The code to create it is generated by the VFlexDialog builder. More details on how that is done are here.
confirmProjects - this is the dialog to confirm "delete" actions.
Save the layout.
What have you accomplished so far?
1. You created a new BVAD3 CRUD Project that will use MySQL + PHP, using a b4xtemplate named BVAD3 VFlexMySQL PHP.
2. You created a page for a table named projects using an existing template named BVAD3 CRUD Page. This involved creating a class module based on an existing template. You named this page ViewProjects
3. You copied the layCRUD template to a layProjects and renamed all the elements inside it from contCRUD to contProjects etc.
NB: B4xTemplate & Example Project Attached
This example is a showcase of using the VFlexDialog with MySQL as a back-end using PHP.
By the end of this tutorial, you should have been able to
1. You created a new BVAD3 CRUD Project that will use MySQL + PHP, using a b4xtemplate named BVAD3 VFlexMySQL PHP.
2. You created a page for a table named projects using an existing template named BVAD3 CRUD Page. This involved creating a class module based on an existing template. You named this page ViewProjects
3. You copied the layCRUD template to a layProjects and renamed all the elements inside it from contCRUD to contProjects etc.
4. You have installed a development webserver (if you did not have one running) of your choice.
5. In the Main Module, you have changed the variable AppName to be assigned the name of your app (DO NOT USE SPACES)
6. In the Main Module, you have updated the Publish variable to be assigned the folder path where your app will be published to on your PC. The contents of this folder are what you will FTP to your public webserver.
7. You have updated the config.properties file to point to where your app will be running from.
8. You have updated the mysqlconfig.php file to link your MySQL backend to the app.
9. You have also created the back-end MySQL database that you will use with the tables you need.
10. We started the VFlexDialog builder and created a new page, a new form and 2 text fields.
11. We updated the properties of the form so that it works with the projects table.
12. We also updated the properties of both our text fields to be linked to the id and name fields of our table.
13. We did a preview of how our UI looks like, how our HTML will look like and how our b4x code is.
14. We downloaded the generated b4x source code so that we can copy it to our project.
15. After downloading the VFlexBuilder generated source code for your page, you added parts of the code to pgIndex.AddPages, this had an effect of adding the page for the build up process of the app.
16. You also added a script to save the data-model for the projects table to the memory of the app. Part of this code has an effect of creating the database table if it does not exist.
17. You also added a link to the page on the navigation drawer of the app.
18. You replaced all the source code in the ViewProjects page in your B4J project with what was generated by the VFlexDialog builder.
19. You ran your app, added, updated, deleted some projects.
20. You discovered that a bug where the id column is marked as "Hidden-Table" was showing on the data-table. This bug was set on purpose for you to fix.
21. You fixed the "All Columns Visible" property of the tblProjects component by setting it to off.
22. You also verified the code that controls the name field visibility on the data-table.
23. Possibly you played with Hide Details to explore what it does on the "error" messages being shown under the field.
24. You are happy with the progress made and are ready to publish your app to your server.
Lets begin!
In the attached source code, there are templates, this is how you will use them to create your app.
Preparing the IDE
1. Close B4J and copy the attached b4xtemplate to your Additional Libraries folder
2. If you have not used BVAD3 before, copy these additional resources and unzip them to your Additional Libraries. Also download, unzip and run the BVAD3 library from here. You will need the BANano library for this to work.
Creating a Database Driven Web App
1. Open B4J, click File > New then
2. Type in your project name and click Ok.
Adding a Page for projects (this should be done for each table you need to be in the WebApp)
1. Click on Project > Add New Module > Class Module > BVAD3 CRUD Page
2. Type in the name of the View, name it ViewProjects and click Ok. Another page for another table can be ViewResources, ViewRisks, ViewTasks etc.
Creating the layouts (this should be done for each DB table you want to be in the webapp)
1. We have a template called layCRUD. This is the basis for everything crud you will do. It comes with a data-source, a vue table, a msgbox and a message box elements.
2. Lets use the example provided, for creating a CRUD example using a DB table called "projects". Open the layCRUD layout.
3. On the layout, click File > Save As
4. We will use the table name as a suffix for everything. Type in layprojects as a layout name and click Ok. For another table it can be layresources, layrisks, laychallenges etc.
5. In layprojects, rename the elements to be suffixed by the word projects. So contCRUD>contProjects, dsCRUD>dsProjects etc.
contProjects - this is the housing container for everything on the page. This container is compulsory for each page. By renaming it contProjects you are making it unique across the app.
dsProjects - this is the Database Abstract Layer. Its a simple tool for you not to worry about writing SQL statements and yes, you can feed it custom SQL statements too. You rename is dsProjects to make it unique.
rowProjects - this is the row inside the container.
colProjects - this is the 12 spaces column inside the row
tblProjects - this is the data-table to list the records in the database table. The following important properties are set [Manual=True, Button Size=Small, Button Elevation=0]. The Manual property is compulsory because the data-table structure, that is columns etc will be build by the vflexdialog.
dlgProjects - this is the vflexdialog that is the glue for our page. The code to create it is generated by the VFlexDialog builder. More details on how that is done are here.
confirmProjects - this is the dialog to confirm "delete" actions.
Save the layout.
What have you accomplished so far?
1. You created a new BVAD3 CRUD Project that will use MySQL + PHP, using a b4xtemplate named BVAD3 VFlexMySQL PHP.
2. You created a page for a table named projects using an existing template named BVAD3 CRUD Page. This involved creating a class module based on an existing template. You named this page ViewProjects
3. You copied the layCRUD template to a layProjects and renamed all the elements inside it from contCRUD to contProjects etc.
Attachments
Last edited: