This tutorial is made for Linux JDK14 set Java + JavaFX for B4J practically, AI suggestions were partially OK only.
The .jar app file is compiled at Windows developer host.
Very important part is the starting line of the GUI app under Linux, here the correct starting line after the DEB-package is already installed:
----------BONUS:------------
If to modify steps 3, 4, 6, 7 - it's possible to use default Java (downloading during .deb installation) with only distributed needed for you JavaFX.
3. Use as lib only javafx folder
4. Use "Depends: default-jre"
6-7. Use short simpler starting line with just "java" and path to the javafx:
The .jar app file is compiled at Windows developer host.
Building a DEB package for a Java application using JavaFX requires creating a directory structure and writing several configuration files. Here is a detailed algorithm on how to do this for an application named "myb4japp".
▎Step 1: Install the required tools
Make sure you have the required tools installed to build DEB packages:
sudo apt update
sudo apt install build-essential devscripts debhelper
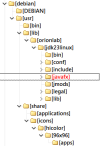
▎Step 2: Create the directory structure
Create the required directory structure for your DEB package:
mkdir -p ~/dev/myb4japp/debian/usr/bin
mkdir -p ~/dev/myb4japp/debian/DEBIAN
▎Step 3: Copy the files
Copy your JAR file and Java libraries to the appropriate directories:
cp ~/dev/myb4japp/myb4japp.jar ~/dev/myb4japp/debian/usr/bin/
cp -r ~/dev/myb4japp/jdk14/* ~/dev/myb4japp/debian/usr/lib/myb4japp/jdk14/
▎Step 4: Create a control file
Create a control file in the DEBIAN directory:
nano ~/dev/myb4japp/debian/DEBIAN/control
Paste the following information into it:
Package: myb4japp
Version: 0.994
Section: education
Priority: optional
Architecture: all
Name=My GUI Linux app
Comment=My First B4J Linux app
Name[gr]=My GUI Linux app on Greek
Comment[gr]=My First B4J Linux app on Greek
Depends: default-jre, openjfx
Maintainer: My Name <my[email protected]>
Description: myb4japp Application
A simple Java application using JavaFX.
------
* Depends: remove if no dependencies like for B4J with built-in Java + JavaFX files.
* Note the first space " " in the latest line: " A simple Java application using JavaFX."
▎Step 5: Create a postinstall file (optional)
If you need to perform some actions after installing the package (for example, add access rights), create a postinst file:
nano ~/dev/myb4japp/debian/DEBIAN/postinst
Paste the following content into it:
#!/bin/bash
set -e
# Example of adding execution rights
chmod +x /usr/bin/myb4japp.jar
exit 0
Don't forget to make the file executable:
chmod +x ~/dev/myb4japp/debian/DEBIAN/postinst
▎Step 6: Create a startup script
Create a script to start your application:
nano ~/dev/myb4japp/debian/usr/bin/myb4japp
Paste the following content into it ("jdk14" is your Java build + Javafx inside):
#!/bin/bash
export JAVA_HOME="$APPDIR/usr/lib/myb4japp/jdk14/"
export PATH="$JAVA_HOME/bin:$PATH"
export APP_DIR="$APPDIR/usr/lib/myb4japp" # Assuming your app-specific libraries are here
/usr/lib/myb4japp/jdk14/bin/java -jar --module-path /usr/lib/myb4japp/jdk14/javafx/lib --add-modules ALL-MODULE-PATH -Djdk.gtk.version=2 --add-opens javafx.controls/com.sun.javafx.scene.control.inputmap=ALL-UNNAMED --add-opens javafx.graphics/com.sun.javafx.scene=ALL-UNNAMED --add-opens javafx.controls/com.sun.javafx.scene.control.behavior=ALL-UNNAMED --add-opens javafx.graphics/com.sun.javafx.scene.traversal=ALL-UNNAMED --add-opens javafx.graphics/javafx.scene=ALL-UNNAMED --add-opens javafx.base/com.sun.javafx.collections=ALL-UNNAMED --add-opens javafx.controls/com.sun.javafx.scene.control=ALL-UNNAMED --add-opens javafx.base/com.sun.javafx.event=ALL-UNNAMED --add-opens javafx.graphics/com.sun.javafx.css=ALL-UNNAMED --add-opens javafx.base/com.sun.javafx.runtime=ALL-UNNAMED --add-opens javafx.controls/com.sun.javafx.scene.control.skin=ALL-UNNAMED --add-opens javafx.graphics/com.sun.javafx.geom=ALL-UNNAMED --add-opens javafx.graphics/javafx.scene.canvas=ALL-UNNAMED --add-modules=javafx.swing,javafx.media,javafx.swt,javafx.base,javafx.web,javafx.graphics,javafx.fxml,javafx.controls /usr/bin/myb4japp.jar
Make it executable:
chmod +x ~/dev/myb4japp/debian/usr/bin/myb4japp
------------------
To add an icon and create a .desktop file for your Java applications in DEB format, follow these steps:
▎Step 6: Adding an icon
1. Create a folder for the icon:
In your project, create a directory usr/share/icons/hicolor/243x243/apps/ (or another size, depending on your needs):
mkdir -p ~/dev/myb4japp/debian/usr/share/icons/hicolor/243x243/apps/
2. Copy the icon:
Place your icon (for example, myb4japp.png) in this directory:
cp /path/to/your/icon/myb4japp.png ~/dev/myb4japp/debian/usr/share/icons/hicolor/243x243/apps/
▎Step 7: Creating a .desktop file
1. Create a file myb4japp.desktop in the debian directory:
nano ~/dev/myb4japp/debian/myb4japp.desktop
2. Add content:
Paste the following content, changing the paths and names to your own:
[Desktop Entry]
Type=Application
Name=myb4japp
Version=0.994
Icon=myb4japp
Terminal=false
Categories=Education;
Exec=/usr/lib/myb4japp/jdk14/bin/java -jar --module-path /usr/lib/myb4japp/jdk14/javafx/lib --add-modules ALL-MODULE-PATH -Djdk.gtk.version=2 --add-opens javafx.controls/com.sun.javafx.scene.control.inputmap=ALL-UNNAMED --add-opens javafx.graphics/com.sun.javafx.scene=ALL-UNNAMED --add-opens javafx.controls/com.sun.javafx.scene.control.behavior=ALL-UNNAMED --add-opens javafx.graphics/com.sun.javafx.scene.traversal=ALL-UNNAMED --add-opens javafx.graphics/javafx.scene=ALL-UNNAMED --add-opens javafx.base/com.sun.javafx.collections=ALL-UNNAMED --add-opens javafx.controls/com.sun.javafx.scene.control=ALL-UNNAMED --add-opens javafx.base/com.sun.javafx.event=ALL-UNNAMED --add-opens javafx.graphics/com.sun.javafx.css=ALL-UNNAMED --add-opens javafx.base/com.sun.javafx.runtime=ALL-UNNAMED --add-opens javafx.controls/com.sun.javafx.scene.control.skin=ALL-UNNAMED --add-opens javafx.graphics/com.sun.javafx.geom=ALL-UNNAMED --add-opens javafx.graphics/javafx.scene.canvas=ALL-UNNAMED --add-modules=javafx.swing,javafx.media,javafx.swt,javafx.base,javafx.web,javafx.graphics,javafx.fxml,javafx.controls /usr/bin/myb4japp.jar
• Exec: Specify the path to your JAR file.
• Icon: Specify the name of your icon without the extension (e.g. myb4japp).
• Categories: Add categories that are relevant to your application.
▎Step 8: Installing the .desktop file
1. Create a folder for .desktop files:
mkdir -p ~/dev/myb4japp/debian/usr/share/applications/
2. Move your .desktop file to this folder:
cp ~/dev/myb4japp/debian/myb4japp.desktop ~/dev/myb4japp/debian/usr/share/applications/
▎Step 9: Update the control file
Don't forget to update the control file if needed. For example, you can add Java dependency information if required.
-------------------
▎Step 10: Build the DEB package
You are now ready to build your DEB package. Go to the parent directory and run the command:
cd ~/dev/myb4japp/debian
dpkg-deb --build . ../myb4japp_0.994_all.deb
▎Step 11: Install the package
Now you can install the created package with the following command:
sudo dpkg -i ~/dev/myb4japp/myb4japp_0.994_all.deb
▎Step 12: Run the application
Now you can run your application by running the command:
myb4japp
Very important part is the starting line of the GUI app under Linux, here the correct starting line after the DEB-package is already installed:
But more correctly to include into the starting line all the modules that are generated into "release_java_modules.txt" file by building the standalone package (it depends on the libs of your project) on the target platform Linux via B4J-bridge, like:/usr/lib/myb4japp/jdk14/bin/java -jar --module-path /usr/lib/myb4japp/jdk14/javafx/lib --add-modules ALL-MODULE-PATH -Djdk.gtk.version=2 --add-opens javafx.controls/com.sun.javafx.scene.control.skin=ALL-UNNAMED /usr/bin/myb4japp.jar
[Desktop Entry]
Type=Application
Name=myb4japp
Version=0.994
Icon=myb4japp
Terminal=false
Categories=Education;
Exec=/usr/lib/myb4japp/jdk14/bin/java -jar --module-path /usr/lib/myb4japp/jdk14/javafx/lib --add-modules ALL-MODULE-PATH -Djdk.gtk.version=2 --add-opens javafx.controls/com.sun.javafx.scene.control.inputmap=ALL-UNNAMED --add-opens javafx.graphics/com.sun.javafx.scene=ALL-UNNAMED --add-opens javafx.controls/com.sun.javafx.scene.control.behavior=ALL-UNNAMED --add-opens javafx.graphics/com.sun.javafx.scene.traversal=ALL-UNNAMED --add-opens javafx.graphics/javafx.scene=ALL-UNNAMED --add-opens javafx.base/com.sun.javafx.collections=ALL-UNNAMED --add-opens javafx.controls/com.sun.javafx.scene.control=ALL-UNNAMED --add-opens javafx.base/com.sun.javafx.event=ALL-UNNAMED --add-opens javafx.graphics/com.sun.javafx.css=ALL-UNNAMED --add-opens javafx.base/com.sun.javafx.runtime=ALL-UNNAMED --add-opens javafx.controls/com.sun.javafx.scene.control.skin=ALL-UNNAMED --add-opens javafx.graphics/com.sun.javafx.geom=ALL-UNNAMED --add-opens javafx.graphics/javafx.scene.canvas=ALL-UNNAMED --add-modules=javafx.swing,javafx.media,javafx.swt,javafx.base,javafx.web,javafx.graphics,javafx.fxml,javafx.controls /usr/bin/myb4japp.jar
----------BONUS:------------
If to modify steps 3, 4, 6, 7 - it's possible to use default Java (downloading during .deb installation) with only distributed needed for you JavaFX.
3. Use as lib only javafx folder
4. Use "Depends: default-jre"
6-7. Use short simpler starting line with just "java" and path to the javafx:
But this variant must be installed by apt command as dpkg command - cannot resolve the dependencies:java -jar --module-path /usr/lib/myb4japp/javafx/lib --add-modules ALL-MODULE-PATH -Djdk.gtk.version=2 --add-opens javafx.controls/com.sun.javafx.scene.control.inputmap=ALL-UNNAMED --add-opens javafx.graphics/com.sun.javafx.scene=ALL-UNNAMED --add-opens javafx.controls/com.sun.javafx.scene.control.behavior=ALL-UNNAMED --add-opens javafx.graphics/com.sun.javafx.scene.traversal=ALL-UNNAMED --add-opens javafx.graphics/javafx.scene=ALL-UNNAMED --add-opens javafx.base/com.sun.javafx.collections=ALL-UNNAMED --add-opens javafx.controls/com.sun.javafx.scene.control=ALL-UNNAMED --add-opens javafx.base/com.sun.javafx.event=ALL-UNNAMED --add-opens javafx.graphics/com.sun.javafx.css=ALL-UNNAMED --add-opens javafx.base/com.sun.javafx.runtime=ALL-UNNAMED --add-opens javafx.controls/com.sun.javafx.scene.control.skin=ALL-UNNAMED --add-opens javafx.graphics/com.sun.javafx.geom=ALL-UNNAMED --add-opens javafx.graphics/javafx.scene.canvas=ALL-UNNAMED --add-modules=javafx.swing,javafx.media,javafx.swt,javafx.base,javafx.web,javafx.graphics,javafx.fxml,javafx.controls /usr/bin/myb4japp.jar
And the .deb file is 3 times smaller without built-in Java for Linux.sudo apt-get install myb4japp.deb
Attachments
Last edited:
 Preparing the Environment and Package Structure
 Creating the Directory Structure
 Metadata File: `control`
 Placing Application Files
 Creating the systemd Unit File
 Installation and Verification
 Final Package Structure