After the release of the new grandiose DJI library and the preliminary work of freedom2000 and JordiCP in this thread
https://www.b4x.com/android/forum/threads/dji-virtual-joystick-almost-not-working.128412/#content
i decided to deal a little bit more with dji’s virtual stick and it wasn't as complicated as initially thought. There are a few things which must be taken into account for safety reasons, so it is better to make a tutorial instead of simple code snippets.
First it is important to understand the differences between missions and virtual stick and use them to evaluate the pros and cons:
Missions are executed on the aircraft itself. Once, a mission was planned, it will be uploaded to the drone where it will be executed without any command from the controller.
Theoretically, the missions are executed even if the connection to the controller is lost. (In practice, however, dji has integrated security scenarios with the behavior when signal lost.)
When using virtual stick, all control inputs comes from the controller. Each calculation is done by the software on the controller and only the control correction, which normaly is done from the pilot in manual mode, is send to the drone. To do that, your software has to check first the aircraft-data, for example getting the location, calculate the right correction and send this up to the aircraft.
This already shows the first disadvantage: There is a certain latency by constantly comparing the data.
Another disadvantage is, that once the virtual stick mode has been activated, the drone is no longer controllable over the real sticks. So you have to make sure, that you first could get control back at any time.
Also you have to set the emergency regulations like smart return home etc. which are almost part of the preconfigured dji missions.
On the other side, using virtual stick brings us a lot of advantages:
Virtual stick seems to be available for all drones which are supported from the used sdk and the code is always the same.
With virtual stick, we could currently make ‘waypoint-‘ and ‘follow me-missions’ for drones like
- DJI Mavic Air 2
- DJI Mavic Mini
- DJI Mini SE
- DJI Mini 2
even if they boards don’t support waypoint-missions.
We could use the same code also on
- DJI Mavic Pro
- DJI Mavic 2 (Zoom und Dual) etc.,
which board supports the missions.
I have testet it successfully on Mini 2, Air 2 and Mavic 2 Zoom.
Another advantage is, that virtual stick not only works in 'p-mode' like waypoint. It works in all modes, like 'sport' or 'tripod' with a maximum speed of 15 m/s. In vs-mode, the aircraft makes no difference between flight-modes. In this context it is important to know, that on the devices, which I have tested, the virtual stick mode will be stopped when changing the flightmode with the controller's hardwarebutton. You have to start the virtual stick-mode again in the new settings.
Otherwise the mode is very stable. For example, the normal followme-mission for the Mavic 2 will be interrupted, when the following gps-position is more then 30m removed from the last position. This is not the case in virtual stick mode which offers us numerous advantages because the object, which will be followed, could reach higher speeds.
To start virtual stick, we could use the following code. Erel’s dji-example is a very good base to start. The subs will refer to this example:
https://www.b4x.com/android/forum/threads/dji-drones.75244/#content
It is nessecary to know, that it is possible to activate the vs-mode, when the drone is on the ground and the motors are off. This could be difficult, because you noticed it first after starting the motors manually. The drone starts and works autark emediatly. So it is nesseccary to make some checks first:
For example we could first check, if the aircraft is flying:
If we want to start a mission from the ground with only in 'switched-on'- state, we could first start the motors and after that we activate the virtual stick-mode. The drone will be started and follows the virtual stick commands:
Now, after starting the virtual stick-mode, we have to set the needed parameter to this mode. The most important thing to handle this mode as easy as possible is to set the virtual stick-advancedmode to 'true'. Under this mode, the aircraft is stabilized with the use of the flightsensors like gps etc. Wind and gusts are automatically compensated to hold the aircraft's position. Otherwise the effort will be too great for a stable fly.
After that we check, if the modes are available respectively activated. If that is the case, we set the different flightmodes for 'roll' and 'pitch', 'yaw' and 'vertical control'. There are different modes available with different effects. To lern more about the 'roll pitch control mode' and especially about 'virtual stick coordinate system', read the dji documentation under
https://developer.dji.com/mobile-sd...duction/component-guide-flightController.html
I decided to use the 'rollpitch-mode' in 'VELOCITY' to make the settings in m/s, the yaw to 'ANGLE' and the vertical mode to 'POSITION' to set the aircrafts hight easily in meters. It is also very important to set 'rollpitchcoordinatesystem' to ‘BODY’, if you want to control the drone with the following subs. Some settings are the default settings of the aircraft, but to be sure and to show the way to switch the modes, I set and check them all in the following sub:
To send the virtual stick command to our aircraft, we start a timer. DJI says, virtual stick commands should be sent to the aircraft between 5 Hz and 25 Hz. I testet it successful with a timer of 50 ms.
Before we get to the real mission, we need to do some more saftey settings. To stop the vs-mode as fast as possible we check, if there is an real stick input from the pilot. If so, we stop the vs-mode. It is also possible to make a stop-button, but you can’t get back the control better than over the real sticks. In der HardwareState_Event, i stop the vs-mode by actuation of the right stick:
In my tests, the stop works all the time, but it is also possible to make a callback and check, if the vs-mode is realy stopped. If not, you can stop it again and again.
Then we need more security settings: With the following subs, we could check and set the failsafe-behavior of the aircraft. This is impossible, if the controller looses the signal to the aitcraft. We could set the following modes:
HOVER
LANDING
GO_HOME
If we set it to HOVER, we have to try to get back the signal. If that doesn’t work, the aircraft will land if the battery is emty. So the safest solution is to GO_HOME. It is a mater of taste and depending on the purpose:
Next is the smartreturnhome-feature: If smart-rth is set to 'true', the aircraft comes back to the home postion, if the battery capacity is just enough for the fly back home. This feature is supported by mavic 2, air2 etc., but seems not to be available under the mini 2.
I also did not have checked yet, if the smart-rth is triggered in the virtual stick-mode, after signal is lost and the failsavebehavior is set to 'HOVER'.
In this context, don’t forget to set the gohome-height:
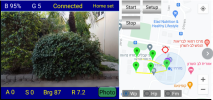
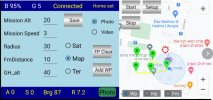
Now, we made all settings and we could send the vs-commands to fly to a waypoint:
This sub is constructed in such a way that the aircraft will first get the approach height before making a roll or pitch move to protect the aircraft against collisions. During the ascent, the drone will correct the direction to the waypoint. After reaching the height, the drone will roll with the autoflight speed (max. 15m/s) to the waypoint while always correcting the direction to the target. So as not to fly over the target, we have to reduce the speed in time. If the distance to the target is smaller than 60 meters, the maximum speed may only be a quarter of the distance. If the distance is near than 2 meters, we set the speed to 0 an stop the vs-mode. I made several tests with strong headwind and crosswind and all testet aircrafts have always reached the targets exactly.
After reaching the waypoint, it is easy to add a waypoint-action like 'go home', 'next waypoint' or some else.
In the same way, you can make an easy followme-mission by changing the VSLocation in the VirtualStick-timer dynamically. It is very impressive to see the mini 2 or air 2 following your position with an maximum speed of 54km/h.
The next thing to do is to make a hotpoint-mission. The first tests shows, that it is not realy simple. With constant speed and pitch , we could fly a beautiful circle in the simulator and with no wind. With wind, we have to adjust the speed and pitch. The parameter 'getmayangularvelocity',
, which is only available inside the dji hotpointmission-control suggests, that dji seems to include the weight of each aircraft. So i don’t know, if it is possible to do it only with virtual stick commands.
To test all the features, the simulator is still a good solution before flying outdoor.
I hope that the subject of drones will continue to be promoted here, because the future range of dji is very impressive.
https://www.b4x.com/android/forum/threads/dji-virtual-joystick-almost-not-working.128412/#content
i decided to deal a little bit more with dji’s virtual stick and it wasn't as complicated as initially thought. There are a few things which must be taken into account for safety reasons, so it is better to make a tutorial instead of simple code snippets.
First it is important to understand the differences between missions and virtual stick and use them to evaluate the pros and cons:
Missions are executed on the aircraft itself. Once, a mission was planned, it will be uploaded to the drone where it will be executed without any command from the controller.
Theoretically, the missions are executed even if the connection to the controller is lost. (In practice, however, dji has integrated security scenarios with the behavior when signal lost.)
When using virtual stick, all control inputs comes from the controller. Each calculation is done by the software on the controller and only the control correction, which normaly is done from the pilot in manual mode, is send to the drone. To do that, your software has to check first the aircraft-data, for example getting the location, calculate the right correction and send this up to the aircraft.
This already shows the first disadvantage: There is a certain latency by constantly comparing the data.
Another disadvantage is, that once the virtual stick mode has been activated, the drone is no longer controllable over the real sticks. So you have to make sure, that you first could get control back at any time.
Also you have to set the emergency regulations like smart return home etc. which are almost part of the preconfigured dji missions.
On the other side, using virtual stick brings us a lot of advantages:
Virtual stick seems to be available for all drones which are supported from the used sdk and the code is always the same.
With virtual stick, we could currently make ‘waypoint-‘ and ‘follow me-missions’ for drones like
- DJI Mavic Air 2
- DJI Mavic Mini
- DJI Mini SE
- DJI Mini 2
even if they boards don’t support waypoint-missions.
We could use the same code also on
- DJI Mavic Pro
- DJI Mavic 2 (Zoom und Dual) etc.,
which board supports the missions.
I have testet it successfully on Mini 2, Air 2 and Mavic 2 Zoom.
Another advantage is, that virtual stick not only works in 'p-mode' like waypoint. It works in all modes, like 'sport' or 'tripod' with a maximum speed of 15 m/s. In vs-mode, the aircraft makes no difference between flight-modes. In this context it is important to know, that on the devices, which I have tested, the virtual stick mode will be stopped when changing the flightmode with the controller's hardwarebutton. You have to start the virtual stick-mode again in the new settings.
Otherwise the mode is very stable. For example, the normal followme-mission for the Mavic 2 will be interrupted, when the following gps-position is more then 30m removed from the last position. This is not the case in virtual stick mode which offers us numerous advantages because the object, which will be followed, could reach higher speeds.
To start virtual stick, we could use the following code. Erel’s dji-example is a very good base to start. The subs will refer to this example:
https://www.b4x.com/android/forum/threads/dji-drones.75244/#content
B4X:
Sub Process_Globals
    ...
    Public sdk As DJISDKManager
    Private aircraft As DJIAircraft
    Private controller As DJIFlightController
    Private camera As DJICamera

    'We make an instance of the aircraft and flightcontroller for the later used javaobjects
    Dim AircraftInstance As JavaObject
    Dim FlightControllerInstance As JavaObject
    ….
    ..
End Sub

Sub AfterAircraftConnected
    ....
    ..
    'initialize it in this sub of Erel’s example:
    AircraftInstance=aircraft
    FlightControllerInstance=AircraftInstance.RunMethod("getFlightController", Null)
    ..
    ....
End Sub

Private Sub StartVirtualStick
    Dim callback As Object = FlightControllerInstance.CreateEventFromUI("dji.common.util.CommonCallbacks$CompletionCallback", "setvirtualstickcallback", Null)
    FlightControllerInstance.RunMethod("setVirtualStickModeEnabled",Array(True, callback))    'switch on/off the virtual joysticks

    Wait For (FlightControllerInstance) setvirtualstickcallback_Event (MethodName As String, args() As Object)
    If args(0) = Null Then
        Log("VirtualStickMode enabled!")
        SetParameterVirtualStick
    Else
        Log("Error SetVirtualStickMode: " & args(0))
    End If
End Sub
It is nessecary to know, that it is possible to activate the vs-mode, when the drone is on the ground and the motors are off. This could be difficult, because you noticed it first after starting the motors manually. The drone starts and works autark emediatly. So it is nesseccary to make some checks first:
For example we could first check, if the aircraft is flying:
B4X:
If controller.IsInitialized Then
    Dim St As DJIFlightControllerCurrentState = controller.CurrentState
    If St.Flying Then StartVirtualStick
End if
If we want to start a mission from the ground with only in 'switched-on'- state, we could first start the motors and after that we activate the virtual stick-mode. The drone will be started and follows the virtual stick commands:
B4X:
Private Sub TurnMotorsOn
    Dim callback As Object = FlightControllerInstance.CreateEventFromUI("dji.common.util.CommonCallbacks$CompletionCallback", "motorsoncallback", Null)
    FlightControllerInstance.RunMethod("turnOnMotors",Array(callback))

    Wait For (FlightControllerInstance) motorsoncallback_Event (MethodName As String, args() As Object)
    If args(0) = Null Then
        Log("Motors on!")
        StartVirtualStick
    Else
        Log("Error motors on: " & args(0))
    End If
End Sub
Now, after starting the virtual stick-mode, we have to set the needed parameter to this mode. The most important thing to handle this mode as easy as possible is to set the virtual stick-advancedmode to 'true'. Under this mode, the aircraft is stabilized with the use of the flightsensors like gps etc. Wind and gusts are automatically compensated to hold the aircraft's position. Otherwise the effort will be too great for a stable fly.
After that we check, if the modes are available respectively activated. If that is the case, we set the different flightmodes for 'roll' and 'pitch', 'yaw' and 'vertical control'. There are different modes available with different effects. To lern more about the 'roll pitch control mode' and especially about 'virtual stick coordinate system', read the dji documentation under
https://developer.dji.com/mobile-sd...duction/component-guide-flightController.html
I decided to use the 'rollpitch-mode' in 'VELOCITY' to make the settings in m/s, the yaw to 'ANGLE' and the vertical mode to 'POSITION' to set the aircrafts hight easily in meters. It is also very important to set 'rollpitchcoordinatesystem' to ‘BODY’, if you want to control the drone with the following subs. Some settings are the default settings of the aircraft, but to be sure and to show the way to switch the modes, I set and check them all in the following sub:
B4X:
...
dim virtualStickAvailable, virtualStickAdvancedEnabled as boolean
..
Private Sub SetParameterVirtualStick
    FlightControllerInstance.RunMethod("setVirtualStickAdvancedModeEnabled", Array(True))

    virtualStickAvailable = FlightControllerInstance.RunMethod("isVirtualStickControlModeAvailable", Null)
    virtualStickAdvancedEnabled = FlightControllerInstance.RunMethod("isVirtualStickAdvancedModeEnabled", Null)

    Log($"virtual stick available: ${virtualStickAvailable}"$)
    Log($"virtual stick advanced enabled: ${virtualStickAdvancedEnabled}"$)
    If virtualStickAvailable And virtualStickAdvancedEnabled Then

        'Modes mit set manuell setzen und Ergebnis mit get zur Kontrolle auslesen :
        FlightControllerInstance.RunMethod("setRollPitchControlMode", Array("VELOCITY"))    'Roll und Nick in Meter pro Sekunden eingeben: Bereich -15m/s bis +15m/s (0=Stop)
        FlightControllerInstance.RunMethod("setYawControlMode", Array("ANGLE"))                'Richtung in Abhängigkeit vom Norden in Grad eingeben: Bereich -180 bis +180 (0=Nord)
        FlightControllerInstance.RunMethod("setVerticalControlMode", Array("POSITION"))        'Höhe in Meter eingeben!
        FlightControllerInstance.RunMethod("setRollPitchCoordinateSystem", Array("BODY"))    'Koordinatensystem von der Lage der Drohne abhängig machen, da ansonsten Roll und Pitch von Nord anhängig sind!

        Dim RollPitchControlMode As String = FlightControllerInstance.RunMethod("getRollPitchControlMode", Null)
        Log("RollPitchControlMode: "& RollPitchControlMode)

        Dim YawControlMode As String = FlightControllerInstance.RunMethod("getYawControlMode", Null)
        Log("YawControlMode: " & YawControlMode)

        Dim VerticalControlMode As String = FlightControllerInstance.RunMethod("getVerticalControlMode", Null)
        Log("VerticalControlMode: " & VerticalControlMode)

        Dim RollPitchCoordinateSystem As String = FlightControllerInstance.RunMethod("getRollPitchCoordinateSystem", Null)
        Log("RollPitchCoordinateSystem: " & RollPitchCoordinateSystem)

        TimerVirtualStick.enabled = True
    Else
        TimerVirtualStick.enabled = False
    End If
End Sub
To send the virtual stick command to our aircraft, we start a timer. DJI says, virtual stick commands should be sent to the aircraft between 5 Hz and 25 Hz. I testet it successful with a timer of 50 ms.
B4X:
TimerVirtualStick.Initialize("TimerVirtualStick", 50)Before we get to the real mission, we need to do some more saftey settings. To stop the vs-mode as fast as possible we check, if there is an real stick input from the pilot. If so, we stop the vs-mode. It is also possible to make a stop-button, but you can’t get back the control better than over the real sticks. In der HardwareState_Event, i stop the vs-mode by actuation of the right stick:
B4X:
Sub CreateHardwareStateListener
    Dim RemoteController As JavaObject = aircraft
    RemoteController = RemoteController.RunMethod("getRemoteController", Null)
    Dim callback As Object = RemoteController.CreateEventFromUI("dji.common.remotecontroller.HardwareState$HardwareStateCallback", "HardwareState", Null)
    RemoteController.RunMethod("setHardwareStateCallback", Array(callback))
End Sub

Sub HardwareState_Event (MethodName As String, Args() As Object) As Object
    Dim HardwareState As JavaObject = Args(0)
    Dim c1button As JavaObject = HardwareState.RunMethod("getC1Button", Null)
    Dim IsClicked As Boolean = c1button.RunMethod("isPresent", Null) 'ignore

    If TimerVirtualStick.Enabled=True Then
        Dim Lstick As JavaObject = HardwareState.RunMethod("getLeftStick", Null)
        Dim Lhoriz As Int = Lstick.RunMethod("getHorizontalPosition", Null)
        Dim Lvert As Int = Lstick.RunMethod("getVerticalPosition", Null)
        Log($"left stick H value: ${Lhoriz}"$)    '-660 bis +660
        Log($"left stick V value: ${Lvert}"$)    '-660 bis +660

        Dim Rstick As JavaObject = HardwareState.RunMethod("getRightStick", Null)
        Dim Rhoriz As Int = Rstick.RunMethod("getHorizontalPosition", Null)
        Dim Rvert As Int = Rstick.RunMethod("getVerticalPosition", Null)
        Log($"right stick H value: ${Rhoriz}"$)
        Log($"right stick V value: ${Rvert}"$)

        If Rhoriz<>0 Or Rvert<>0 Then StopVirtualStick    'Beim Betätigen des rechten Sticks VS aufheben!

    End If

    Return Null
End Sub
In my tests, the stop works all the time, but it is also possible to make a callback and check, if the vs-mode is realy stopped. If not, you can stop it again and again.
B4X:
Private Sub StopVirtualStick
    FlightControllerInstance.RunMethod("setVirtualStickModeEnabled",Array(False, Null))    'switch on/off the virtual joysticks
    FlightControllerInstance.RunMethod("setVirtualStickAdvancedModeEnabled", Array(False))
    TimerVirtualStick.enabled = False
End Sub
Then we need more security settings: With the following subs, we could check and set the failsafe-behavior of the aircraft. This is impossible, if the controller looses the signal to the aitcraft. We could set the following modes:
HOVER
LANDING
GO_HOME
If we set it to HOVER, we have to try to get back the signal. If that doesn’t work, the aircraft will land if the battery is emty. So the safest solution is to GO_HOME. It is a mater of taste and depending on the purpose:
B4X:
..
SetConnectionFailSafeBehavior("GO_HOME")
...
Private Sub SetConnectionFailSafeBehavior(FailSafeMode As String)
    Dim callback As Object = FlightControllerInstance.CreateEventFromUI("dji.common.util.CommonCallbacks$CompletionCallback", "failsafebehaviorcallback", Null)
    FlightControllerInstance.RunMethod("setConnectionFailSafeBehavior", Array(FailSafeMode,callback))

    Wait For (FlightControllerInstance) failsafebehaviorcallback_Event (MethodName As String, args() As Object)
    If args(0) = Null Then
        SignalverlustState=FailSafeMode
        Log("Set FailSafeBehavior to: " & FailSafeMode)
    Else
        Log("Error setting FailSafeBehavior: " & args(0))
    End If
End Sub

'Check the failsafe-settings with this sub:
Private Sub GetConnectionFailSafeBehavior
    Dim callback As Object = FlightControllerInstance.CreateEventFromUI("dji.common.util.CommonCallbacks$CompletionCallbackWith", "getfailsafebehaviorcallback", Null)
    FlightControllerInstance.RunMethod("getConnectionFailSafeBehavior", Array(callback))

    Wait For (FlightControllerInstance) getfailsafebehaviorcallback_Event (MethodName As String, args() As Object)
    Dim GetFailSafeBehavior As String =args(0)
    Log("GetFailSafeBehavior: " & GetFailSafeBehavior)
End Sub
Next is the smartreturnhome-feature: If smart-rth is set to 'true', the aircraft comes back to the home postion, if the battery capacity is just enough for the fly back home. This feature is supported by mavic 2, air2 etc., but seems not to be available under the mini 2.
I also did not have checked yet, if the smart-rth is triggered in the virtual stick-mode, after signal is lost and the failsavebehavior is set to 'HOVER'.
In this context, don’t forget to set the gohome-height:
B4X:
If controller.IsInitialized Then
        'RTH-Höhe setzen:
        Dim sf As Object = controller.SetGoHomeHeightInMeters(manager.GetString("flytoalt"))
        Wait For (sf) controller_Result (Success As Boolean, ErrorMessage As String)
        If Success Then
            Dim currentstate As DJIFlightControllerCurrentState
            currentstate=controller.CurrentState
            Log("RTH-Höhe:" & currentstate.GoHomeHeight)
            RTHHoeheState=currentstate.GoHomeHeight
        Else
            Log("Error: " & ErrorMessage)
        End If
End if
Now, we made all settings and we could send the vs-commands to fly to a waypoint:
B4X:
Dim AutoFLightSpeed As Int = 15  'max speed in vs-mode
Dim VSLocation As Location
VSLocation.Initialize2(gmap.CameraPosition.Target.Latitude, gmap.CameraPosition.Target.Longitude)     'We could fly to a point of the map
VSLocation.Altitude=45

Sub TimerVirtualStick_Tick
    WayPointVirtualStick(VSLocation)
End Sub
This sub is constructed in such a way that the aircraft will first get the approach height before making a roll or pitch move to protect the aircraft against collisions. During the ascent, the drone will correct the direction to the waypoint. After reaching the height, the drone will roll with the autoflight speed (max. 15m/s) to the waypoint while always correcting the direction to the target. So as not to fly over the target, we have to reduce the speed in time. If the distance to the target is smaller than 60 meters, the maximum speed may only be a quarter of the distance. If the distance is near than 2 meters, we set the speed to 0 an stop the vs-mode. I made several tests with strong headwind and crosswind and all testet aircrafts have always reached the targets exactly.
B4X:
Sub WayPointVirtualStick(WPLocation As Location)

    Dim mRoll As Float = 0
    Dim mYaw As Float = 0

    Dim St As DJIFlightControllerCurrentState = controller.CurrentState

    Dim DroneLocation As Location
    DroneLocation.Initialize2(St.AircraftLocation.Latitude, St.AircraftLocation.Longitude)
    DroneLocation.Altitude=St.AircraftLocation.Altitude

    Dim VirtualStickBearing As Float = DroneLocation.BearingTo(WPLocation)
    Dim VirtualStickDistance As Float = DroneLocation.DistanceTo(WPLocation)
    Dim VirtualStickAltitudeDifference As Double = Abs(Round(DroneLocation.Altitude)-WPLocation.Altitude)

    Select True
        Case VirtualStickAltitudeDifference>1
            mYaw=VirtualStickBearing

        Case Abs(St.Attitude.Yaw-VirtualStickBearing)>5
            mYaw=VirtualStickBearing

        Case VirtualStickDistance>60
            mYaw=VirtualStickBearing
            mRoll=AutoFLightSpeed

        Case VirtualStickDistance>2 And VirtualStickDistance<=60
            mYaw=VirtualStickBearing
            mRoll=Min(VirtualStickDistance/4, AutoFLightSpeed)

        Case Else
            mYaw=VirtualStickBearing
            mRoll=0
            StopVirtualStick
            'Do, what ever you want after reaching the waypoint:
            AddWayPointAction("GIMBAL_PITCH", "-90")

    End Select
    sendVirtualStickFlightControlData(0,mRoll, mYaw, WPLocation.Altitude)
End Sub

Sub sendVirtualStickFlightControlData(Pitch As Float, Roll As Float, Yaw As Float, Throttle As Float)
    Try
        Dim FlightControlData As JavaObject
        FlightControlData.InitializeNewInstance("dji.common.flightcontroller.virtualstick.FlightControlData", Array(Pitch, Roll, Yaw, Throttle) )
        FlightControllerInstance.RunMethod("sendVirtualStickFlightControlData",Array( FlightControlData, Null) )
    Catch
        Log(LastException)
    End Try
End Sub
After reaching the waypoint, it is easy to add a waypoint-action like 'go home', 'next waypoint' or some else.
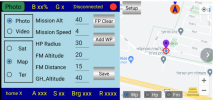
In the same way, you can make an easy followme-mission by changing the VSLocation in the VirtualStick-timer dynamically. It is very impressive to see the mini 2 or air 2 following your position with an maximum speed of 54km/h.
The next thing to do is to make a hotpoint-mission. The first tests shows, that it is not realy simple. With constant speed and pitch , we could fly a beautiful circle in the simulator and with no wind. With wind, we have to adjust the speed and pitch. The parameter 'getmayangularvelocity',
B4X:
Dim callback As Object=HotPointMissionControl.CreateEventFromUI("dji.common.util.CommonCallbacks$CompletionCallbackWith", "getmaxangularvelocitycallback", Null)
HotPointMissionControl.RunMethod("getMaxAngularVelocityForRadius", Array(RadiusAufklaerung,callback))
Wait For (HotPointMissionControl) getmaxangularvelocitycallback_Event (MethodName As String, args() As Object)
Dim MaxAngularVelocity As Float = args(0)
, which is only available inside the dji hotpointmission-control suggests, that dji seems to include the weight of each aircraft. So i don’t know, if it is possible to do it only with virtual stick commands.
To test all the features, the simulator is still a good solution before flying outdoor.
I hope that the subject of drones will continue to be promoted here, because the future range of dji is very impressive.
Last edited:
")