Hi I have wrote this just in case someone needs to implement the jRDC2 on a VM on cloud, I know a lot of members already know this and it is definitely not a new information, but for someone that have not tried this before I think it will be useful to have a start to end process.
Steps in brief:
1 - Create a VM.
2 - Install mysql.
3 - Create a test database.
4 - Download/install java on your VM.
5 - Download mysql connector.
6 - Edit the file config.properties.
7 - Run the jRDC2.
8 - Test the connection.
Steps in details:
1 - Create a VM:


If you do not have a linux OS, or do not know how to generate the keys, then you can use a mobile App named JuiceSSH to generate the keys (use at your own risk).
Note: By default there is no users created on Digital ocean's VMs except the root user, if you think it is helpful to add these steps here, please let me know, for now we will be using the root user.
2 - Install mysql:
Please follow the link below to install mysql on your VM:
https://www.digitalocean.com/community/tutorials/how-to-install-mysql-on-ubuntu-18-04
Some notes:
4 - Download/install java on your VM:
a. You can either download java and unzip it and upload to your server (steps are explained on the b4x link below:
Source: https://www.b4x.com/android/forum/threads/server-run-a-server-on-a-vps.60378/#content
b. Or you can install java on your VM:
On ubuntu 18.04:
$ sudo apt update
$ sudo apt install default-jre
$ sudo apt install default-jdk
Source: https://www.digitalocean.com/community/tutorials/how-to-install-java-with-apt-on-ubuntu-18-04
Now we are finished with the VM part, let us work with the jRDC2 part.
5 - Download mysql connector:
https://dev.mysql.com/downloads/connector/j/
Select Platform Independent --> Unzip/unar until you find the "mysql-connector-java-8.0.17.jar" (this is the current version on their site)

https://www.b4x.com/android/forum/t...ation-of-rdc-remote-database-connector.61801/
7 - Run the jRDC2.
$ java -jar <path to your jRDC2 file>/jRDC2.jar
If not then:
https://www.b4x.com/android/forum/threads/server-run-a-server-on-a-vps.60378/#content
8 - Test the connection:
https://www.b4x.com/android/forum/threads/server-run-a-server-on-a-vps.60378/#content
Hope this is helpful! thanks
Steps in brief:
1 - Create a VM.
2 - Install mysql.
3 - Create a test database.
4 - Download/install java on your VM.
5 - Download mysql connector.
6 - Edit the file config.properties.
7 - Run the jRDC2.
8 - Test the connection.
Steps in details:
1 - Create a VM:
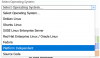
- Sure you can select the cloud vendor you would like, but for this example I am creating a VM on Digital ocean:
- Register on digital ocean.
- Once you are logged in, select Create --> Droplet (VM is named droplet in their dashboard).
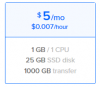
- Choose the plan you would like, for my setup I have selected:
- Ubuntu 18.04, Standard, 5$/month - this is for testing.
- Select the authentication method, I suggest try the One-Time password at the beginning if this is your first time to create a VM, once you are confident and find it easy, then start generating and adding ssh keys to your droplet while creating the VM, I find this more easier:
If you do not have a linux OS, or do not know how to generate the keys, then you can use a mobile App named JuiceSSH to generate the keys (use at your own risk).
- After following the steps on the email or used the ssh keys option, download and install a terminal emulator like putty, I personally I prefer mobaxterm since it provides a lot of features In one App:
- Create a session and enter the IP of your VM in the Remote host on mobaxterm, in case you have used the ssh keys option, make sure to select the "use private key" --> browse to the file where you have saved the private key.
Note: By default there is no users created on Digital ocean's VMs except the root user, if you think it is helpful to add these steps here, please let me know, for now we will be using the root user.
2 - Install mysql:
Please follow the link below to install mysql on your VM:
https://www.digitalocean.com/community/tutorials/how-to-install-mysql-on-ubuntu-18-04
Some notes:
- I didn't create another mysql user, I only used the root user.
- Read carefully step 3, I have spent 2 hours trying to troubleshoot the error "java.sql.SQLException: Access denied for user 'root'@'localhost'" and turned out that I didn't follow this part where root shall have mysql_native_password instead of auth_socket!
- For jRDC2 example to work you need to have a database already in place named as test, so to create a database in mysql please follow the link below:
4 - Download/install java on your VM:
a. You can either download java and unzip it and upload to your server (steps are explained on the b4x link below:
Source: https://www.b4x.com/android/forum/threads/server-run-a-server-on-a-vps.60378/#content
b. Or you can install java on your VM:
On ubuntu 18.04:
$ sudo apt update
$ sudo apt install default-jre
$ sudo apt install default-jdk
Source: https://www.digitalocean.com/community/tutorials/how-to-install-java-with-apt-on-ubuntu-18-04
Now we are finished with the VM part, let us work with the jRDC2 part.
5 - Download mysql connector:
https://dev.mysql.com/downloads/connector/j/
Select Platform Independent --> Unzip/unar until you find the "mysql-connector-java-8.0.17.jar" (this is the current version on their site)
- Copy "mysql-connector-java-8.0.17.jar" to your b4J additional library.
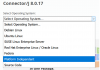
- Download the jRDC2 example on the link below --> Open the b4j file (jRDC file) --> File Manager --> open config.properties file --> edit the user and password to match the user and password that you have created on step 2.
- Save and close the file.
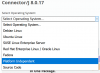
- On the b4j jRDC2 edit this part to match the sql connector version you have added to the b4J additional library:
https://www.b4x.com/android/forum/t...ation-of-rdc-remote-database-connector.61801/
7 - Run the jRDC2.
- Run the jRDC - b4j example in release mode in order to have the output file.
- Copy jRDC2.jar file that is located in the objects in your project folder into the VM.
- Mobaxterm is useful here as you already can ssh/ftp the file to your VM.
- On the VM command line run:
$ java -jar <path to your jRDC2 file>/jRDC2.jar
If not then:
https://www.b4x.com/android/forum/threads/server-run-a-server-on-a-vps.60378/#content
8 - Test the connection:
- Open you PC browser and type: <VM_IP address>:17178/test
https://www.b4x.com/android/forum/threads/server-run-a-server-on-a-vps.60378/#content
Hope this is helpful! thanks
Attachments
Last edited: