Introduction
The big day has dawned at last. We are now going to connect our Arduino to our Android device and get the two to talk to each other and to their own IDE on the PC.
Make the connection
Now we are connecting the Arduino to an Android device we may have some power issues to consider as the Android device sees the Arduino as a host when it is connected. Because of this if the device is capable of charging through the USB port it will try to charge itself from it. Some tablets, like my Motorola Xoom, will not attempt to charge as they have a separate charging socket that allows them to be charged faster and at a higher voltage than a USB host port will permit.
When working stand-alone and not connected to an Android device or a PC the Arduino will obviously need an external power supply which will need to have enough capacity to power the Arduino and any shields attached to it. The power supply needs to be able to supply a continuous current capacity of about 0.5 Amp or more at a voltage between 7 and 12 volts.
When working connected to a PC by its slave port the Arduino will power itself from the PC and needs no external power supply unless there is a shield connected that needs more current than a USB port can supply
When working connected to an Android device by its host port and not connected to a PC the Arduino will need an external power supply which will need to have enough capacity to charge the Android device as well as power the Arduino and any shields attached to it. . The power supply needs to be able to supply a continuous current capacity of about 1.5 Amp or more at a voltage between 7 and 12 volts.
When working connected to both a PC and an Android device and not connected to an external power supply the Arduino will power itself from the USB port of the PC to which it is connected and will also pass power through to the Android device to charge it. If the USB port cannot supply enough power then the Arduino will not operate correctly. You can check this by downloading a known good sketch, like the Blink sketch, and observing if it works properly while both the PC and the Android device are connected to it.
If there is not enough USB power available and if your device is chargeable from a source other than its USB port then connecting that charger should ease the load on the USB power enough to make things work. Otherwise an external power supply for the Arduino will be required, and will in any case be needed if the Arduino is to run disconnected from the PC
Communicating with Basic4android
Finally we have come to what this series of tutorials is all about, talking to our Arduino application from Basic4android. As the Arduino is occupying the USB port of the Android device we will need to use B4A Bridge to download and run our Basic4android application. This enables us to avoid plugging and unplugging cables during development and conveniently allows us to work on both the Arduino and Basic4ppc program simultaneously.
I have written two simple companion programs that will bring together all that we have done so far. Both programs can be found in the archive attached to this post.
There is a program to run on the Arduino that will print whatever it receives from the Android device to the Serial Monitor in the Arduino IDE and return the same data to the Android device. It will also send any messages received from the Serial Monitor to the Android device. There is also a simple program to run on the Android device that will log whatever it receives from the Arduino. The design of the GUI is down to my traditionally low standards but adequately demonstrates how to use an Arduino as an Accessory. On the Arduino Serial operations run asynchronously to avoid hanging the main loop and I have used AsyncStreams to get similar asynchronous operation on the Android device.
Note that there is a bug in the USB library version 0.96 UsbManager.GetAccessories method which throws a NullPointer Exception if there is no Accessory attached to the Android device. This will be fixed in the next version of Basic4android.
There also seems to be a bug in the Android USB Accessory handling (what’s new!) when trying to reconnect to a disconnected Accessory. I struggled with for a few hours with an input stream exception when trying to reconnect before finding this.
android - Proper way to close a USB accessory connection - Stack Overflow
From that thread it seems even the official Google demo has this problem. Please post if anyone has any suggestions to overcome this.
In order to reliably connect to an Accessory with your program it is necessary to ensure that the process of any previous instance of your program that communicated with the Arduino has been killed. This is the reason why there is an Exit button in the Basic4ppc program that calls ExitApplication that you should use to kill the program. It is also necessary before restarting the program, or downloading and running a modified version again to either press the reset button on the Arduino or disconnect and reconnect it again. If you merely reaset the Arduino your USB permission seems to be maintained. If you disconnect and reconnect you will get the permission dialog again. In either case you will be offered the choice of opening a browser and going to the Basic4android home page
Getting started
Download the archive at the bottom of this post and copy the “ADKdemo” folder and contents to your “Documents\Arduino” folder and copy the “Arduino ADK” folder to where you keep your Basic4android projects.
Open “ADKdemo” in the Arduino IDE, download it to the Arduino and open Serial Monitor and set the Serial monitor to115200 baud.

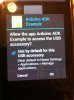
Connect the Arduino to your Android device. You may get an Android dialog offering to view the Basic4android home page – press Cancel.
Open “AduinoADKdemo.b4a” in Basic4android. Compile, download and run it, preferably via B4A Bridge as we are using the device USB port. Press the “Connect” button and you may get a dialog asking for permission. Accept it and press “Connect” again. Each press on “Send” will send a message to the Arduino which it will print to the Serial Monitor and send back to Basic4android which will log it to the Log pane in the Basic4android IDE.

Any message sent from the Serial Monitor will also be logged.

Exit the Basic4android application by pressing the Exit button to kill the process.
The next tutorial
The next tutorial will be the last and for some it will be superfluous as they will be able to take the two sets of source code and learn enough from them to be able to progress on their own. In it I will comment on both sets of source code and maybe add some appropriate homilies, should any actually come to mind!
Tutorials
In addition to this tutorial there are other tutorials. They are:
1. Introduction to the Arduino Mega ADK and Android Accessories. Introduction
2. Installing the Arduino IDE and compiling your first program. Installation
3. Connecting the Arduino Mega ADK to your computer and running programs on it. Programming
4. This one!
5. Some commentary on the two programs in tutorial 4. Coda
The big day has dawned at last. We are now going to connect our Arduino to our Android device and get the two to talk to each other and to their own IDE on the PC.
Make the connection
Now we are connecting the Arduino to an Android device we may have some power issues to consider as the Android device sees the Arduino as a host when it is connected. Because of this if the device is capable of charging through the USB port it will try to charge itself from it. Some tablets, like my Motorola Xoom, will not attempt to charge as they have a separate charging socket that allows them to be charged faster and at a higher voltage than a USB host port will permit.
When working stand-alone and not connected to an Android device or a PC the Arduino will obviously need an external power supply which will need to have enough capacity to power the Arduino and any shields attached to it. The power supply needs to be able to supply a continuous current capacity of about 0.5 Amp or more at a voltage between 7 and 12 volts.
When working connected to a PC by its slave port the Arduino will power itself from the PC and needs no external power supply unless there is a shield connected that needs more current than a USB port can supply
When working connected to an Android device by its host port and not connected to a PC the Arduino will need an external power supply which will need to have enough capacity to charge the Android device as well as power the Arduino and any shields attached to it. . The power supply needs to be able to supply a continuous current capacity of about 1.5 Amp or more at a voltage between 7 and 12 volts.
When working connected to both a PC and an Android device and not connected to an external power supply the Arduino will power itself from the USB port of the PC to which it is connected and will also pass power through to the Android device to charge it. If the USB port cannot supply enough power then the Arduino will not operate correctly. You can check this by downloading a known good sketch, like the Blink sketch, and observing if it works properly while both the PC and the Android device are connected to it.
If there is not enough USB power available and if your device is chargeable from a source other than its USB port then connecting that charger should ease the load on the USB power enough to make things work. Otherwise an external power supply for the Arduino will be required, and will in any case be needed if the Arduino is to run disconnected from the PC
Communicating with Basic4android
Finally we have come to what this series of tutorials is all about, talking to our Arduino application from Basic4android. As the Arduino is occupying the USB port of the Android device we will need to use B4A Bridge to download and run our Basic4android application. This enables us to avoid plugging and unplugging cables during development and conveniently allows us to work on both the Arduino and Basic4ppc program simultaneously.
I have written two simple companion programs that will bring together all that we have done so far. Both programs can be found in the archive attached to this post.
There is a program to run on the Arduino that will print whatever it receives from the Android device to the Serial Monitor in the Arduino IDE and return the same data to the Android device. It will also send any messages received from the Serial Monitor to the Android device. There is also a simple program to run on the Android device that will log whatever it receives from the Arduino. The design of the GUI is down to my traditionally low standards but adequately demonstrates how to use an Arduino as an Accessory. On the Arduino Serial operations run asynchronously to avoid hanging the main loop and I have used AsyncStreams to get similar asynchronous operation on the Android device.
Note that there is a bug in the USB library version 0.96 UsbManager.GetAccessories method which throws a NullPointer Exception if there is no Accessory attached to the Android device. This will be fixed in the next version of Basic4android.
There also seems to be a bug in the Android USB Accessory handling (what’s new!) when trying to reconnect to a disconnected Accessory. I struggled with for a few hours with an input stream exception when trying to reconnect before finding this.
android - Proper way to close a USB accessory connection - Stack Overflow
From that thread it seems even the official Google demo has this problem. Please post if anyone has any suggestions to overcome this.
In order to reliably connect to an Accessory with your program it is necessary to ensure that the process of any previous instance of your program that communicated with the Arduino has been killed. This is the reason why there is an Exit button in the Basic4ppc program that calls ExitApplication that you should use to kill the program. It is also necessary before restarting the program, or downloading and running a modified version again to either press the reset button on the Arduino or disconnect and reconnect it again. If you merely reaset the Arduino your USB permission seems to be maintained. If you disconnect and reconnect you will get the permission dialog again. In either case you will be offered the choice of opening a browser and going to the Basic4android home page
Getting started
Download the archive at the bottom of this post and copy the “ADKdemo” folder and contents to your “Documents\Arduino” folder and copy the “Arduino ADK” folder to where you keep your Basic4android projects.
Open “ADKdemo” in the Arduino IDE, download it to the Arduino and open Serial Monitor and set the Serial monitor to115200 baud.
Connect the Arduino to your Android device. You may get an Android dialog offering to view the Basic4android home page – press Cancel.
Open “AduinoADKdemo.b4a” in Basic4android. Compile, download and run it, preferably via B4A Bridge as we are using the device USB port. Press the “Connect” button and you may get a dialog asking for permission. Accept it and press “Connect” again. Each press on “Send” will send a message to the Arduino which it will print to the Serial Monitor and send back to Basic4android which will log it to the Log pane in the Basic4android IDE.
Any message sent from the Serial Monitor will also be logged.
Exit the Basic4android application by pressing the Exit button to kill the process.
The next tutorial
The next tutorial will be the last and for some it will be superfluous as they will be able to take the two sets of source code and learn enough from them to be able to progress on their own. In it I will comment on both sets of source code and maybe add some appropriate homilies, should any actually come to mind!
Tutorials
In addition to this tutorial there are other tutorials. They are:
1. Introduction to the Arduino Mega ADK and Android Accessories. Introduction
2. Installing the Arduino IDE and compiling your first program. Installation
3. Connecting the Arduino Mega ADK to your computer and running programs on it. Programming
4. This one!
5. Some commentary on the two programs in tutorial 4. Coda
Attachments
Last edited: