B4J Tutorial [BANanoWebix] App Creation Process: The UI

Ola

The form builder should be run on a web server as it uses SQLite with php. We use xampp. (The WebServer for Chrome DOES NOT support PHP)

Development Servers you can use

1. XAMPP
2. Laragon

This tutorial will introduce us of how to create an app using BANanoWebixFD (Form Designer)

At the end of this tutorial, we would have achieved the following:

1. We will create a backend database using BANanoSQL. This will use BANanoSQLUtils.
2. We will create a form with some textboxes
3. We will add some buttons that are related to CRUD, link these to the UI
4. We will test our app for functionality.


Get Set, Ready, Go

Get the complete BANanoWebix project

If you downloaded the complete project, just complete the rest of these 3 steps from your complete download. No need to redownload.

1. We will need the BANanoWebix library. Download and copy the contents of this folder to your b4j external libraries folder.
2. We will need the BANanoWebixFD, this is a form designer specifically creates to build BANano based apps using the BANanoWebix library. Download and unzip the FD on your webserver.
3. We will need a skeleton copy of a b4j BANanoWebix based project. Get it here

Designing the UI with the Form Designer

The next process involves creating the UI of our form, we want a simple form with some text boxes. You are already set up your development environment and are ready to create the UI.

1. Let's start the FD.

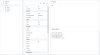
When you start the FD, its blank and you need to create your form.

01FD.png


2. Expand the Layouts on the side-bar and click form. This updates the property bag. There is nothing much to do here except click the 'save' button for now on the property bag toolbar. This will add the form to the treeview just under database.
 

Attachments

  • BANanoWebixAppDev.zip
    2.3 KB · Views: 394
Last edited:

Mashiane

Expert
Licensed User
Longtime User
3. For now, lets not worry much about what is happening, you now see the 'source code' for your form on the right. We will use this source code in our B4J app, for now let's just create everything we need.

02FD.jpg


4. The property bag has a toolbar to access most of the functionality related to element addition/update/deletion.

03FD.jpg


The first button is to add a row, the second to add a column, the third to add 'anything' and the fourth 'save'. As soon as we clicked 'save' for our form, it got saved and recorded and got listed in the tree.

5. We need to add some controls in the form. We can do this in two ways, use the side-bar menu or use the 'add' button in the property bag toolbar. The add button when a form is selected, add a 'text' control to the form. To add other controls, goto 'controls' in the side-bar and AFTER selecting the form, click the item to add on the side-bar. Lets add 4 text boxes to the form. We will name them id, field1, field2, field3.

IMPORTANT: This goes on like this.

5.1 You select the 'form' in the treeview. This helps establish a parent child relationship for the element to add.
5.2 You click the 'add' button in the property bag toolbar. This will create a 'text' object for you to put to the form.
5.3 You change the properties of the 'text' object, e.g. name, tabindex, label etc. The tabindex defines the sort order also of the elements. This helps place elements one after another, so you might begin from 0... n
5.4. You click 'save' on the property bag toolbar to save the element to the form. This generates a preview of the element and the source code needed to produce it for your b4j app.

For controls in the side-bar, the process is the same, click the form in the tree first, then on the sidebar, click the element you want to add on the form, then change properties in the property bag and then save. Once saved, a 'trash' button will be available for you to delete an element that you don't need.

Adding the ID field

1. Click 'form' on treeview
2. Click add.jpg on the property bag toolbar.

3. In the property bag, change the 'id' from text1 to 'id' and change the Label.Text to 'ID' Each time you change a property, the element is saved automatically. If not you can click 'save' on the property bag toolbar.

You follow the same steps to create the other text fields, field1, field2, field3. Please note that the tabindexes for each should be 1,2,3 respectively.

04id.jpg


field1.jpg


field2.png


field3.png


Attachments

  • 04id.jpg
    04id.jpg
    55.1 KB · Views: 285
  • delete.jpg
    delete.jpg
    1.4 KB · Views: 278

Mashiane

Expert
Licensed User
Longtime User
In 4. above, we created the id, field1, field2, field3 textboxes, changed some properties like tabindex, label.text and saved these for the form. We saw how they will look based on the preview (top right) and saw how the code will be like on 'source code' (bottom right). Let's take this to B4J.

Fire up the BANanoWebix skeleton app template from your downloads.

In the B4J top menu, click Windows > Reset. On the bottom right of your IDE select the Libraries tab.
Ensure that BANano 3.09+, BANanoWebix 1.06+, BP (0.2) This is an updated version of the lib) are loaded.

projectsettings.jpg


Now you are ready to do this, let's just test if everything is ok. Let's run the BANanoWebixApp project. If all goes well, this is what you need to see. A kinda like blank canvas with Hello BANanoWebix.

skeleton.jpg


The project itself has been ready for you to work on. All you need to do is transfer the code from the designer to the b4j project. As you might have noted, the BANano_Ready call just activates a module.

B4X:
Sub BANano_Ready()
    'build a page and render it to the body of the page
    pgIndex.init("body")
End Sub

If you open up the module code, there is nothing except the 'Hello..."

B4X:
Sub Init(pgContainer As String)
    pg.Initialize("index", pgContainer).SetResponsive(True).SetHeader("Hello BANanoWebix")
    pg.UI
End Sub

We have initialized a page, we want the contents of whatever is generated inside that page to be rendered inside a container called 'body'. So to create our BANanoWebix App, we need to write code between the pg.initialize and the pg.ui methods. We will however write any other subs and events for button clicks anywhere else.

Now lets copy our code to the project.

In the form designer, click on 'form' in the tree. Copy the source code of the form and paste it to our b4j project.

Now you will have something like this..

B4X:
Sub Init(pgContainer As String)
    pg.Initialize("index", pgContainer).SetResponsive(True).SetHeader("Hello BANanoWebix")
    'lets create a form
    Dim form As WixForm
    form.Initialize("form")
    form.SetName("form")
    pg.AddRows(form.Item)
    pg.UI
End Sub

Running the project now will give an error because the form is blank. So let's copy and paste all the code from our designer to our b4j project and create the form in completeness. This process involves for each element we want to add.

Click the element, copy source code, paste code to our project. At the end we have this code.

B4X:
Sub Init(pgContainer As String)
    pg.Initialize("index", pgContainer).SetResponsive(True).SetHeader("Hello BANanoWebix")
    'lets create a form
    Dim form As WixForm
    form.Initialize("form").SetName("form")
    
    Dim id As WixText
    id.Initialize("id").SetType("text").SetLabel("ID")
    form.AddRows(id.Item)
    
    Dim field1 As WixText
    field1.Initialize("field1").SetType("text").SetLabel("Field 1")
    form.AddRows(field1.Item)
    
    Dim field2 As WixText
    field2.Initialize("field2").SetType("text").SetLabel("Field 2")
    form.AddRows(field2.Item)
    
    Dim field3 As WixText
    field3.Initialize("field3").SetType("text").SetLabel("Field 3")
    form.AddRows(field3.Item)
    
    pg.AddRows(form.Item)
    pg.UI
End Sub

What I have done is to chain the methods.

1. We initialized the page...
2. We initialized the form
3. We added elements to the form. We added these in the sequence that we want them to appear
4. We added the form to the page.
5. We build the UI by calling pg.UI.

Now running our app produces this.

formrun.png


The form is being added to the rows collection of the page pg.AddRows(form.item) thus it takes the whole width of our page.
Each element is being added to the rows collection of the form, form.AddRows(field1.item) thus it takes the whole width of the form.

So far our UI looks cool. But we need buttons and things.
 

Mashiane

Expert
Licensed User
Longtime User
Let's assume that we dont want our element labels to be on the side for the form but on top. By just setting a default property on the form, its changes how the child elements react.

To do this, we can just change this line from..

B4X:
form.Initialize("form").SetName("form")
to

B4X:
form.Initialize("form").SetName("form").SetDefaultLabelPosition("top")
and now our form looks like..

formrun1.jpg


Due to the intelligence behind webix, everything is an object. So if we did a console.log(form.item) of the form object, we will see this for this project. We have not written any HTML so far but just called some .Set??? methods.

formobject.png
 
Last edited:

Mashiane

Expert
Licensed User
Longtime User
Adding Buttons

We want to add buttons to our form in the same row. To do this we need to create a grid. This grid will be a row with a single column and in this column there will be our buttons.

For now, one of the most important things to note and consider is the 'tabindex' of controls. Creating buttons on the same column inside a row is like creating a tree structure. Row>Column>Buttons.

We have already created controls and these had tabindexes 1 to 3. So the row we will create needs to sit at tabindex 4. This is used internally by the FD and helps with generating the tree. On the tree we want to show elements by order of importance, this importance is defined by the tabindex.

Our row will be 4, our column 4.1 and our buttons 4.1.1 to 4.1.4.

At the end we will have something like this..

row.jpg


When you click the form, the buttons to add the row appear in the property bag toolbar.

addrow.png


This also includes the button to add a column.

AddColumn.png


Click the 'form' in the treeview, click Add Row, update the row id to be 'r1' and change the tabindex to be 4 and save it.

Click the form in the treeview, click Add Column, update the column id to be 'r1c1' and change the tabindex to be 4.1 and save it.
 

Mashiane

Expert
Licensed User
Longtime User
For each of the buttons we will add the process will be the same.

1. Click the 'form' in the treeview,
2. On the side bar, goto to Controls > Buttons > Button, a button structure is added to the property bag.

sidebar.png


3. Change the button id, change the Parent.Parent, Parent.AddingMethod, Parent.TabIndex, Label.Text and set the Size.Width to ""

Looking at one of the buttons we have..

btnnew.png


We create the rest of the buttons and move our code over to our b4j project.

So what we have done is.

1. We initialized a row element, r1
2. We initialized a column element, r1c1
3. We initialized buttons and added them to the columns collection of r1c1.
4. We added r1c1 to the rows collection of r1
5. We added r1 to the form.
6. We then added the form to the page...

Our code for the row and column is like this..

B4X:
Dim r1 As WixElement
    r1.Initialize("r1")
    '
    Dim r1c1 As WixElement
    r1c1.Initialize("r1c1")
    '
    Dim btnnew As WixButton
    btnnew.Initialize("btnnew").SetLabel("New")
    'btnnew.SetClick("BANano.CallBack(Me,button1_click,Null)")
    r1c1.AddColumns(btnnew.Item)
    
    Dim btninsert As WixButton
    btninsert.Initialize("btninsert").SetLabel("Insert")
    'btninsert.SetClick("BANano.CallBack(Me,button1_click,Null)")
    r1c1.AddColumns(btninsert.Item)
    
    Dim btnupdate As WixButton
    btnupdate.Initialize("btnupdate").SetLabel("Update")
    'btnupdate.SetClick("BANano.CallBack(Me,button1_click,Null)")
    r1c1.AddColumns(btnupdate.Item)
    
    Dim btnread As WixButton
    btnread.Initialize("btnread").SetLabel("Read")
    'btnread.SetClick("BANano.CallBack(Me,button1_click,Null)")
    r1c1.AddColumns(btnread.Item)
    
    Dim btndelete As WixButton
    btndelete.Initialize("btndelete").SetLabel("Delete")
    'btndelete.SetClick("BANano.CallBack(Me,button1_click,Null)")
    r1c1.AddColumns(btndelete.Item)
    
    r1.AddRows(r1c1.Item)
    form.AddRows(r1.Item)
 

Mashiane

Expert
Licensed User
Longtime User
The complete form code now is...

B4X:
Sub Init(pgContainer As String)
    pg.Initialize("index", pgContainer).SetResponsive(True).SetHeader("Hello BANanoWebix")
    'lets create a form
    Dim form As WixForm
    form.Initialize("form").SetName("form").SetDefaultLabelPosition("top")
    
    Dim id As WixText
    id.Initialize("id").SetType("text").SetLabel("ID")
    form.AddRows(id.Item)
    
    Dim field1 As WixText
    field1.Initialize("field1").SetType("text").SetLabel("Field 1")
    form.AddRows(field1.Item)
    
    Dim field2 As WixText
    field2.Initialize("field2").SetType("text").SetLabel("Field 2")
    form.AddRows(field2.Item)
    
    Dim field3 As WixText
    field3.Initialize("field3").SetType("text").SetLabel("Field 3")
    form.AddRows(field3.Item)
    '
    Dim r1 As WixElement
    r1.Initialize("r1")
    '
    Dim r1c1 As WixElement
    r1c1.Initialize("r1c1")
    '
    Dim btnnew As WixButton
    btnnew.Initialize("btnnew").SetLabel("New")
    'btnnew.SetClick("BANano.CallBack(Me,button1_click,Null)")
    r1c1.AddColumns(btnnew.Item)
    
    Dim btninsert As WixButton
    btninsert.Initialize("btninsert").SetLabel("Insert")
    'btninsert.SetClick("BANano.CallBack(Me,button1_click,Null)")
    r1c1.AddColumns(btninsert.Item)
    
    Dim btnupdate As WixButton
    btnupdate.Initialize("btnupdate").SetLabel("Update")
    'btnupdate.SetClick("BANano.CallBack(Me,button1_click,Null)")
    r1c1.AddColumns(btnupdate.Item)
    
    Dim btnread As WixButton
    btnread.Initialize("btnread").SetLabel("Read")
    'btnread.SetClick("BANano.CallBack(Me,button1_click,Null)")
    r1c1.AddColumns(btnread.Item)
    
    Dim btndelete As WixButton
    btndelete.Initialize("btndelete").SetLabel("Delete")
    'btndelete.SetClick("BANano.CallBack(Me,button1_click,Null)")
    r1c1.AddColumns(btndelete.Item)
    
    r1.AddRows(r1c1.Item)
    form.AddRows(r1.Item)
    '
    pg.AddRows(form.Item)
    
    Log(form.Item)
    
    pg.UI
End Sub

We have commented out the button click events because the backend linkages to the db will be discussed in the next lesson.

The resized, responsive form is now available for further development.

updatedform.png
 

Mashiane

Expert
Licensed User
Longtime User
Summary

In this tutorial, we created a blank project using the BANanoWebixApp skeleton. We added a form, created some elements inside it and got introduced to the grid workings in bananowebix by adding a row, then a column and then some elements inside that column i.e. buttons.

We designed our form in the form designer and then copied and pasted the code on our banano project, executed it and it created what we needed.

That covers the UI in terms of creating an app for our project. We will look at the back end functionality next and use BANanoSQL as a backend for our CRUD.

#HelpingOthersToSucceed

Enjoy!
 

ThRuST

Well-Known Member
Licensed User
Longtime User
@Mashiane Hey this is indeed great work. The step by step guide is always useful, but I think you should considder creating a video tutorial, perhaps post it on youtube to attract new users as well. Anyway, nice going and keep up the good work.
 

ThRuST

Well-Known Member
Licensed User
Longtime User
That was funny :) I prefer to use TTS myself. This is an example from TTSMP3.com it uses the voice Mathieu from French. Personally I find the accent very charming :)
 

Attachments

  • speech.zip
    58.9 KB · Views: 283

RWK

Member
Licensed User
Hoy Mashy,
thanks for the great work.
I'll tried it so far....everything work fine except to the point at adding the form in the designer.
I click on the form icon, the property bag is shown and i can change the properties, but clicking the save button does not add the form in the treeview, but the generated source code of the form is shown correctly.

Webserver tested are : WebServer for chrome and usbwebserver (usbwebserver.com)

the generated BANanoWebixDemo is running correctly, as far as i can say.

Where is my fault?

Greetings
Rainer
 

Mashiane

Expert
Licensed User
Longtime User
everything work fine except to the point at adding the form in the designer.
Try and refresh the browser. There is a delay as we are running promises on the code CallInlinePhp to save stuff to SQLite php. It's a glitch I will look @, so try and work a little sss lll ooo www lll yyy. ha ha ha.

I think by the time the promise is fulfilled, something else might have happened and is causing the error, I also picked this up.

Thanks!
 

Mashiane

Expert
Licensed User
Longtime User
The next lesson will be about the Backends, we will look at

1. BANanoSQL
2. BANanoSQLite and
3. BANanoMySQL

The principles of how these helper classes work has already been discussed here in the forum, however if you are in a hurry, ahoy ahead.

Using the grid has been explained in detailed on the BANanoWebixDemo app. We will however touch on it at a later stage.

You will basically need .SetValues("form", map) and .GetValues("form")
 

ThRuST

Well-Known Member
Licensed User
Longtime User
@Mashiane Oh my dear family member :) , I see that you have worked soooo hard soo hard but still, AARRGHH!!! I hate to say it but but :-D It is too BLURRY!!! :) Please don't be sad puppy eyes I still love your work and you're almost there, but it takes a few more steps to get it right but you're getting there. Please please please try to increase the resolution, so that my eyes can see the beauty and poetry in your masterful work. You might want to record with a high res and put it on yourtube, then share the link. By then, I will LOVE your work with genuine PASSION. Dear brother in code, I admire your hard work, but just follow your brothers advice and we will all be happy :)
 

ThRuST

Well-Known Member
Licensed User
Longtime User
Let me find a proper screen recording tool for you. All for you, dear brother :)

Edit: Camstasia get it here. Do it all over again, and replace the video you first posted. Make sure the resolution is to your comfort when you play it back. If you Love it, I will love it even more :)

Here is a tutorial how to use it


Mashiane

Expert
Licensed User
Longtime User
It is too BLURRY!!!
I think you spoke too soon, the video is in youtube and you need to watch in HD there. I think its because it was still loading on their side, but I promise you if you watch it again, you will find out that it ok. Anyway I will check your camstasia but Im vey happy with active presentor. Ta!
 

ThRuST

Well-Known Member
Licensed User
Longtime User
ah yes, you're right it looks better now. I must have strreamed it before all data was transferred!! Crystal clear vision, it might have been my glasses lol TA! :)
 

ThRuST

Well-Known Member
Licensed User
Longtime User
Now my dear friend, I will look at your video and enjoy your hard work. You sure have adopted quite some advanced skills, I am very proud to see your work. You have an amazing talent to absorb and understand others code, and output something new. That's pure genius. I'm luvin' it :)
 
Top