Let's face it, making good looking buttons with core B4A is cumbersome and all those JPG's with different resolutions and colors are a real pain to manage, plus they bloat your application significantly.
SmartHost allows you to use Icons from fonts in any size shape and color that you want. Because they are vector based they scale to any size without loss of quality. Unicode has thousands of these Icons and Emoji's defined and most of them are built into Android. Additionally SmartHost makes it easy to add Text, Animations, Gradients, Rotations, Touch Effects etc to buttons to make them much more visually interesting.
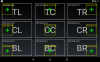
Before we create our first button it will be helpful to understand the structure of a SmartHost. A SmartHost is combined of multiple layers that appear as a single image as shown below.

SmartHost Layers (Bottom Up)
Background: Supports images, colors and gradients
Layers 0-15: Can contain font Icons or Text.
Layers 16-22: System layers which will be covered later.
Foreground: Transparent layer that handles all touch events.
Creating a SmartHost Button
Before starting make sure you have added the SmartHost library to your project.
Dim a SmartHost
Initialize a SmartHost
Add the SmartHost to a parent panel or Activity
Add an Icon to the SmartHost
Add some Text to the SmartHost
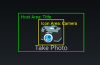
This is what we have so far.

Add a Click Event Handler
'This uses the EventName provided when the SmartHost was initialized and appends a _Click to it.
Adding more Layers
'We will another layer indicating No Photos
Add a Gradient Background
'We will add a gradient to the SmartHost to make it look more button like.
This is what the final button looks. Of course you cannot see the animated X, but it's there.

Useful Links:
Link to the SmartHost library and full demo: SmartHost library and Demo
Link to using EmojiOne font with SmartHost: Beautiful Icons and Buttons with EmojiOne
Link to library for easy access to Unicode Icons: List of Named Icons from Unicode and other Fonts
SmartHost allows you to use Icons from fonts in any size shape and color that you want. Because they are vector based they scale to any size without loss of quality. Unicode has thousands of these Icons and Emoji's defined and most of them are built into Android. Additionally SmartHost makes it easy to add Text, Animations, Gradients, Rotations, Touch Effects etc to buttons to make them much more visually interesting.
Before we create our first button it will be helpful to understand the structure of a SmartHost. A SmartHost is combined of multiple layers that appear as a single image as shown below.
SmartHost Layers (Bottom Up)
Background: Supports images, colors and gradients
Layers 0-15: Can contain font Icons or Text.
Layers 16-22: System layers which will be covered later.
Foreground: Transparent layer that handles all touch events.
Creating a SmartHost Button
Before starting make sure you have added the SmartHost library to your project.
Dim a SmartHost
B4X:
Dim SH as SmartHostInitialize a SmartHost
B4X:
'HostName ("SH") - This name is often passed back in Callbacks to allow shared event handlers.
'Callback Object (Me) - Will always be: Me
'Parent object (Activity) - The name of a Panel or Activity that this SmartHost will be placed onto.
'EventName ("SHEvent") - The base name of the event handler
'Stacks (1) - Determines whether Icons and Text will share the same stack. Just use 1 for now.
SH.Initialize("SH", Me, Activity, "SHEvent", 1)
Add the SmartHost to a parent panel or Activity
B4X:
'Left (35%x) - Sets the left edge of the SmartHost
'Top (35%y) - Sets the Top edge of the SmartHost
'Width (25%x) - Sets the Width of the SmartHost
'Height (30%y) - Sets the Height of the SmartHost
'IconSize (20%y) - Sets the Width AND Height of the Icon within the SmartHost.
'IconLocation("LC") - Sets the position of the Icon within the SmartHost. See the attached image file IconPosition.png for codes and locations.
SH.SetLayout(35%x, 35%y, 25%x, 30%y, 20%y, "CC")
Add an Icon to the SmartHost
B4X:
'We will add a Camera Icon
'LayerName ("Camera"): A name by which to reference this layer in future operations
'Icon (0x1F4F7): The int value of a character in the Font table. If you use my Icons_ class you can more easily browse the Unicode table and use Icons.Unicode.MiscSymbolsExt.Camera
'Color (Colors.Red): The color of the Icon. This has no effect on Emoji.
'IconSize (100): The size of the Icon expressed as a percentage of the maximum size.
'Font (TypeFace.Default): The Typeface to use for the Icon character
SH.LayerAddIcon("Camera", 0x1F4F7, Colors.Red, 100, Typeface.DEFAULT)
Add some Text to the SmartHost
B4X:
'We will add some text
'LayerName ("Title"): A name by which to reference this layer in future operations
'Text ("Take Photo"): The text to add to the SmartHost
'TextColor (Colors.White): The color of the text to be added.
'TextSize (50): The size of the text expressed as a percentage of the maximum size that would fit within the SmartHost text area.
'Gravity (Gravity.CENTER_HORIZONTAL + Gravity.BOTTOM): The gravity of the text.
'TextWrap (False): Whether to wrap the text if necessary.
'Font (TypeFace.Default): The Typeface to use for the text.
SH.LayerAddText("Title", "Take Photo", Colors.White, 50, Gravity.CENTER_HORIZONTAL + Gravity.BOTTOM, False, Typeface.DEFAULT)
This is what we have so far.
Add a Click Event Handler
'This uses the EventName provided when the SmartHost was initialized and appends a _Click to it.
B4X:
Sub SHEvent_Click
    Msgbox("You clicked on the Camera", "Camera Click")
End Sub
Adding more Layers
'We will another layer indicating No Photos
B4X:
'Add a layer called "NoPhoto" and place an X on it and color it red.
'With the Icons library you would use Icons.Unicode.Dingbats.Cross_Mark instead of 0x274C
SH.LayerAddIcon("NoPhoto", 0x274C, Colors.Red, 100, Typeface.DEFAULT)

'Add an animation to the layer "NoPhoto" to cause the X to pulsate.
'Layer ("NoPhoto"): The Layer name to animate.
'X1 (0.9): starting X size multiplication factor.
'Y1 (0.9): starting Y size multiplication factor.
'X2 (1.2): ending X size multiplication factor.
'Y2 (1.2): ending Y size multiplication factor.
'Duration (1000): Duration for 1 cycle in millieseconds
'RepeatMode (SH.cRepeatReverse): Uses a constant to indicate RepeatMode
'RepeatCount (SH.cRepeatForever): Animation will continue until stopped.
'Delay (0): Delay in millieseconds before starting each cycle.
SH.LayerAnimateResize("NoPhoto", 0.9, 0.9, 1.2, 1.2, 1000, SH.cRepeatReverse, SH.cRepeatForever, 0)

'Change the Text to "No Photo", Color to Red
'We still use the SH.LayerAddText function. Because the Layer name already exists it does a modification instead of creating a new layer.
SH.LayerAddText("Title", "No Photo", Colors.Red, 60, Gravity.CENTER_HORIZONTAL + Gravity.BOTTOM, False, Typeface.DEFAULT_BOLD)
Add a Gradient Background
'We will add a gradient to the SmartHost to make it look more button like.
B4X:
'Focus ("HOST"): Tells the SmartHost to apply the gradient to the entire Host area.
'ColorArray(Colors.White, Colors.Blue): An array of colors to use.  This can be any number of colors.
'Radius (20): The Radius of the corner.
'Style ("TOP_BOTTOM"): The style of gradient to apply. Uses standard gradient names.
SH.BackgroundGradient("HOST", Array As Int(Colors.White, Colors.Blue), 20, "TOP_BOTTOM")
This is what the final button looks. Of course you cannot see the animated X, but it's there.
Useful Links:
Link to the SmartHost library and full demo: SmartHost library and Demo
Link to using EmojiOne font with SmartHost: Beautiful Icons and Buttons with EmojiOne
Link to library for easy access to Unicode Icons: List of Named Icons from Unicode and other Fonts
Attachments
Last edited: