*START OF NOTICE
As of 02 FEB 2021, this project is is no longer maintained as it has given birth to BVAD3.
This project was a joy to create, however like everything that has a start and an end, its time to move on and evolve. BVAD3 is faster, more simpler to implement and takes advantage of the Abstract Designer use.
Subscribe to Telegram Channel
[BANanoVuetifyAD] Vuetify WebSites & WebApps with BANano for Dummies
Ahoy!!!
*END OF NOTICE
UPDATE 24 October 2020: The recommended methodology to create BANanoVuetify WebApp is being discussed here: MealPrep. This covers most of what VueJS + Vuetify is all about in terms of the internals.
Whilst you can use the designer to create your UX, you need to separate your concerns when creating the app just like its done on the MealPrep by using components and routers for the pages.
DO NOT FOLLOW THE APPROACH USED IN CREATING THE BANANOVUEMATERIALDEMO WHEN CREATING YOUR APPS. THAT METHOD IS NO LONGER FEASIBLE.
Download
BANanoVuetifyAD - Prelease Playlist on Youtube
BANanoVueMaterial (Vuetify) Playlist on Youtube
2020-05-20 Update: Important Update
BANanoVueMaterial Designer Usage - Mock.Compile.Publish
BANanoVueMaterialCore (pure vuetify without extensions)
Exploring Components & Router Basics
How to ask questions, request help, report bugs and request enhancements + Telegram Channel
Thanks to everyone who has been playing with this and highlighting issues and requesting features. You are stars!
*** IMPORTANT: Migrating to the new version
Word. Moving from VueMaterial to Vuetify was inevitable and whilst both are Vue Material based frameworks, Vuetify has more strengths. If if was going to be possible, we would not be having a migration guide, however things changed and enhancements happened and some code rewrites took place. When doing the transition from the VueMaterial to Vuetify codebases, we tried to make the code transition to be as smooth as possible, thus our migration guide is as small as possible. We did not want to dictate how to use the lib, so we removed some things that were hard coded and fixed. This was specific to the side drawer. To test the migration, the old examples were converted to new examples (see below) and all of them work.
BANanoVueMaterial is complete open source, so this means you can use it to your hearts content and adjust it and make it your own. If you enhance, send us word, we will merge. Make the code simple and comment it as much as you can. I cannot over-emphasize that Vuetify is LARGE, so check their website on how components are created and used to learn stuff. Do enjoy. TheMash. #IAmLovingThis
BANanoVuetify (recommended for new projects & migration notes attached)
You can track our progress from here. All the components that we got from VueMaterial exists in Vuetify and more!!!
Tutorials (New)
Mock.Compile.Publish
NB: Download and Import the Project Components files for the Expense Tracker here.
1. Expense Tracker with BANanoSQL
Expense Tracker Part 1
Expense Tracker Part 2
Expense Tracker Part 3
Expense Tracker Part 4
Preparations for Part 5
Expense Tracker Part 5.1
Expense Tracker Part 5.2
2. Expense Tracker with SQLite (you need to understand all of 1. Expense Tracker with BANanoSQL first!)
Making your app use SQLite as a backend
Mock.Compile.Publish Expense Tracker with SQLite as BackEnd Full Implementation
3. Expenses Tracker with MSSQL (you need to understand all of 1. & 2. above first!)
Mock.Compile.Publish Expense Tracker with MSSQL as BackEnd
4. Expense Tracker with MySQL (you need to understand all of 1. - 3. above first)
Mock.Compile.Publish Expense Tracker with MySQL as BackEnd
NEW NEW NEW!!!! Handling Events
Developing a grid with the Designer
Developing forms with the Designer
Designing text field controls with the Designer
Designing text area controls with the Designer
Designing password controls with the Designer
Designing images with the Designer
Designing file input with the Designer
Designing buttons with the Designer
Designing checkboxes with the Designer
Designing switches with the Designer
Designing icons with Designer
Designing labels with Designer
Designing sliders with the Designer
Designing select, combo and autocomplete with the Designer
Designing radio boxes with the Designer
Designing date & time pickers with the Designer (NB: functionality works on your app)
Designing a parallax with the Designer
Designing a container with the Designer
Designing the appbar, toolbars and systembar with the Designer - Part 1
Designing the appbar, toolbars and systembar with the Designer - Part 2
Drag n Drop Menu - Part 1
Drag n Drop Menu - Part 2
Drag n Drop Carousel
Drag n Drop Dialog
Drag n Drop Rating
Drag n Drop SpeedDial
DataTable multi selects
SetFocus(?)
Invisible File Selector
DataTable GetItemKeys
Drag n Drop Chips
Drag n Drop Badges
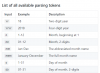
Drag n Drop Avatars
Exporting Component Schemas (Multi Development Mode)
Importing Component Schemas (Multi Development Mode)
Drag n Drop Lists
Drag n Drop Tabs
Drag n Drop Stepper
Drag n Drop ExpansionPanels (Accordion)
Drag n Drop Page
Setting Project Properties
Reading Text files (without upload to server)
Reading Excel files (without upload to server)
Reporting (New)
Excel Client Side Reporting with OXML
Example Projects
Hello World
Navigation (1 or more pages using v-show directive)
Login Screen
User Registration Screen
Expenses.Show - MySQL+PHP+ChartKick CRUD
Form Utilities - BANanoSQL CRUD
Calculations - using watch directives
IMPORTANT: Asking Questions about BANanoVueMaterial
1. Please do not ask questions on this thread as this is about updates and new developments about BANanoVueMaterial.
2. When asking a question, please use the B4J Forum and prefix your question with [BANanoVueMaterial] Your Question
3. As the author of this lib, I would recommend that in the content of your question you also address it to myself with @Mashiane (this will also help me find and attend to your questions faster as it will show in my personal notifications)
Related Content
BANanoVue - a now updated CORE of BANanoVueMaterial
BANanoWired - a mockup framework build on BANanoVue (WIP)
BANanoPDFDesign - a creation based on BANanoVueMaterial for PDF reporting (WIP)
BANanoVMDesign - this intends to support BANanoVueMaterial design philosophy. (WIP)
Have fun and enjoy!
PS: BANanoVueMaterial uses an updated version of the BANanoPostProcessor library done by Kiffi.
As of 02 FEB 2021, this project is is no longer maintained as it has given birth to BVAD3.
This project was a joy to create, however like everything that has a start and an end, its time to move on and evolve. BVAD3 is faster, more simpler to implement and takes advantage of the Abstract Designer use.
Subscribe to Telegram Channel
[BANanoVuetifyAD] Vuetify WebSites & WebApps with BANano for Dummies
Ahoy!!!
*END OF NOTICE
UPDATE 24 October 2020: The recommended methodology to create BANanoVuetify WebApp is being discussed here: MealPrep. This covers most of what VueJS + Vuetify is all about in terms of the internals.
Whilst you can use the designer to create your UX, you need to separate your concerns when creating the app just like its done on the MealPrep by using components and routers for the pages.
DO NOT FOLLOW THE APPROACH USED IN CREATING THE BANANOVUEMATERIALDEMO WHEN CREATING YOUR APPS. THAT METHOD IS NO LONGER FEASIBLE.
Download
BANanoVuetifyAD - Prelease Playlist on Youtube
BANanoVueMaterial (Vuetify) Playlist on Youtube
2020-05-20 Update: Important Update
BANanoVueMaterial Designer Usage - Mock.Compile.Publish
BANanoVueMaterialCore (pure vuetify without extensions)
Exploring Components & Router Basics
How to ask questions, request help, report bugs and request enhancements + Telegram Channel
Thanks to everyone who has been playing with this and highlighting issues and requesting features. You are stars!
*** IMPORTANT: Migrating to the new version
Word. Moving from VueMaterial to Vuetify was inevitable and whilst both are Vue Material based frameworks, Vuetify has more strengths. If if was going to be possible, we would not be having a migration guide, however things changed and enhancements happened and some code rewrites took place. When doing the transition from the VueMaterial to Vuetify codebases, we tried to make the code transition to be as smooth as possible, thus our migration guide is as small as possible. We did not want to dictate how to use the lib, so we removed some things that were hard coded and fixed. This was specific to the side drawer. To test the migration, the old examples were converted to new examples (see below) and all of them work.
BANanoVueMaterial is complete open source, so this means you can use it to your hearts content and adjust it and make it your own. If you enhance, send us word, we will merge. Make the code simple and comment it as much as you can. I cannot over-emphasize that Vuetify is LARGE, so check their website on how components are created and used to learn stuff. Do enjoy. TheMash. #IAmLovingThis
BANanoVuetify (recommended for new projects & migration notes attached)
You can track our progress from here. All the components that we got from VueMaterial exists in Vuetify and more!!!
- Copy all the files in the 1. External Libraries folder to your B4J external libraries folder
- If you want to explore the BANanoVuetify source code, open and run the project in 2. Library
- If you want to explore all the components in this version, open and run the project in 3. Demo
- You can also explore other specific examples from the 4. Examples folder
Tutorials (New)
Mock.Compile.Publish
NB: Download and Import the Project Components files for the Expense Tracker here.
1. Expense Tracker with BANanoSQL
Expense Tracker Part 1
Expense Tracker Part 2
Expense Tracker Part 3
Expense Tracker Part 4
Preparations for Part 5
Expense Tracker Part 5.1
Expense Tracker Part 5.2
2. Expense Tracker with SQLite (you need to understand all of 1. Expense Tracker with BANanoSQL first!)
Making your app use SQLite as a backend
Mock.Compile.Publish Expense Tracker with SQLite as BackEnd Full Implementation
3. Expenses Tracker with MSSQL (you need to understand all of 1. & 2. above first!)
Mock.Compile.Publish Expense Tracker with MSSQL as BackEnd
4. Expense Tracker with MySQL (you need to understand all of 1. - 3. above first)
Mock.Compile.Publish Expense Tracker with MySQL as BackEnd
NEW NEW NEW!!!! Handling Events
Developing a grid with the Designer
Developing forms with the Designer
Designing text field controls with the Designer
Designing text area controls with the Designer
Designing password controls with the Designer
Designing images with the Designer
Designing file input with the Designer
Designing buttons with the Designer
Designing checkboxes with the Designer
Designing switches with the Designer
Designing icons with Designer
Designing labels with Designer
Designing sliders with the Designer
Designing select, combo and autocomplete with the Designer
Designing radio boxes with the Designer
Designing date & time pickers with the Designer (NB: functionality works on your app)
Designing a parallax with the Designer
Designing a container with the Designer
Designing the appbar, toolbars and systembar with the Designer - Part 1
Designing the appbar, toolbars and systembar with the Designer - Part 2
Drag n Drop Menu - Part 1
Drag n Drop Menu - Part 2
Drag n Drop Carousel
Drag n Drop Dialog
Drag n Drop Rating
Drag n Drop SpeedDial
DataTable multi selects
SetFocus(?)
Invisible File Selector
DataTable GetItemKeys
Drag n Drop Chips
Drag n Drop Badges
Drag n Drop Avatars
Exporting Component Schemas (Multi Development Mode)
Importing Component Schemas (Multi Development Mode)
Drag n Drop Lists
Drag n Drop Tabs
Drag n Drop Stepper
Drag n Drop ExpansionPanels (Accordion)
Drag n Drop Page
Setting Project Properties
Reading Text files (without upload to server)
Reading Excel files (without upload to server)
Reporting (New)
Excel Client Side Reporting with OXML
Example Projects
Hello World
Navigation (1 or more pages using v-show directive)
Login Screen
User Registration Screen
Expenses.Show - MySQL+PHP+ChartKick CRUD
Form Utilities - BANanoSQL CRUD
Calculations - using watch directives
IMPORTANT: Asking Questions about BANanoVueMaterial
1. Please do not ask questions on this thread as this is about updates and new developments about BANanoVueMaterial.
2. When asking a question, please use the B4J Forum and prefix your question with [BANanoVueMaterial] Your Question
3. As the author of this lib, I would recommend that in the content of your question you also address it to myself with @Mashiane (this will also help me find and attend to your questions faster as it will show in my personal notifications)
Related Content
BANanoVue - a now updated CORE of BANanoVueMaterial
BANanoWired - a mockup framework build on BANanoVue (WIP)
BANanoPDFDesign - a creation based on BANanoVueMaterial for PDF reporting (WIP)
BANanoVMDesign - this intends to support BANanoVueMaterial design philosophy. (WIP)
Have fun and enjoy!
PS: BANanoVueMaterial uses an updated version of the BANanoPostProcessor library done by Kiffi.
Last edited: