Background
One of the most common issues that Android developers face is the need to adopt the user interface to devices with different screen sizes.
As described in the visual designer tutorial, you can create multiple layout variants to match different screens.
However it is not feasible nor recommended to create many layout variants.
Basic4android v1.9 introduces a new tool named "designer scripts" that will help you fine tune your layout and easily adjust it to different screens and resolutions.
The idea is to combine the usefulness of the visual designer with the flexibility and power of programming code.
You can write a simple script to adjust the layout based on the dimensions of the current device and immediately see the results. No need to compile and install the full program each time.
You can also immediately see the results on the abstract designer. This allows you to test your layout on many different screen sizes.
How to
Every layout file can include script code. The script is written inside the visual designer under the new Designer Scripts tab:
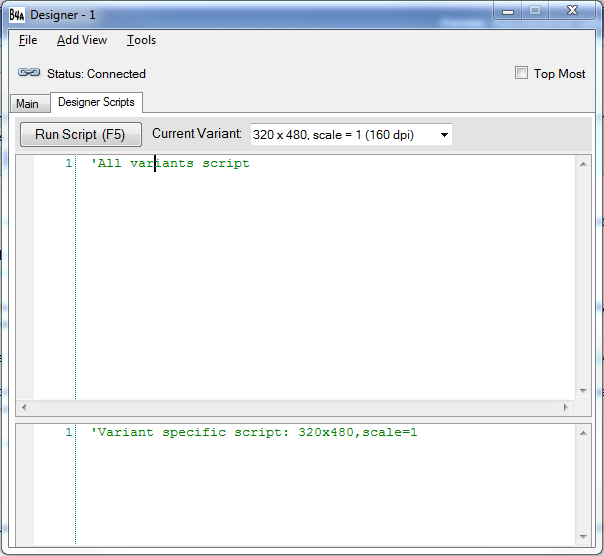
Their are two types of scripts: the general script that will be applied to all variants, and a script specific to the current variant.
Once you press on the Run Script button (or F5), the script is executed and the connected device / emulator and abstract designer will show the updated layout.
The same thing happens when you run your compiled program. The (now compiled) script is executed after the layout is loaded.
The general script is first executed followed by the variant specific script.
The script language is very simple and is optimized for managing the layout.
Lets start with an example.
Example
In this example we will build the following layout:
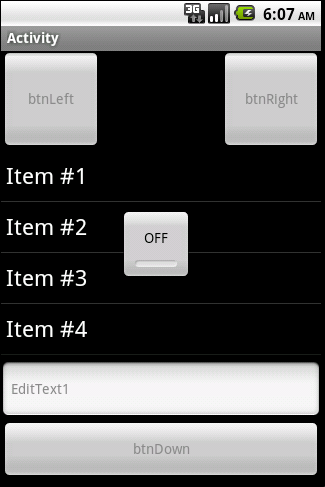
btnLeft and btnRight should be located in the top corners.
btnDown should be located at the bottom and fill the entire width.
ListView1 should fill the entire available area.
ToggleButton1 should be located exactly in the center.
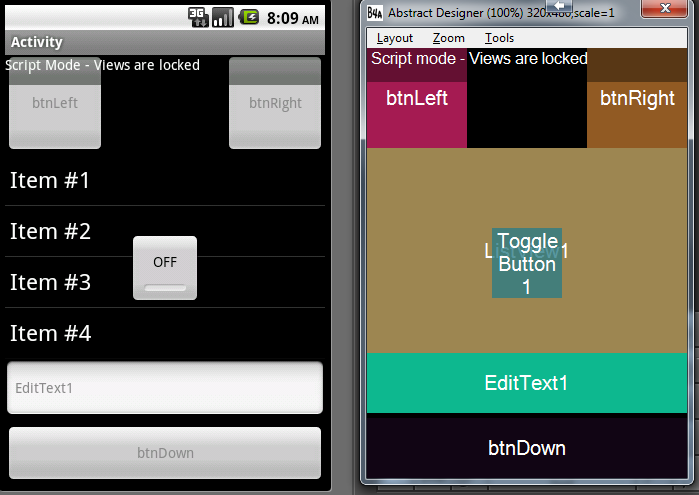
The first step is to add the views and position them with the visual designer (you do not need to be 100% accurate).
Now we will select the designer scripts tab and add the code.
Note that the views are locked when the designer scripts tab is selected.
The code in this case is:
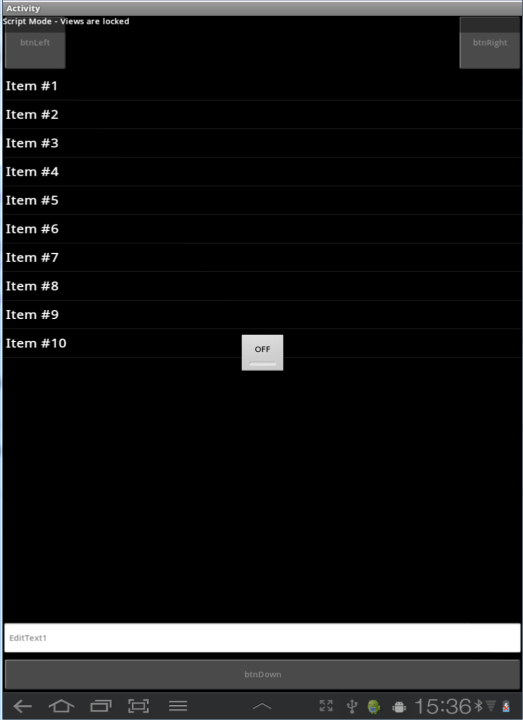
The result:
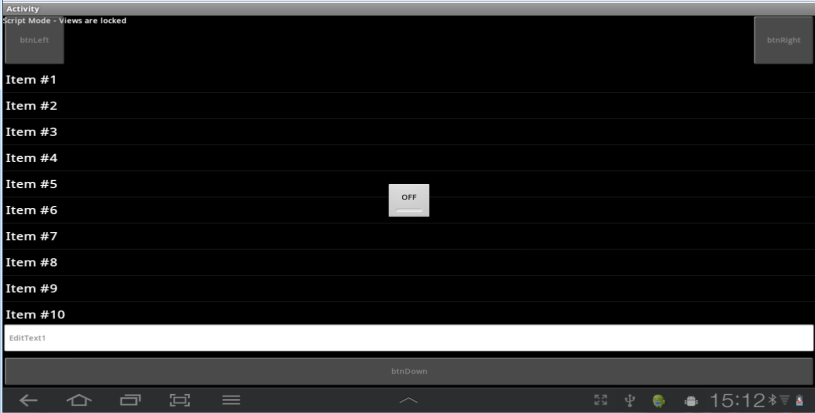
10'' tablet:
Reference
The following properties are supported:
- Left / Right / Top / Bottom / HorizontalCenter / VerticalCenter - Gets or sets the view's position. The view's width or height will not be changed.
- Width / Height - Gets or Sets the view's width or height.
- TextSize - Gets or sets the text size. You should not used 'dip' units with this value as it is already measured in physical units.
- Text - Gets or sets the view's text.
TextSize and Text properties are only available to views that show text.
- Image - Sets the image file (write-only). Only supported by ImageView.
- Visible - Gets or sets the view's visible property.
Methods:
- SetLeftAndRight (Left, Right) - Sets the view's left and right properties. This method changes the width of the view based on the two values.
- SetTopAndBottom (Top, Bottom) - Sets the view's top and bottom properties. This method changes the height of the view based on the two values.
Keywords:
- Min / Max - Same as the standard Min / Max keywords.
- AutoScale - Autoscales a view based on the device physical size.
Example:
- AutoScaleAll - Autoscales all layout views.
Example:
- AutoScaleRate - Sets the scaling rate, a value between 0 to 1. The default value is 0.3
Example:
- ActivitySize - Returns the approximate activity size measured in inches.
- If ... Then condition blocks - Both single line and multiline statements are supported. The syntax is the same as the regular If blocks.
- Landscape (v3.20) - Returns True if the current orientation is landscape.
- Portrait (v3.20) - Returns True if the current orientation is portrait.
Notes and tips
- %x and %y values are relative to the view that loads the layout.
Usually it will be the activity. However it you use Panel.LoadLayout then it will be relative to this panel.
Note that ScrollView inner panel width is set to -1. This is a special value that causes the panel to fill its parent available size.
If you want to load a layout file (with a script) to the inner panel then you will need to first set the panel width: ScrollView.Panel.Width = ScrollView.Width.
- Use 'dip' units for all specified sizes (except of TextSize). By using 'dip' units the values will be scaled correctly on devices with higher or lower resolution.
- In most cases it is not recommended to create variants with scales other than 1.0. When you add such a variant you will be given an option to add a normalized variant instead with a scale of 1.0.
- Variables - You can use variables in the script. You do not need to declare the variables before using them (there is no Dim keyword in the script).
- Activity.RerunDesignerScript (LayoutFile As String, Width As Int, Height As Int) - In some cases it is desirable to run the script code again during the program. For example you may want to update the layout when the soft keyboard becomes visible. Activity.RerunDesignerScript method allows you to run the script again and specify the width and height that will represent 100%x and 100%y. In order for this method to work all the views referenced in the script must be declared in Sub Globals.
Note that this method should not be used to handle screen orientation changes. In that case the activity will be recreated and the script will run during the Activity.LoadLayout call.
It is recommended to continue to this tutorial: http://www.b4x.com/forum/basic4andr...ing-multiple-screens-tips-best-practices.html
One of the most common issues that Android developers face is the need to adopt the user interface to devices with different screen sizes.
As described in the visual designer tutorial, you can create multiple layout variants to match different screens.
However it is not feasible nor recommended to create many layout variants.
Basic4android v1.9 introduces a new tool named "designer scripts" that will help you fine tune your layout and easily adjust it to different screens and resolutions.
The idea is to combine the usefulness of the visual designer with the flexibility and power of programming code.
You can write a simple script to adjust the layout based on the dimensions of the current device and immediately see the results. No need to compile and install the full program each time.
You can also immediately see the results on the abstract designer. This allows you to test your layout on many different screen sizes.
How to
Every layout file can include script code. The script is written inside the visual designer under the new Designer Scripts tab:
Their are two types of scripts: the general script that will be applied to all variants, and a script specific to the current variant.
Once you press on the Run Script button (or F5), the script is executed and the connected device / emulator and abstract designer will show the updated layout.
The same thing happens when you run your compiled program. The (now compiled) script is executed after the layout is loaded.
The general script is first executed followed by the variant specific script.
The script language is very simple and is optimized for managing the layout.
Lets start with an example.
Example
In this example we will build the following layout:
btnLeft and btnRight should be located in the top corners.
btnDown should be located at the bottom and fill the entire width.
ListView1 should fill the entire available area.
ToggleButton1 should be located exactly in the center.
The first step is to add the views and position them with the visual designer (you do not need to be 100% accurate).
Now we will select the designer scripts tab and add the code.
Note that the views are locked when the designer scripts tab is selected.
The code in this case is:
B4X:
'All variants script
btnRight.Right = 100%x

btnDown.Bottom = 100%y
btnDown.Width = 100%x

EditText1.Width = 100%x
EditText1.Bottom = btnDown.Top - 5dip

ListView1.Width = 100%x
ListView1.SetTopAndBottom(btnLeft.Bottom, EditText1.Top)

ToggleButton1.HorizontalCenter = 50%x
ToggleButton1.VerticalCenter = 50%y
The result:
10'' tablet:
Reference
The following properties are supported:
- Left / Right / Top / Bottom / HorizontalCenter / VerticalCenter - Gets or sets the view's position. The view's width or height will not be changed.
- Width / Height - Gets or Sets the view's width or height.
- TextSize - Gets or sets the text size. You should not used 'dip' units with this value as it is already measured in physical units.
- Text - Gets or sets the view's text.
TextSize and Text properties are only available to views that show text.
- Image - Sets the image file (write-only). Only supported by ImageView.
- Visible - Gets or sets the view's visible property.
Methods:
- SetLeftAndRight (Left, Right) - Sets the view's left and right properties. This method changes the width of the view based on the two values.
- SetTopAndBottom (Top, Bottom) - Sets the view's top and bottom properties. This method changes the height of the view based on the two values.
Keywords:
- Min / Max - Same as the standard Min / Max keywords.
- AutoScale - Autoscales a view based on the device physical size.
Example:
B4X:
AutoScale(Button1)Example:
B4X:
AutoScaleAllExample:
B4X:
AutoScaleRate(0.2)- ActivitySize - Returns the approximate activity size measured in inches.
- If ... Then condition blocks - Both single line and multiline statements are supported. The syntax is the same as the regular If blocks.
- Landscape (v3.20) - Returns True if the current orientation is landscape.
- Portrait (v3.20) - Returns True if the current orientation is portrait.
Notes and tips
- %x and %y values are relative to the view that loads the layout.
Usually it will be the activity. However it you use Panel.LoadLayout then it will be relative to this panel.
Note that ScrollView inner panel width is set to -1. This is a special value that causes the panel to fill its parent available size.
If you want to load a layout file (with a script) to the inner panel then you will need to first set the panel width: ScrollView.Panel.Width = ScrollView.Width.
- Use 'dip' units for all specified sizes (except of TextSize). By using 'dip' units the values will be scaled correctly on devices with higher or lower resolution.
- In most cases it is not recommended to create variants with scales other than 1.0. When you add such a variant you will be given an option to add a normalized variant instead with a scale of 1.0.
- Variables - You can use variables in the script. You do not need to declare the variables before using them (there is no Dim keyword in the script).
- Activity.RerunDesignerScript (LayoutFile As String, Width As Int, Height As Int) - In some cases it is desirable to run the script code again during the program. For example you may want to update the layout when the soft keyboard becomes visible. Activity.RerunDesignerScript method allows you to run the script again and specify the width and height that will represent 100%x and 100%y. In order for this method to work all the views referenced in the script must be declared in Sub Globals.
Note that this method should not be used to handle screen orientation changes. In that case the activity will be recreated and the script will run during the Activity.LoadLayout call.
It is recommended to continue to this tutorial: http://www.b4x.com/forum/basic4andr...ing-multiple-screens-tips-best-practices.html
Last edited:
")