How do they... ? #1
(French version/Version française)
This tutorial is the first in a series that will show you how to reproduce some user interfaces (UI) with the classes and libraries available with B4A. The main goal is to show you how to best use the tools at your disposal. I do not claim to teach you how to design user interfaces and I will spare you any theory on the subject. I am not a professional designer. There are probably other methods as good as the ones here.
I chose the interfaces to be reproduced for various reasons. Their common point is to be of professional quality. I voluntarily discarded the interfaces of games, which are a special case, and I shall not discuss the quality, efficiency or visual appeal of these interfaces.
Note that I have not done reverse engineering; I thus ignore the exact method used by the authors of these UI, and I have reproduced the graphics from screenshots (thanks to the inventor of copy/paste). For copyright reasons, there will be nothing to download in this article.
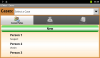
We'll start with Microsoft's Hotmail, and more specifically, its message list. This is a sober and classic interface:
We see that the interface is composed of a list that is not a Listview (Listview does not allow us to add a Checkbox and is limited to two Labels) and, above this list, there is a tab bar. We are therefore faced with a TabHost hosting a ScrollView. Just below the tab bar, there is a header indicating what messaging folder is currently displayed. It is a label that is not part of the ScrollView. By cons, in other pages, it is embedded. I will show this variant at the end. For now, I open the B4A designer and I create my TabHost. Next, I create a panel consisting of a Label and a ScrollView:
In the script editor, I type the code placing and sizing views. The TabHost fills the screen. The Label and the ScrollView share the Panel. The Label has a fixed height.
B4X:
'All variants script
TabHost1.Height = 100%y
TabHost1.Width = 100%x

'Panel1 Views
Label1.Top = 0
Label1.Left = 0
Label1.Width = 100%x
Label1.Height = 30dip
ScrollView1.Top = Label1.Height
ScrollView1.Height = 100%y - ScrollView1.Top
ScrollView1.Width = 100%x
I save this layout with the name TabMsg.bal.
In the sub Activity_Create, I load the layout to the Activity and I add the Panel to the TabHost:
B4X:
Sub Globals
   Dim TabHost1 As TabHost
   Dim Panel1 As Panel
   Dim Label1 As Label
   Dim ScrollView1 As ScrollView
End Sub

Sub Activity_Create(FirstTime As Boolean)
   Activity.LoadLayout("TabMsg.bal")

   Dim bmpDefault, bmpSelected As Bitmap
   bmpDefault = LoadBitmap(File.DirAssets, "envel_orange.png")
   bmpSelected = bmpDefault
   Panel1.RemoveView
   TabHost1.AddTabWithIcon2("Hotmail", bmpDefault,  bmpSelected, Panel1)
End SubTo add an icon in the tab, I use the function AddTabWithIcon2. As the icon is the same regardless of the state of the tab, I load it only once in memory (bmpSelected points to bmpDefault).
Now I add the other tabs. As I have not created content for these tabs, I create a white colored panel to fill them: DummyPanel. In this example, I do not care about icons.
B4X:
Dim DummyPanel As Panel
DummyPanel.Initialize("")
DummyPanel.Color = Colors.White
TabHost1.AddTab2("Home", DummyPanel)
TabHost1.AddTab2("All emails", DummyPanel)

Dim bmpDefault, bmpSelected As Bitmap
bmpDefault = LoadBitmap(File.DirAssets, "envel_orange.png")
bmpSelected = bmpDefault
Panel1.RemoveView
TabHost1.AddTabWithIcon2("Hotmail", bmpDefault,  bmpSelected, Panel1)

TabHost1.AddTab2("School", DummyPanel)
TabHost1.AddTab2("Search", DummyPanel)
B4X:
Label1.Text = " Hotmail - Inbox"
Label1.Typeface = Typeface.DEFAULT_BOLD
Label1.Color = Colors.RGB(124, 133, 148) 'Bluish grayI use the library TabHostExtras to change all that. I select it in B4A Libs and I add it in Globals:
B4X:
Dim THExtras As TabHostExtras
B4X:
THExtras.setTabHeight(TabHost1, 62dip)
THExtras.setTabHostPadding(TabHost1, 0, 0, 0, 0)
THExtras.setTabContentViewPadding(TabHost1, 0, 0, 0, 0)
THExtras.setTabTextColorStateList(TabHost1, "tab_widget_text_colors")
B4X:
<?xml version="1.0" encoding="utf-8"?>
<selector xmlns:android="http://schemas.android.com/apk/res/android">
   <item android:state_selected="true"
      android:color="#FFFFFF" />
   <item android:state_selected="false"
      android:color="#606060" />
</selector>It remains to color the tab background. Here, things get complicated because TabHostExtras v2.0 does not have the needed function. So I have to either write a library to fill the gap, or use the Android API with the Reflection library. I choose the second option. I add in Activity_Create:
B4X:
Dim cdEnabled, cdSelected As ColorDrawable
cdEnabled.Initialize(Colors.Black, 0)
cdSelected.Initialize(Colors.Gray, 0)
Dim r As Reflector
r.Target = TabHost1
r.Target = r.RunMethod("getTabWidget")
For t = 0 To TabHost1.TabCount - 1
   Dim TabPanel As Panel
   TabPanel = r.RunMethod2("getChildAt", t, "java.lang.int")
   Dim sd As StateListDrawable
   sd.Initialize
   sd.AddState(sd.State_Selected, cdSelected)
   sd.AddState(sd.State_Pressed, LoadDrawable("highlight_pressed"))
   sd.AddState(sd.State_Enabled, cdEnabled)
   TabPanel.Background = sd
Next
B4X:
Sub LoadDrawable(Name As String) As Object
   Dim r As Reflector
   r.Target = r.GetContext
   r.Target = r.RunMethod("getResources")
   r.Target = r.RunMethod("getSystem")
   Dim ID_Drawable As Int
   ID_Drawable = r.RunMethod4("getIdentifier", Array As Object(Name, "drawable", "android"), _
                                               Array As String("java.lang.String", "java.lang.String", "java.lang.String"))
   r.Target = r.GetContext
   r.Target = r.RunMethod("getResources")
   Return r.RunMethod2("getDrawable", ID_Drawable, "java.lang.int")
End Sub
B4X:
Dim ivShadow As ImageView
ivShadow.Initialize("")
ivShadow.Background = LoadDrawable("code_lock_bottom")
Panel1.AddView(ivShadow, 0, 0, 100%x, 5dip)It's time to take care of the ScrollView. To create the list, I'm going to use the class CheckList. I copy its bas file in the project folder and I declare it in Globals:
B4X:
Dim MsgList As ClsCheckList
B4X:
MsgList.Initialize(Me, ScrollView1, "", "Msg_Click", "", 2dip)Mask script:
B4X:
'All variants script
Label1.Width = 100%x - 85dip
Label2.Width = 100%x - 130dip
Label3.Left = 100%x - Label3.Width - 5dip
ImageView1.Left = 100%x - ImageView1.Width – 5dip
B4X:
Sub FillItem(MsgSender As String, MsgSubject As String, MsgDate As String, MsgRead As Boolean, MsgAttached As Boolean) As Panel
   Dim pnl As Panel
   pnl.Initialize("")
   pnl.LoadLayout("item.bal")

   If MsgRead Then
      pnl.Color = Colors.Black
   Else
      pnl.Color = Colors.DarkGray 'Unread messages have a gray background
   End If

   Dim lblSender, lblSubject, lblDate As Label
   lblSender = pnl.GetView(1)
   lblSender.Text = MsgSender

   lblSubject = pnl.GetView(2)
   lblSubject.Text = MsgSubject

   lblDate = pnl.GetView(3)
   lblDate.Text = MsgDate

   Dim ivAttached As ImageView
   ivAttached = pnl.GetView(4)
   ivAttached.Visible = MsgAttached

   Return pnl
End Sub
B4X:
Dim pnl As Panel
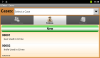
pnl = FillItem("John Smith", "Hello Fred", "22:26", True, False)
MsgList.AddCustomItem("ID#100", pnl, 60dip)
pnl = FillItem("Lisa Gray", "I'm still loving you", "22:26", False, False)
MsgList.AddCustomItem("ID#101", pnl, 60dip)
pnl = FillItem("Darth Vador", "I'm your father", "09/08/2011", False, False)
MsgList.AddCustomItem("ID#102", pnl, 60dip)
pnl = FillItem("Pamela Rose", "FW: Class ChkList", "09/08/2011", True, True)
MsgList.AddCustomItem("ID#103", pnl, 60dip)
MsgList.ResizePanelVariant:
In the page "All E
mails", the header label is not static. It is part of the ScrollView and scrolls with him. To do this, remove the Label from the Panel in the designer and give the space freed to the ScrollView. Then, before filling the list, create a Panel, put the Label into it and add it to the list with AddCustomItem (height=30dip).
How do they... ? #2 >>>
About the author: Frédéric Leneuf-Magaud. I'm a professional developper since the early 90's and I have designed or contributed to hundreds of applications. I currently work for the French administration in a supervisory team of servers. Android development is one of my hobbies.
PS: Don't hesitate to help me to improve my english.
Last edited:
")