The ListView control is a very powerful control. It allows you to show short or long lists in a very "sleek" way.
Creating a simple list is easy:
Sub Globals
    Dim ListView1 As ListView
End Sub

Sub Activity_Create(FirstTime As Boolean)
    ListView1.Initialize("ListView1")
    For i = 1 To 300
        ListView1.AddSingleLine("Item #" & i)
    Next
    Activity.AddView(ListView1, 0, 0, 100%x, 100%y)
End Sub
Sub ListView1_ItemClick (Position As Int, Value As Object)
    Activity.Title = Value
End Sub
The ListView can be added programmatically or with the designer. For now the items must be added with code.
About the code:
- ListView1.Initialize("ListView1") - Here we initialize the list and set the event name property to ListView1. Which means that in order to catch related events we should have subs like: ListView1_ItemClick.
- ListView1.AddSingleLine - adds a single line item.
- Activity.AddView(ListView1, 0, 0, 100%x, 100%y) - Note the use of the percentage units. We are setting the width and height to the values of the containing activity.
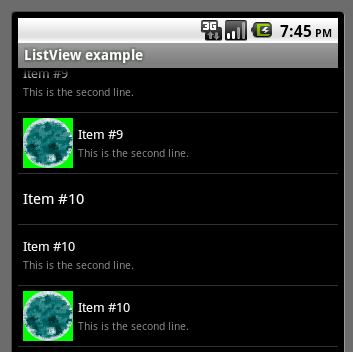
There are currently three types of items: single line, two lines and two lines and bitmap.
Each type can be customized. The default look is:
This is the relevant code:
    Dim Bitmap1 As Bitmap
    Bitmap1.Initialize(File.DirAssets, "button.gif")
    For i = 1 To 300
        ListView1.AddSingleLine("Item #" & i)
        ListView1.AddTwoLines("Item #" & i, "This is the second line.")
        ListView1.AddTwoLinesAndBitmap("Item #" & i, "This is the second line.", Bitmap1)
    Next
We can set different bitmaps to different items.
Note that this code loads an image file named button.gif. This file should be added to the Files tab (in the right pane). You can download the project which is attached to this post.
Customizing each type
Each of the three types can be customized. The change will affect all items of that type.
The ListView has three "models" which are stored under:
- SingleLineLayout
- TwoLinesLayout
- TwoLinesAndBitmap
Each of this model has an ItemHeight property, a Background property and one or more views properties. Again, if you change any of these properties it will affect all the items of this type.
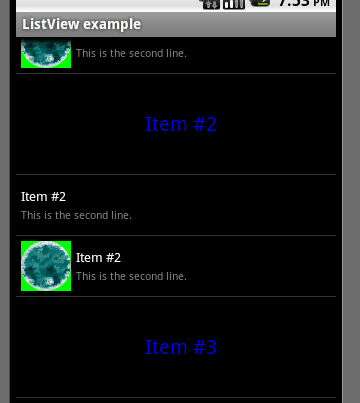
Example of customizing the single line items:
ListView1.SingleLineLayout.ItemHeight = 100dip
    ListView1.SingleLineLayout.Label.TextSize = 20
    ListView1.SingleLineLayout.Label.TextColor = Colors.Blue
    ListView1.SingleLineLayout.Label.Gravity = Gravity.CENTER
    For i = 1 To 300
        ListView1.AddSingleLine("Item #" & i)
        ListView1.AddTwoLines("Item #" & i, "This is the second line.")
        ListView1.AddTwoLinesAndBitmap("Item #" & i, "This is the second line.", Bitmap1)
    Next
Result:
Note that the ItemHeight is set to 100
dip. The 'dip' unit causes it to automatically scale the height based on the current device scale. For the TextSize it is a mistake to use dip units as the text size is already measured in scaled units.
The above code is equivalent to this code (which is a bit more clear):
    ListView1.SingleLineLayout.ItemHeight = 100dip
    Dim label1 As Label
    label1 = ListView1.SingleLineLayout.Label 'set the label to the model label.
    label1.TextSize = 20
    label1.TextColor = Colors.Blue
    label1.Gravity = Gravity.CENTER
In a similar way you can change the way the other types look.
The other types have additional views: SecondLabel and ImageView.
Return value
First notice that there is no selected item. The reason is that the combination of scrolling the list with finger and scrolling with the wheel or keyboard makes it non relevant.
You should catch the ItemClick event and then handle the clicked item.
The value of the clicked item is passed as a parameter.
Now, what is a value of an item???
By default this is the text stored in the first line.
However you can change it to any object you like by using:
AddSingleLine2, AddTwoLines2 and AddTwoLinesAndBitmap2 methods. These methods receive an additional parameter which is the return value. This allows you to pass more information as required by your application.
Background optimization
There is a hidden assumption that the background behind the ListView is solid black. If you set the background to something else like a gradient background or image you will see that during scrolling the background disappears.
You can change the background scrolling color with the ScrollingBackgroundColor property. If the background is not solid color set it to Colors.Transparent.
Example (the activity background is a gradient):
    Dim GD As GradientDrawable
    GD.Initialize("TR_BL", Array As Int(Colors.Gray, Colors.LightGray))
    Activity.Background = GD
    ListView1.ScrollingBackgroundColor = Colors.Transparent
Tips
If you want a single line item with a bitmap (and do not need two lines and a bitmap), you can set the visible property of the second label to false.
If you have many items then you should enable the fast scroller:
ListView1.FastScrollEnabled = true
A small example is available here:
http://www.b4x.com/android/files/tutorials/ListView.zip