Note: You should use B4A 6.0 or above for this tutorial.
Google recommends to use a ToolBar instead of the standard system ActionBar for Material Design apps. In this tutorial we will use a ACToolBar(Light/Dark) object from the AppCompat library (1.10 and above) as an ActionBar.
One of the main differences between a ToolBar and the standard ActionBar is that the ActionBar is a system component which is automatically added by the os and a ToolBar is part of our layout so we can add it to the activity with the designer or by code.
Using the ToolBar object
First we need to set up our project like in the Material Design 2 tutorial.
Then we need to add some more items to the theme:
This disables the standard ActionBar in the theme. With the windowActionModeOverlay set to true ActionMode Actionbars will replace the ToolBar and are not displayed above it.
Now we can create our layout. For the example project I decided to split the layout into two parts. One "main" layout which contains the ToolBar and a simple Panel for the content.
So add a CustomView of type "ACToolBarLight" to a new layout called "main" and set the following properties:

Note that "Use as main ActionBar" is checked to use this Toolbar as the main ActionBar for the Activity. You can only use one Toolbar as the Activity ActionBar.
Elevation should be set to 4 for a normal ActionBar. This will produce a small shadow below it.
Additionally you should disable the Background color in the properties.
There are two versions of the ToolBar object. ACToolBarLight uses a light theme and ACToolBarDark uses a dark theme by default. This is only for historical reasons. You can set the light or dark theme for the ToolBar and the overflow menu with the designer properties now.
Now we add a Panel named pContent to the Layout with the following properties:

Because the standard height of the ToolBar/ActionBar in Material Design depends on the device orientation and screen size we add a small designer script:
This will set the ActionBar height to 64dip on tablets and to 56dip on portrait phones and 48dip on landscape phones. These specifications are in the Material Design guide.
Now we have a minimal example of how to setup a ToolBar as an ActionBar.

Misc stuff
You can use the ACActionBar object to control some ActionBar features like showing the "Up" indicator arrow.
Adding actions and overflow menu
You can use the normal Activity.AddMenuItem() methods to add a menu or actions to the ToolBar:
I prefer to use drawables for action icons than use the LoadBitMap() function. The drawables are available in different resolutions and will always load in the perfect size for your device. To load drawables you will have to use the XmlLayoutBuilder library.
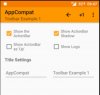
The attached example has some UI elements to control some features of the ToolBar. Have fun with it.

Google recommends to use a ToolBar instead of the standard system ActionBar for Material Design apps. In this tutorial we will use a ACToolBar(Light/Dark) object from the AppCompat library (1.10 and above) as an ActionBar.
One of the main differences between a ToolBar and the standard ActionBar is that the ActionBar is a system component which is automatically added by the os and a ToolBar is part of our layout so we can add it to the activity with the designer or by code.
Using the ToolBar object
First we need to set up our project like in the Material Design 2 tutorial.
Then we need to add some more items to the theme:
B4X:
<item name="windowNoTitle">true</item>
<item name="windowActionBar">false</item>
<item name="windowActionModeOverlay">true</item>
This disables the standard ActionBar in the theme. With the windowActionModeOverlay set to true ActionMode Actionbars will replace the ToolBar and are not displayed above it.
Now we can create our layout. For the example project I decided to split the layout into two parts. One "main" layout which contains the ToolBar and a simple Panel for the content.
So add a CustomView of type "ACToolBarLight" to a new layout called "main" and set the following properties:
Note that "Use as main ActionBar" is checked to use this Toolbar as the main ActionBar for the Activity. You can only use one Toolbar as the Activity ActionBar.
Elevation should be set to 4 for a normal ActionBar. This will produce a small shadow below it.
Additionally you should disable the Background color in the properties.
There are two versions of the ToolBar object. ACToolBarLight uses a light theme and ACToolBarDark uses a dark theme by default. This is only for historical reasons. You can set the light or dark theme for the ToolBar and the overflow menu with the designer properties now.
Now we add a Panel named pContent to the Layout with the following properties:
Because the standard height of the ToolBar/ActionBar in Material Design depends on the device orientation and screen size we add a small designer script:
B4X:
If ActivitySize > 6.5 Then
  ActionBar.Height = 64dip
Else
  If Portrait Then
    ActionBar.Height = 56dip
  Else
    ActionBar.Height = 48dip
  End If
End If

pContent.SetTopAndBottom(ActionBar.Bottom, 100%y)Now we have a minimal example of how to setup a ToolBar as an ActionBar.
Misc stuff
You can use the ACActionBar object to control some ActionBar features like showing the "Up" indicator arrow.
B4X:
Dim ABHelper as ACActionBar

ABHelper.ShowUpIndicator = True
Adding actions and overflow menu
You can use the normal Activity.AddMenuItem() methods to add a menu or actions to the ToolBar:
B4X:
Dim xml As XmlLayoutBuilder
Dim bd As BitmapDrawable
bd = xml.GetDrawable("ic_plus_one_black_24dp")
Activity.AddMenuItem3("Plus one", "Menu", bd.Bitmap, True)
bd = xml.GetDrawable("ic_refresh_black_24dp")
Activity.AddMenuItem3("Refresh", "Menu", bd.Bitmap, True)
Activity.AddMenuItem("Overflow1", "Menu")
Activity.AddMenuItem("Overflow2", "Menu")
Activity.AddMenuItem("Overflow3", "Menu")
I prefer to use drawables for action icons than use the LoadBitMap() function. The drawables are available in different resolutions and will always load in the perfect size for your device. To load drawables you will have to use the XmlLayoutBuilder library.
The attached example has some UI elements to control some features of the ToolBar. Have fun with it.
Attachments
Last edited:
")