B4J Tutorial [B4X] Custom Views with Enhanced Designer Support

Status
Not open for further replies.
SS-2016-01-14_16.16.18.png


Custom views are implemented as B4X classes or in a library.
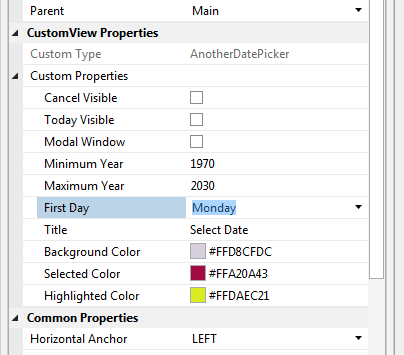
A custom view includes a set of properties that can be set from the visual designer.
Note that the visual designer will show a box instead of the actual view.

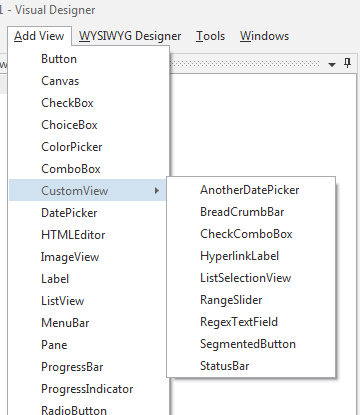
Using custom views is very simple. You need to add the class or library to the project and then you can add the custom view in the same way you add other views:

SS-2016-01-18_14.39.00.png


This tutorial will explain how to implement custom views.

B4X Class

Add a custom view class:

SS-2016-01-18_14.43.10.png


Note that you can also add a regular class. The only difference is in the code template.

The template in B4J is:
B4X:
#Event: ExampleEvent (Value As Int)
#DesignerProperty: Key: BooleanExample, DisplayName: Boolean Example, FieldType: Boolean, DefaultValue: True, Description: Example of a boolean property.
#DesignerProperty: Key: IntExample, DisplayName: Int Example, FieldType: Int, DefaultValue: 10, MinRange: 0, MaxRange: 100, Description: Note that MinRange and MaxRange are optional.
#DesignerProperty: Key: StringWithListExample, DisplayName: String With List, FieldType: String, DefaultValue: Sunday, List: Sunday|Monday|Tuesday|Wednesday|Thursday|Friday|Saturday
#DesignerProperty: Key: StringExample, DisplayName: String Example, FieldType: String, DefaultValue: Text
#DesignerProperty: Key: ColorExample, DisplayName: Color Example, FieldType: Color, DefaultValue: 0xFFCFDCDC, Description: You can use the built-in color picker to find the color values.
Sub Class_Globals
   Private fx As JFX
   Private EventName As String 'ignore
   Private CallBack As Object 'ignore
End Sub

Public Sub Initialize (vCallback As Object, vEventName As String)
   EventName = vEventName
   CallBack = vCallback
End Sub

Public Sub DesignerCreateView (Base As Pane, Lbl As Label, Props As Map)

End Sub

Private Sub Base_Resize (Width As Double, Height As Double)

End Sub

Initialize, DesignerCreateView and Base_Resize signatures must be as in the code above.

At runtime the Initialize sub will be called followed by DesignerCreateView. Most of the work is done in DesignerCreateView.

The events and the designer properties are declared in the attributes.

When you create a custom view a pane or panel (with the event name set to Base) is added to the views tree. In most cases you will add the other views to the base panel and resize the views in Base_Resize event. This is true for B4J and B4i. In B4A there is no resize event as the activity is recreated instead.

The passed label includes the text related settings. It is not added to the views tree. You can either ignore it or use its text properties.
The Props map holds the custom properties. You should get the properties values and apply them to the custom view.

Designer Properties

Each property is made of several fields, the following fields are required:
Key - The property key. This will be used to get the value from the Props map.
DisplayName - The property name in the properties grid.
FieldType - One of the following values (case insensitive): String, Int, Float, Boolean or Color.
DefaultValue - The default value.

Optional fields:
Description - Will be displayed at the bottom of the properties grid when the property is selected.
MinRange / MaxRange - Minimum and maximum numeric values allowed.
List - A pipe (|) separated list of items from which the developer can choose (should be used with string fields).

You shouldn't use commas in any of the above fields.

See the attached project for several B4J examples.


Java Custom Views

Creating a custom view in Java is similar to the above. The class needs to implement the DesignerCustomView interface.
The interface declares two methods:
B4X:
@Override
   public void DesignerCreateView(final ConcretePaneWrapper base, LabelWrapper label,
       Map args) {
     base.AddNode(getObject(), 0, 0, base.getWidth(), base.getHeight());
     new PaneWrapper.ResizeEventManager(base.getObject(), null, new Runnable() {

       @Override
       public void run() {
         SetLayoutAnimated(0, 0, 0, base.getWidth(), base.getHeight());
       }
     });
     getItems().AddAll(Common.ArrayToList(((String)args.Get("Items")).split("\\|")));
     getObject().setStyle(label.getStyle()); //set the font style


   }
   @Hide
   @Override
   public void _initialize(BA ba, Object arg1, String EventName) {
     innerInitialize(ba, EventName.toLowerCase(BA.cul), false);
   }
These methods are similar to the B4X methods discussed above. Note the usage of ResizeEventManager to resize the custom view together with the base panel (B4J only).

Properties are declared as annotations, for example:
B4X:
@DesignerProperties(values={
     @Property(key="MinValue", displayName="Min Value", fieldType="float", defaultValue="0", minRange="0"),
     @Property(key="MaxValue", displayName="Max Value", fieldType="float", defaultValue="100"),
     @Property(key="LowValue", displayName="Low Value", fieldType="float", defaultValue="0", minRange="0",
       description="Current lower value."),
     @Property(key="HighValue", displayName="High Value", fieldType="float", defaultValue="100",
       description="Current lower value."),
     @Property(key="ShowTickLabels", displayName="Show Tick Labels", fieldType="boolean", defaultValue="false"),
     @Property(key="ShowTickMarks", displayName="Show Tick Marks", fieldType="boolean", defaultValue="false"),
     @Property(key="SnapToTicks", displayName="Snap To Ticks", fieldType="boolean", defaultValue="false"),
     @Property(key="Orientation", displayName="Orientation", fieldType="string", defaultValue="Horizontal",
         list="Horizontal|Vertical"),

})

You need to use BADoclet v1.05+ (v1.05 is attached) to generate the XML file.
See the attached ControlsFX source code as an example.

Tips

- In addition to the defined properties the Props map will include the parent form (key=Form) or activity (key=activity) or page (key=page).
- The keys in the Props map are case sensitive.
- If you add a new property to an existing class or library (that was already implemented as a custom view) then you should use Props.GetDefault if you want to maintain backwards compatibility.
- CSSUtils class is very useful for style manipulation: https://www.b4x.com/android/forum/threads/61824/#content
 

Attachments

  • BADoclet.zip
    9.4 KB · Views: 2,011
  • B4J_Example.zip
    8.9 KB · Views: 2,012
  • B4A_ViewsEx_Src.zip
    2.5 KB · Views: 2,376
  • B4i_iUI8.zip
    44.2 KB · Views: 1,324
  • B4J_ControlsFX_SRC.zip
    16.2 KB · Views: 1,698
Last edited:

rwblinn

Well-Known Member
Licensed User
Longtime User
Hi,

created a simple CustomView NumericSpinner. The source code is well commented.

Has been a good learning on how to change Properties and set the position of the CustomView.

upload_2016-2-15_10-47-11.png
 

Attachments

  • B4JHowToCustomViewNumericSpinner.zip
    5.7 KB · Views: 764

Hugh Thomas

Member
Licensed User
Longtime User
Hi,

I'm writing a Custom View, and am having a problem. I want to create a custom view that has a "rotate" option that will rotate the view so that you can have vertical text.

For example, if you wanted the custom view running down the left hand side of the screen, you would create the view with a layout of left=0,top=0,width=50dip,height=100%y. When you set the "rotate" option in the custom view it would adjust the layout values and rotate the view so that it appears in the same location as the original layout, but is rotated so the text is vertical.

The problem I'm having is that if I create the Custom View programmatically it works fine, but if I set it up in the Designer and do the rotation in DesignerCreateView(...) it doesn't work correctly. In the designer case, the view rotates but ends up offset from where I expect it to be. It's as if it's rotating on a different pivot point.

I've checked the layout values before the rotation in both cases and they are the same, but after the rotation the view ends up in a different position,

I'm not sure if I'm doing something wrong, or if this isn't something you can do when using the designer.

I'm using the reflector library to do the rotation:
B4X:
Dim Reflect As Reflector
Reflect.Target = vw
Reflect.RunMethod2("setRotation",RotateDegrees,"java.lang.float")

Attached is a simple project that demonstrates the problem.

Any help appreciated.

Hugh
 

Attachments

  • RotateProblemDemo.zip
    44.2 KB · Views: 540

klaus

Expert
Licensed User
Longtime User
I had a look at your project, and have following comments:
1) You should move the layout definition from Activity_Resume to Activity_Create, otherwise you could get several layouts overlayed.
2) You must remove mBase.Initialize("") from the Initialize routine it is automatically initialized by the Designer.
3) You cannot use progRotatedView.GetBase in this line Activity.AddView(progRotatedView.GetBase, 140dip, 90dip, 50dip, 270dip) because there is no mBase if you have none in the Designer. In your case you have one and with progRotatedView.GetBase you get a new instance of the same object.
4) To add a custom view in the code you need to add a specific routine in your class code. I added two routines AddToParent and AddToParent2 showing two different ways to implement this.
5) I suppose that your code is not finished because you define an innerLabel Label but you dont' use it. If you add one you must also add it in the AddToParent routine.
6) I would leave the the Rotation routine more general with the rotation angle as parameter and set the angle depending on the requested orientation. I have not changed this.
7) It seems that a view added in the Designer has the pivot in the top left corner whereas a view added in the code has the pivot in the center of the view. I set the pivit to the center in the Rotate routine.

Attached a modified version of your project.
 

Attachments

  • RotateProblemDemo1.zip
    9.2 KB · Views: 576

Hugh Thomas

Member
Licensed User
Longtime User
Hi Klaus,

Thanks for taking the time to give such detailed feedback. I should have made it clear that this demo project doesn't use the actual CustomView I'm working on, it uses a basic CustomView class with just enough code to demonstrate the problem. Some of the problems you've highlight are only in this demo project and are the result of me being a bit hasty in putting it together.

I'll implement those of your suggestions that relate to the actual CustomView I'm working on.

Unfortunately, even with your corrections I've still got the same problem... if I create one custom view with designer, and one programmatically within the Main module, then after rotation they end up at different positions even though they started off in exactly the same place.

Hugh
 

Hugh Thomas

Member
Licensed User
Longtime User
My apologies Klaus, I didn't realized when I ran your updated version of my project that you'd changed the layout position of the view that's created programmatically so that it was different to the view created in the designer. So when I ran it and saw that the views ended up in different positions I thought it was because the rotation problem hadn't been fixed.

In fact you're additions to the rotation routine to set the pivot point fixed the problem.

Thanks for your help.

Hugh
 

Cableguy

Expert
Licensed User
Longtime User
hi Erel,

I'm trying to set a custom property to be float with a default value of 0.01, but the designer only shows integers...
I was hoping to get decimal incrementation
 

Cableguy

Expert
Licensed User
Longtime User
as I stated, I am casting it as float.
I can type in decimals, but using the increment/decrement arrows they only act upon the units, when I expected it to change the right most digit
 

stevel05

Expert
Licensed User
Longtime User
I understand now.
 

demasi

Active Member
Licensed User
Longtime User
Ignore that last question, I think I figured it out by myself.

I've been thinking that defining a Custom View class meant that the class would be treat as a View by B4A. In fact the only thing special about a Custom View class is that the Designer understands that it's a view, and will let you set it up in a layout. As far as the rest of B4A is concerned it's just another class that happens to have views in it, so it won't get resize events etc.

Hugh
Can you explain how you did to add a custom view programatically?
I'm trying to do the same but no success.
 

Cableguy

Expert
Licensed User
Longtime User
Create an "AddToParent(Parent as pane)" sub in your customview, and add the customview's base pane to the passed pane
 

LucaMs

Expert
Licensed User
Longtime User
Wonderful (perhaps I have already commented this thread, I have to look at :)).

I would add these lines to the template:
B4X:
Public Sub setTag(Tag As String)
    mBase.Tag = Tag
End Sub
Public Sub getTag As String
    Return mBase.Tag
End Sub
 
Last edited:
Status
Not open for further replies.
Top